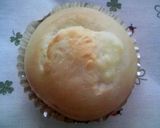
Baking Bread Straight from Liquid Bread Starter - Simple and Basic Rolls
I'm into baking bread from natural leaven, but when I tried baking from a liquid starter, it was hard to knead and took too much time. Bread baking is tricky, but by using this moderate amount of bread flour (160 g), which is what they use in my basic cooking class, it will be easier to knead.
Using a domestic flour blend (I used "Haruyutaka"), about 60 g of flour was sufficient. Use a tad more in the winter. Adjust the amount of water depending on your bread flour and climate. While you may allow a lot of time for the first proofing, time for the second proofing should be shorter in order for a tasty result. Keep an eye on the dough during the second proofing. For 190°c, about 14 minutes. Recipe by Choco dayo
Cooking Instructions
- 1
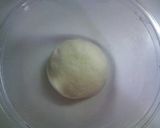
Combine all of the ingredients in a bowl except for the unsalted butter, bring it together into a ball and place it on a work surface to knead.
- 2
Knead the butter into the dough. Press the dough down on the work surface and knead it for 5 minutes in a motion resembling washing with a wash board.
- 3
Once the dough comes together, knead by pressing and pulling it in a "V" along your work surface while putting your weight into it.
- 4
Seal the underside once the surface is no longer rough and the ingredients have combined evenly, and smooth out the surface. Place in a bowl and cover with plastic wrap.
- 5
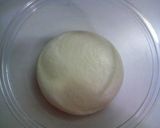
The first proofing is complete once it has doubled in size. (For those concerned about drying out the dough, place it into a plastic bag or Styrofoam container with a cup of lukewarm water and let it rise.)
- 6
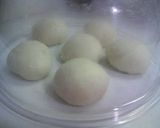
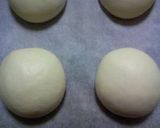
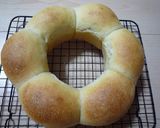
Divide into 6 equal portions with a scraper. Gently stretch out the dough to release the air, then roll each portion into a ball. Sprinkle with a bit of flour if they stick to your hands. Flip the bowl that you used for the proofing over top of the dough to prevent it from drying out, and let it rise for 20 minutes.
- 7
Gently release more gas from the dough and roll them back into a round ball. Arrange them with the seams down on a baking tray lined with parchment paper.

- 8
Place the whole pan into a large plastic bag along with a cup of lukewarm water to prevent it from drying out, and let it rise for the second time.
- 9
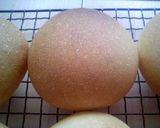
The second proofing is done once they double in size.
- 10
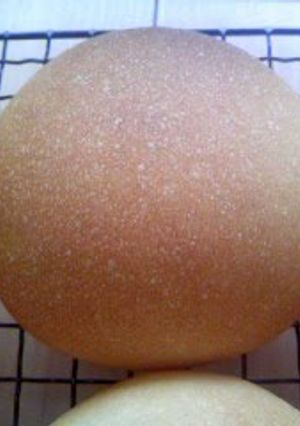
Bake in an oven preheated to 190°C for 14 minutes. (Adjust the heat according to your oven. They will bake more evenly on a round pan.

- 11
They're done!
- 12
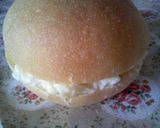
They taste good as is, but you can also cut them in half and eat them with condensed milk cream.
- 13
Or, as hamburger buns.
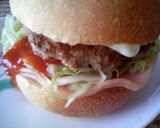
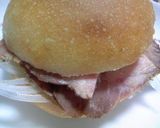
- 14
I eat them with roast beef.
- 15
Or bake them with an anko (sweet adzuki bean paste) filling.
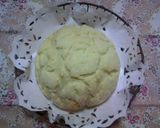
- 16
Layer the top with cookie dough for a "melon" bread.
- 17
Or, without dividing up the dough, roll it into a flat square, spread on some cream cheese, roll it up into a log, then cut it into 6 pieces and bake.
- 18
Knead in a few more grams of water, then add dried blueberries right before you complete the kneading, then let it rise. The berries will be nice and plump when you take that first bite.

- 19
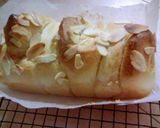
Here it is with a sweet peanut cream filling and topped with almonds. I baked it as a danish-type roll.
- 20
Here they are baked topped with wieners, leftover curry, and melting cheese. Since the dough is not too sweet, it goes well with savory toppings.

- 21
Here it is after cutting the dough in half and baking them in miniature pound cake molds with a sugared or buttered top. Right before baking, slash the tops with one shallow cut along the top, then arrange finely diced pats of butter along the top.
Cooksnaps
Did you make this recipe? Share a picture of your creation!

Similar Recipes
-

Easy For Beginners: Raisin Bread Starter Rolls Easy For Beginners: Raisin Bread Starter Rolls
Ever since I discovered homemade natural bread starter or leaven, my bread baking experience has gotten so much richer. I've been making natural-starter bread referring to various books and online articles.In this recipe the starter liquid is used straight, without making an intermediary sponge. This is called the "straight method". With this method you can really enjoy the fragrance of the starter and the straightforward taste of the flour, and it's really delicious. I prefer using straight starter rather than the sponge method, since the dough is more tender and moist. Please watch the bread's color in the oven to judge its baking time. When it's golden brown and smells wonderful, it's done. If the bread won't brown well, that means the dough was over-proofed. Recipe by Raichi
-

Homemade Yeast French Bread (Using Straight Starter) Homemade Yeast French Bread (Using Straight Starter)
I was able to make a nice yeast, so I used the straight method to turn it into french bread.※ The recipe calls for 75% water, but using about 65~70% at first will make it easier to make (195-210ml).※ I used 36% natural yeast, but 15% should be enough for it to rise sufficiently, so please feel free to reduce as you see fit.(Don't forget to increase the amount of water in turn for this. Recipe by Panko625 -

100% Whole Wheat Bread Rolls with Homemade Bread Starter 100% Whole Wheat Bread Rolls with Homemade Bread Starter
This is a basic macrobiotic recipe for 100% whole wheat bread using homemade bread starter.I used raisin yeast (see recipe) for this bread.Since it uses liquid yeast, this recipe is quite straightforward.I generally prepare the dough in the evening, and do the second rising, then bake it the following morning.It's also good to add nuts or dried fruit of your choice to the dough. Recipe by Mille=miru -

Wiener Sausage Bread Rolls Using Homemade Bread Starter Wiener Sausage Bread Rolls Using Homemade Bread Starter
My family loves these wiener sausage stuffed rolls.Let's make them using homemade bread starter (natural leaven). Recipe by Tsuka mama -

Sake Lees Yeast - Liquid Bread Starter Sake Lees Yeast - Liquid Bread Starter
I think it's quite hard to measure sake lees yeast, so I hope this is helpful.It's possible to make fermentation liquid with only sake lees, but it takes a long time and it's difficult, so I recommend using liquid yeast from raisins or the like.The amount of bread flour to make sponge dough (starter dough) is the same as liquid yeast, so, for example, for the first day, use 100 g of both, then 50 g on the second day. Recipe by Miyanbo -

French Bread with Homemade Bread Starter French Bread with Homemade Bread Starter
I don't like hard bread... but I really love french breads where you can taste the wheat. That's why I decided to make a soft version.Adjust the water content of the bread starter to control the texture of your bread. Recipe by moss green 7 -

Bread (Sourdough) Starter Bread (Sourdough) Starter
The method for making a sourdough starter sponge is the same, regardless of which starter you use! The sponge puffs up and becomes filled with air bubbles, and it's just fun to watch it grow.The method is the same whichever starter liquid you use! I used raisin starter this time.Add the same amount of starter liquid and flour.You can use water instead of starter liquid from the 2nd day onwards, but if you use starter liquid you'll have a more fragrant, robust starter sponge. Recipe by Hirochan -

Pita Bread Using Homemade Bread Starter Pita Bread Using Homemade Bread Starter
I challenged myself to create a recipe for pita bread using my homemade raisin bread starter.Be patient rolling out the dough, letting it rise evenly.If the dough doesn't rise properly, open it up with a knife. Recipe by yukina007 -

Honey and Cinnamon Sugar-Topped Pull-Apart Bread Made With Natural Homemade Starter Honey and Cinnamon Sugar-Topped Pull-Apart Bread Made With Natural Homemade Starter
This is an egg yolk-less version of"Sugar-topped Honey Bread With Homemade Yeast". I adjusted the amount of milk used in the dough, and topped the loaf with cinnamon sugar.The kneading and rising terms are guidelines only. Since they will vary depending on circumstances, please adjust accordingly. I have used cinnamon sugar as a topping, but a sugar-only topping is delicious, too.If you wrap the bread with plastic, it will stick to the sugar on the top, so I wrap the sides with plastic and put a piece of kitchen parchment paper on top to prevent the bread from drying out. For 1 18 cm [7.1 in] square pan worth. Recipe by Lesser Panda -

Italian Dinner Roll Ciabatta Made Using a Bread Starter Italian Dinner Roll Ciabatta Made Using a Bread Starter
I wanted to make ciabatta with the full flavor of wheat...You use very little yeast in this recipe, so it takes a long time, but just take things nice and slow.The dough will be very soft and hard to handle, so dust it well and use a rubber spatula.Usually you would let the dough rise at room temperature, but when it's warm, it will rise too much; in warmer temperatures, put it in the vegetable compartment in the fridge. Recipe by mihotti33 -

Fizzy Bread Starter using Natural Leaven Fizzy Bread Starter using Natural Leaven
I referenced Yuriko Aida's book "Baking Bread with Homemade Yeast--Through the Seasons". Although the author uses only domestically grown wheat, I revised the recipe to more accessible ingredients.You can substitute bread (strong) flour for the whole wheat flour. I use Weck's tulip-shaped 1 liter jar. I recommend it since it's easy to stir the contents. Airtight jars with rubber gaskets are good, but I'm afraid of breakage from fermentation. You can also use a large bottle, or any container and wrap it in plastic wrap. Recipe by Surou -

For Beginners: Yogurt Bread Starter (Leaven) For Beginners: Yogurt Bread Starter (Leaven)
Since this bread starter is made by adding flour to yogurt, it's easy to see how it's fermenting, unlike some other starters. You can store this starter in the refrigerator for about 5 days. If you leave a little leftover, use half the amount of water, bread flour and sugar in step 5, and incubate for 5-6 hours at room temperature you can grow more starter. If you do this twice, your starter will ferment better. If it takes on an "off" smell like a dishtowel, it's better to manfully throw it away.To get a bread starter going, in the spring, summer and fall you can just let it rest at room temperature. In midsummer when it's very hot, put it in a cool location in your room when you're at home, and put it in the refrigerator when you go out if your house will get very hot. You can also put it in an insulated polystyrene container with ice packs to keep it at under 25 °C. In the winter, put the starter jar on top of the refrigerator, near the stove, near your electric water kettle or in your boiler room. You could also make a fermentation box using a thermostat meant for tropical fish aquariums and an insulated box. But don't put the starter in a very warm location. Recipe by mipon
More Recipes

Comments