CookpadCookpad
Guest
Register or Log In
Save and create recipes, send cooksnaps and more
  • Search
  • Premium
    • Top Cooksnapped Recipes
    • Top Viewed Recipes
  • Premium
  • Challenges
  • FAQ
  • Send Feedback
  • Region
  • Your Collection
Your Collection
To start creating your recipe library, please register or login.
Kandvi
Save this recipe to come back to it later.
  • Add Cooksnap
  • Add to folders
  • Print
  • Share
    • Copied!
    • Email
    • Facebook
    • Pin it
    • Twitter
  • Report Recipe
  • See report
  • Edit recipe
  • Delete
CookpadCookpad
A picture of Kandvi.

Kandvi

nidhi Sharma
nidhi Sharma @cook_26144194

#SPS

#SPS

Read more

Kandvi

nidhi Sharma
nidhi Sharma @cook_26144194

#SPS

#SPS

Read more
Saved
Save this recipe to come back to it later.
Edit recipe
See report
Add to folders
Add CooksnapAdd Cooksnap
ShareShare
  • Copied!
  • Email
  • Facebook
  • Pin it
  • Twitter
PrintPrint
  • PrintPrint
  • Add CooksnapAdd Cooksnap
  • Report Recipe
  • See report
  • Delete
Share
  • Copied!
  • Email
  • Facebook
  • Pin it
  • Twitter
Save this recipe to come back to it later.
  • Add Cooksnap
  • Add to folders
  • Print
  • Report Recipe
  • See report
  • Edit recipe
  • Delete

Ingredients

1hr.
8 servings
  • 1 cupbesan
  • 1 cupcurd
  • as per tasteSalt
  • as per your taste Black pepper
  • as requiredAdd water
  • As neededTurmeric
  • 1Lemon
  • as neededmustard Seeds
Cookpad Open in Cookpad App
Saved
Save this recipe to come back to it later.

Steps

1hr.
  1. 1

    First prep up all the ingredients required. Take the yoghurt in a bowl. You can use dairy or vegan yoghurt

  2. 2

    Add water and stir well.

  3. 3

    Add ginger-green chili paste, turmeric powder, asafoetida and salt. If using fresh yoghurt, then to add the sourness, add about 1/2 tsp of lemon juice.

  4. 4

    Add the gram flour aka besan.

  5. 5

    With a wired whisk, keep on stirring and mixing till all the lumps are dissolved and you get a smooth batter.

  6. 6

    Pour this batter in a saucepan or a broad frying pan. Switch on the stovetop and keep the flame to the lowest. Begin to stir.

  7. 7

    Spread oil on plates or boards or tray. Large steel lids or thalis work very well. You can also use the back of a large baking tray. I had to use 4 steel lids. A suggestion would be to use your kitchen counter top, if you prefer. Then you just spread the whole cooked batter on it and can spread it in your own pace. A large wooden or metal tray would also be good.

  8. 8

    Also mix the chopped coriander leaves and grated coconut. Keep aside.

    A picture of step 8 of Kandvi.
  9. 9

    Keep on stirring when the khandvi batter is getting heated up. Lumps begin to form and you have to continuously stir so that the lumps don’t form.

  10. 10

    The batter would thicken and keep on thickening. Keep on stirring. Best to use a wooden spatula or a heat proof silicon spatula

  11. 11

    You will see the khandvi batter has thickened 

  12. 12

    Stir & stir and exercise your hands. the batter also should not be allowed to stick at the bottom. So you have to stir continuously.

  13. 13

    A well thickened batter and looks like we are ready.

  14. 14

    So I just spread a few teaspoons of the batter on a greased lid. As you see the texture is still wet

  15. 15

    Once the spread batter cooled a bit, I tried rolling. As you see the rolls could not be formed. The batter was still pasty, sticky and not properly set.

  16. 16

    So the batter needs to be cooked more.

  17. 17

    Continue to stir.

  18. 18

    This is the Final consistency of the khandvi batter. it took me 17 minutes to get the correct consistency on a low flame. The timing will vary depending on the intensity of the flame, the thickness/thinness of the pan and the size of the pan. Just do the plate test and when you can form the rolls, then the khandvi batter is ready. If the batter becomes too thick, then it becomes difficult to spread and you don’t get thin layers in the rolls. In this case, still spread the batter. You will get th

  19. 19

    Tested again and this time the rolls were happening. This time the batter had spread evenly and there is a smoothness in the layers as well as in the spread batter.

  20. 20

    Quickly pour about ½ to ⅔ cup of batter on a large plate and spread thinly & evenly with a spatula. You have to be quick with the remaining batter too. Since even a bit of cooling and the batter becomes likes blob, difficult to spread. If you use a large tray or a parat, then it's much easier as you don’t hurry like a harried woman here and there.

  21. 21

    Allow to cool and then sprinkle the coconut + coriander leaves mixture sparingly. You can also skip this stuffing part and directly garnish with the coconut and coriander once you temper the khandvi rolls.

  22. 22

    Cut into equal sized strips
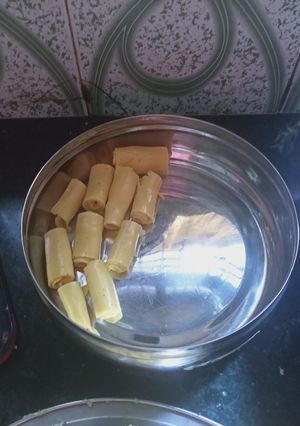
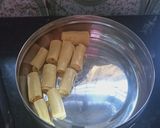
  23. 23

    Gently roll each strip tightly. Then place them in a serving tray or plate next to each other or stack them neatly. If the tray or plate is large, then you will get large khandvi rolls. In this case after you finish rolling half,  just cut horizontally and make a second roll.

  24. 24

    For the tempering, heat oil and crackle the mustard seeds.

  25. 25

    Pour this hot tempering mixture along with the oil on the khandvi rolls.

  26. 26

    You can garnish it with some more coconut and coriander leaves, if you prefer. Serve khandvi with coriander chutney or coriander mint chutney.

Saved
Save this recipe to come back to it later.
Edit recipe
See report
Add to folders
Add CooksnapAdd Cooksnap
ShareShare
  • Copied!
  • Email
  • Facebook
  • Pin it
  • Twitter
PrintPrint
  • PrintPrint
  • Add CooksnapAdd Cooksnap
  • Report Recipe
  • See report
  • Delete

Cooksnaps

Saved
Save this recipe to come back to it later.
  • Add Cooksnap
  • Add to folders
  • Print
  • Share
    • Copied!
    • Email
    • Facebook
    • Pin it
    • Twitter
  • Report Recipe
  • See report
  • Edit recipe
  • Delete

Copied!

nidhi Sharma
nidhi Sharma @cook_26144194
on September 07, 2020 10:53

Comments (2)

Neha Dua
Neha Dua @cook_90450
September 07, 2020 15:23
Nice
Guest
Add a comment
0/0

Similar Recipes

More Recipes

  1. A picture of Easy Homemade Dog Cake (Crazyforcrust.com).

    Easy Homemade Dog Cake (Crazyforcrust.com)

    Cluelesskitty Cluelesskitty
  2. A picture of Healthy Yellow Moong Dal Soup😋.

    Healthy Yellow Moong Dal Soup😋

    Anoli Vinchhi Anoli Vinchhi
  3. A picture of Tips How to Preserve Banana at Home.

    Tips How to Preserve Banana at Home

    Krishna Biswas Krishna Biswas
  4. A picture of Poha Uttapam.

    Poha Uttapam

    Sanuber Ashrafi Sanuber Ashrafi
  5. A picture of Kataifi & Gulab Jamun Delight.

    Kataifi & Gulab Jamun Delight

    Rekha Bapodra Rekha Bapodra
  6. A picture of Prik Nam Pla. Thai Fish Sauce - the Main Seasoning Sauce That Goes with All Thai Food - Enjoy :P.

    Prik Nam Pla. Thai Fish Sauce - the Main Seasoning Sauce That Goes with All Thai Food - Enjoy :P

    farang31 farang31
  7. A picture of Pan-fried Halibut, Jersey Royals, Herb and Legume Crush.

    Pan-fried Halibut, Jersey Royals, Herb and Legume Crush

    Laura Laura
  8. A picture of Jamun Raita.

    Jamun Raita

    Suchitra S(Radhika S) Suchitra S(Radhika S)
  9. A picture of Sweet Glutinous Rice in Palm Sugar Syrup.

    Sweet Glutinous Rice in Palm Sugar Syrup

    Pinkblanket's Kitchen Pinkblanket's Kitchen
  10. A picture of मेदू वड़ा#वड़ा.

    मेदू वड़ा#वड़ा

    Shah Anupama Shah Anupama
  11. A picture of Slow Cooker Cheesy Kielbasa Hashbrown Casserole.

    Slow Cooker Cheesy Kielbasa Hashbrown Casserole

    🌈NinjaMommaKitchen🌈 🌈NinjaMommaKitchen🌈
  12. A picture of Creamy Baked Mac & Cheese.

    Creamy Baked Mac & Cheese

    Mrs. Ballard's Secrets Mrs. Ballard's Secrets
  13. A picture of Extra Fluffy Banana Pancakes.

    Extra Fluffy Banana Pancakes

    StephieCanCook StephieCanCook
  14. A picture of Banana bread.

    Banana bread

    Zane519 Zane519
  15. A picture of Texas Smokehouse Beef Jerky.

    Texas Smokehouse Beef Jerky

    The GrillFather The GrillFather
  16. A picture of GUAVA JUICE | HOMEMADE GUAVA SMOOTHIE.

    GUAVA JUICE | HOMEMADE GUAVA SMOOTHIE

    Viona Cooks Viona Cooks
  17. A picture of Cheesy bread sandwich.

    Cheesy bread sandwich

    Zainab Aftab Zainab Aftab
  18. A picture of Homemade Gulab Jamun.

    Homemade Gulab Jamun

    Rabiqa Ahsan Rabiqa Ahsan
  19. A picture of Lauki halwa.

    Lauki halwa

    DROOLSOME MORSEL BY AFREEN WASEEM DROOLSOME MORSEL BY AFREEN WASEEM
  20. A picture of Moong daal pakora.

    Moong daal pakora

    Zainab Aftab Zainab Aftab
  21. A picture of 'Sloppy Joes'.

    'Sloppy Joes'

    Adeya Adeya
  22. A picture of French Toast.

    French Toast

    Adeya Adeya
  23. A picture of Garlic Butter Naan.

    Garlic Butter Naan

    Mrs Ovais Mrs Ovais
  24. A picture of Egg pulao under 20 min.

    Egg pulao under 20 min

    Priya Sahani 271995 Priya Sahani 271995
  25. A picture of Easy Homemade Bread Loaf.

    Easy Homemade Bread Loaf

    Yodaga Yodaga
https://cookpad.wasmer.app/us/recipes/13588487
Cookpad Open in Cookpad App

About Us

Our mission at Cookpad is to make everyday cooking fun, because we believe that cooking is key to a happier and healthier life for people, communities and the planet. We empower home cooks all over the world to help each other by sharing their recipes and cooking experiences.

Subscribe to Premium for exclusive features & benefits!

Cookpad Communities

🇺🇸 United States 🇬🇧 United Kingdom 🇪🇸 España 🇦🇷 Argentina 🇺🇾 Uruguay 🇲🇽 México 🇨🇱 Chile 🇻🇳 Việt Nam 🇹🇭 ไทย 🇮🇩 Indonesia 🇫🇷 France 🇸🇦 السعودية 🇹🇼 臺灣 🇮🇹 Italia 🇮🇷 ایران 🇮🇳 India 🇭🇺 Magyarország 🇳🇬 Nigeria 🇬🇷 Ελλάδα 🇲🇾 Malaysia 🇵🇹 Portugal 🇺🇦 Україна 🇯🇵 日本 See All

Learn More

Cookpad Premium Careers Feedback Blog Terms of Service Community Guidelines Privacy Policy Frequently Asked Questions

Download our app

Open Cookpad App on Google Play Open Cookpad App on App Store
Copyright © Cookpad Inc. All Rights Reserved
close