CookpadCookpad
Guest
Register or Log In
Save and create recipes, send cooksnaps and more
  • Search
  • Premium
    • Top Cooksnapped Recipes
    • Top Viewed Recipes
  • Premium
  • Challenges
  • FAQ
  • Send Feedback
  • Region
  • Your Collection
Your Collection
To start creating your recipe library, please register or login.
Satoimo (Taro Root) Ice Cream! With Variations
Save this recipe to come back to it later.
  • Add Cooksnap
  • Add to folders
  • Print
  • Share
    • Copied!
    • Email
    • Facebook
    • Pin it
    • Twitter
  • Report Recipe
  • See report
  • Edit recipe
  • Delete
CookpadCookpad
A picture of Satoimo (Taro Root) Ice Cream! With Variations.

Satoimo (Taro Root) Ice Cream! With Variations

cookpad.japan
cookpad.japan @cookpad_jp

This is an adapted version of my satoimo parfait. It needs a little processing before you eat it, but if you use a microwave it will become creamy in no time. Compared to the work involved in beating eggs or cream, or the need to mix up regular ice cream when it's being frozen, I think it's so much less work. I tried it out under various conditions, so please refer to the notes.

When adding flavor, add vanilla essence to taste. You can make this with low fat milk, but it tastes better with rich milk. Artificial sweetener will not add any stickiness, so the finish becomes sorbet-like and is no good. If you are using retort or frozen satoimo, heat them through too. Some frozen satoimo has to be boiled for more than 20 minutes to get tender. If some graininess remains when the satoimo are pureed, they may be undercooked or you may just have a bad batch. Make sure that they are cooked through so that a skewer goes through easily beforehand. For about 2 cups (400 ml). Recipe by Daikichi MAX

Read more
Saved
Save this recipe to come back to it later.
Edit recipe
See report
Add to folders
Add CooksnapAdd Cooksnap
ShareShare
  • Copied!
  • Email
  • Facebook
  • Pin it
  • Twitter
PrintPrint
  • PrintPrint
  • Add CooksnapAdd Cooksnap
  • Report Recipe
  • See report
  • Delete
Share
  • Copied!
  • Email
  • Facebook
  • Pin it
  • Twitter
Save this recipe to come back to it later.
  • Add Cooksnap
  • Add to folders
  • Print
  • Report Recipe
  • See report
  • Edit recipe
  • Delete

Ingredients

2 servings
  1. Base:
  2. 250 gramsunpeeled, 200 grams peeled Satoimo (taro)
  3. 200 mlMilk or homegenized soy milk
  4. 70to 100 grams Sugar
  5. 1 pinchSalt
  6. 1Vanilla extract
Cookpad Open in Cookpad App
Saved
Save this recipe to come back to it later.

Steps

  1. 1

    Wash the unpeeled satoimo well. Wrap in plastic and microwave. When a bamboo skewer goes through easily, remove the peel with your hands. 250 g of satoimo unpeeled is about 200 g peeled.

  2. 2

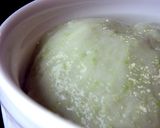
    Put the satoimo, milk, sugar, salt and vanilla essence in a food processor, and process until smooth. Do this while the satoimo is still warm. It should have a thick consistency that won't drop from a spoon at this point.

  3. 3

    Transfer to a container and freeze. It will freeze in 2 to 4 hours.

  4. 4

    If you have the energy, pierce it several times with a fork just before it freezes solid to open many holes. This is to defrost it easier when it's time to eat it.

    A picture of step 4 of Satoimo (Taro Root) Ice Cream! With Variations.
  5. 5

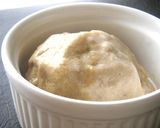
    When you want to eat this, defrost using the microwave's defrost function to soften it (or leave it out at room temperature)and mix well until it's your desired consistency.

    A picture of step 5 of Satoimo (Taro Root) Ice Cream! With Variations.
  6. 6

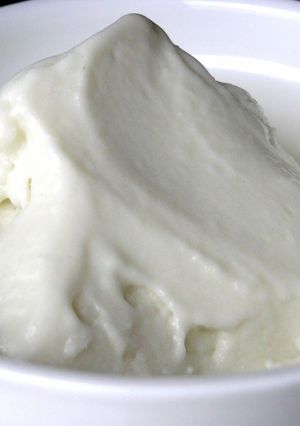
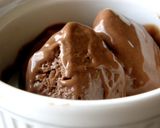
    Cheese flavor: This is the version in the top photo. Add 100 g of cream cheese, 1 teaspoon rum, and 1/2 to 1 tablespoon of lemon juice to the base.

  7. 7

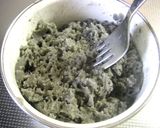
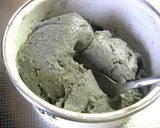
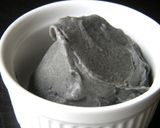
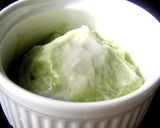
    Black sesame flavor: Add 1 tablespoon of black sesame seeds and 1 tablespoon of ground black sesame seeds to the base.

    A picture of step 7 of Satoimo (Taro Root) Ice Cream! With Variations.
  8. 8

    Chocolate flavor: Add 40 g of bar chocolate and 1 tablespoon of cocoa powder. Warm up the milk in the base beforehand. Break up the chocolate bar and add to the food processor.

    A picture of step 8 of Satoimo (Taro Root) Ice Cream! With Variations.
  9. 9

  10. 10

    Coffee and banana flavor: For coffee flavor, add 1 tablespoon of instant coffee to the base (it will be quite strong). For banana, add 100 g of banana and 1 tablespoon of banana liqueur to the base.

    A picture of step 10 of Satoimo (Taro Root) Ice Cream! With Variations.
  11. 11

    Matcha and condensed milk flavor: To add matcha tea flavor, add 1 1/2 tablespoons to the base. For condensed milk flavor, use 3 tablespoons of sugar in the base and add 3 to 4 tablespoons of condensed milk.

    A picture of step 11 of Satoimo (Taro Root) Ice Cream! With Variations.
  12. 12

  13. 13

    Zunda flavor: Add 50 g of shelled edamame (100 g before shelling).

    A picture of step 13 of Satoimo (Taro Root) Ice Cream! With Variations.
  14. 14

    Raspberry flavor: Add 50 g of raspberries to the base. I made the sauce by processing raspberries and condensed milk together.

    A picture of step 14 of Satoimo (Taro Root) Ice Cream! With Variations.
Saved
Save this recipe to come back to it later.
Edit recipe
See report
Add to folders
Add CooksnapAdd Cooksnap
ShareShare
  • Copied!
  • Email
  • Facebook
  • Pin it
  • Twitter
PrintPrint
  • PrintPrint
  • Add CooksnapAdd Cooksnap
  • Report Recipe
  • See report
  • Delete

Cooksnaps

Saved
Save this recipe to come back to it later.
  • Add Cooksnap
  • Add to folders
  • Print
  • Share
    • Copied!
    • Email
    • Facebook
    • Pin it
    • Twitter
  • Report Recipe
  • See report
  • Edit recipe
  • Delete

Copied!

cookpad.japan
cookpad.japan @cookpad_jp
on July 11, 2014 04:30

Did you know that you can import recipes from anywhere into Cookpad with one click?
https://blog.cookpad.com/us/cookpad-recipe-import-feature-save-recipes-from-anywhere/

Download Cookpad app to plan your meals and store your cooking ideas in one safe place! https://cookpad.wasmer.app/us/download

Read more

Comments

Guest
Add a comment
0/0

Similar Recipes

More Recipes

  1. A picture of Albondigas Slugs.

    Albondigas Slugs

    Spicy George Foreman Spicy George Foreman
  2. A picture of Ghiya gosht!.

    Ghiya gosht!

    Bukharicooking vlogs Bukharicooking vlogs
  3. A picture of Mango Rabdi.

    Mango Rabdi

    Shital Jataniya Shital Jataniya
  4. A picture of Jacket Potatoes with Cheese Filling.

    Jacket Potatoes with Cheese Filling

    ALEX xx ✈🇬🇧🇱🇹 ALEX xx ✈🇬🇧🇱🇹
  5. A picture of Mango Shrikhand - Aamrakhand - Indian traditional desert.

    Mango Shrikhand - Aamrakhand - Indian traditional desert

    Manisha Sampat Manisha Sampat
  6. A picture of Tomato Launji.

    Tomato Launji

    Ruchi Agarwal Ruchi Agarwal
  7. A picture of Creamy Custard Cake.

    Creamy Custard Cake

    ifuchi ifuchi
  8. A picture of Ayushi style aloo samosa.

    Ayushi style aloo samosa

    Priyangi Pujara Priyangi Pujara
  9. A picture of (1) Homemade Pizza.

    (1) Homemade Pizza

    ifuchi ifuchi
  10. A picture of Mango Malai Kulfi - Summer Special Frozen Dessert.

    Mango Malai Kulfi - Summer Special Frozen Dessert

    Manisha Sampat Manisha Sampat
  11. A picture of Easy Chicken Paella.

    Easy Chicken Paella

    Rae Rae
  12. A picture of Kielbasa Sausage & Noodles.

    Kielbasa Sausage & Noodles

    Jasmine Jasmine
  13. A picture of Chinese Steam buns for breakfast by Javier.

    Chinese Steam buns for breakfast by Javier

    cob.javier cob.javier
  14. A picture of Red Velvet Cupcake.

    Red Velvet Cupcake

    Yukte Sharma Yukte Sharma
  15. A picture of Amazegasm black beans and rice.

    Amazegasm black beans and rice

    Wakaflokacooper Wakaflokacooper
  16. A picture of Whipping Cream Scones.

    Whipping Cream Scones

    Maggie Prittie Maggie Prittie
  17. A picture of Marshmallow Fondant.

    Marshmallow Fondant

    Maggie Prittie Maggie Prittie
  18. A picture of Salmon Fish Head With Whisky Tomato And Onion Sauce.

    Salmon Fish Head With Whisky Tomato And Onion Sauce

    Lyii G Lyii G
  19. A picture of Nutella Mini Cup Cake.

    Nutella Mini Cup Cake

    batool.karimi batool.karimi
  20. A picture of Sweet Potato Snacks by a Messy Girl.

    Sweet Potato Snacks by a Messy Girl

    cookpad.japan cookpad.japan
  21. A picture of Packed With Sweet Potatoes! Sweet Potato Cake.

    Packed With Sweet Potatoes! Sweet Potato Cake

    cookpad.japan cookpad.japan
  22. A picture of Cream Cheese and Cranberry Buns.

    Cream Cheese and Cranberry Buns

    cookpad.japan cookpad.japan
  23. A picture of Creamy Chicken and Pasta Recipe.

    Creamy Chicken and Pasta Recipe

    lawlisa lawlisa
  24. A picture of Condensed Milk Sweet Bread (Using a Bread Maker).

    Condensed Milk Sweet Bread (Using a Bread Maker)

    cookpad.japan cookpad.japan
  25. A picture of Eggless Almond and Custard powder cookies.

    Eggless Almond and Custard powder cookies

    richabhargavamitra richabhargavamitra
https://cookpad.wasmer.app/us/recipes/168095
Cookpad Open in Cookpad App

About Us

Our mission at Cookpad is to make everyday cooking fun, because we believe that cooking is key to a happier and healthier life for people, communities and the planet. We empower home cooks all over the world to help each other by sharing their recipes and cooking experiences.

Subscribe to Premium for exclusive features & benefits!

Cookpad Communities

🇺🇸 United States 🇬🇧 United Kingdom 🇪🇸 España 🇦🇷 Argentina 🇺🇾 Uruguay 🇲🇽 México 🇨🇱 Chile 🇻🇳 Việt Nam 🇹🇭 ไทย 🇮🇩 Indonesia 🇫🇷 France 🇸🇦 السعودية 🇹🇼 臺灣 🇮🇹 Italia 🇮🇷 ایران 🇮🇳 India 🇭🇺 Magyarország 🇳🇬 Nigeria 🇬🇷 Ελλάδα 🇲🇾 Malaysia 🇵🇹 Portugal 🇺🇦 Україна 🇯🇵 日本 See All

Learn More

Cookpad Premium Careers Feedback Blog Terms of Service Community Guidelines Privacy Policy Frequently Asked Questions

Download our app

Open Cookpad App on Google Play Open Cookpad App on App Store
Copyright © Cookpad Inc. All Rights Reserved
close