Overnight Proofing Plain Flour Rustic Bread
YouTube is a treasure island for many. We can find all sort of tutorial videos. I learned how to make this ‘Plain Flour Rustic Bread’ on YouTube, however, it was too much of a bother to me. I don’t like weighing the ingredients. I don’t have the required tools such as proofing basket and Dutch oven. I wanted to make this bread more EASILY!
So, here it is. My easier version recipe to share with you. You know All Purpose Plain Flour is very cheap. Today the ingredients of this great looking rustic bread cost me only 40 cents!
Steps
- 1
**Dutch Oven OR Substitutes***
If you have a Dutch Oven, you are lucky. Dutch Oven seems to be the best tool for baking this rustic bread. I used ALDI’s cast-iron casserole pot. You can use an oven-safe metal pot & lid, a high heat oven-safe casserole dish with lid or covered with foil, or something you can cover to trap the moisture. - 2
Place Plain Flour, Dry East and Salt in a large bowl, and mix well to blend evenly.
- 3
Add Warm Water and stir using a spoon or spatula. It is a very soft and gooey dough. Don't try to knead it. When the dough comes together, cover with plastic wrap and rest for 30 minutes at room temperature.
- 4
After 30 minutes, it is still very soft and sticky. Wet your hand with water, grab an edge of the dough, lift and bring it to the centre. Repeat several times. Cover and rest again.
- 5
Repeat this process every 30 minutes, 2 to 3 times, before you go to bed. This process makes the dough elastic. Cover with plastic wrap and leave it somewhere safe and it won't get too cold overnight.
- 6
In the morning, after 10 to 12 hours later, the dough should look bubbly. The dough is still very soft and sticky, but do not wet your hand this time. Dusting the edges of the dough with flour, carefully turn onto a well floured surface and bring the edges to centre to shape into a cob.
- 7
Turn it over, so that the folded side faces down. Place the dough in a well floured bowl or proofing basket. Cover and rest for 30 minutes.
- 8
Line the bottom of the pot with a piece of baking paper.
- 9
After 30 minutes, place the pot in the oven and preheat to 240℃. This means the dough will rest for extra time until the oven gets hot.
- 10
Take the very hot pot out of the oven, take off the lid, turn the dough into the pot, so that the folded side now faces up, put the lid back on, and bake for 30 minutes.
- 11
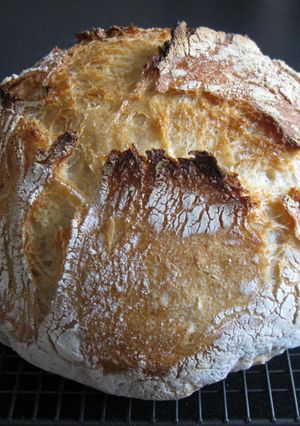
After 30 minutes, remove the lid and bake for 5 minutes or until nicely brown. Take the bread out very carefully and cool on wire rack.
- 12
*Alternatively, bake on a baking tray, with/without boiling water in an oven-safe dish on the bottom of the oven, at 190℃ for 40 minutes. The below picture is the result of this method.

Cooksnaps
Similar Recipes
More Recipes
-


-


-


-


-


-

")
-


-


-

Vegetarian White sauce cream cheese pasta

-


-
")
Shepherd's Pie (Vegetarian/Vegan /Low Carb)

-


-

Homemade Beef brawn pizza#moms recipe

-

 rahu kumar
 -


-

Kolhapuri Chicken Pandhra Rassa

-

-


-

Madeira marble cake# mums recipe
-


Comments (2)