
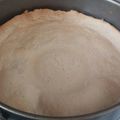
Tart Crust for Quiche
This is one part of a dish that I struggled really hard with while looking at various recipe books and websites. I've tried using both the microwave and the oven and I think I've finally found something successful.
If you use margarine, you can put it in the freezer for about 30 minutes and it will become the same hard consistency as butter.
In Step 6, if you use a rolling pin to roll out the dough, cover the dough with plastic wrap and it will spread easier.
In Step 8, if you fill a one size smaller cake mold with rocks, it becomes perfect to use as pie weights.
Step 9 can be refrigerated as-is. For 22 cm [8.7 in] tart pan. Recipe by tora-mame
Tart Crust for Quiche

This is one part of a dish that I struggled really hard with while looking at various recipe books and websites. I've tried using both the microwave and the oven and I think I've finally found something successful.
If you use margarine, you can put it in the freezer for about 30 minutes and it will become the same hard consistency as butter.
In Step 6, if you use a rolling pin to roll out the dough, cover the dough with plastic wrap and it will spread easier.
In Step 8, if you fill a one size smaller cake mold with rocks, it becomes perfect to use as pie weights.
Step 9 can be refrigerated as-is. For 22 cm [8.7 in] tart pan. Recipe by tora-mame
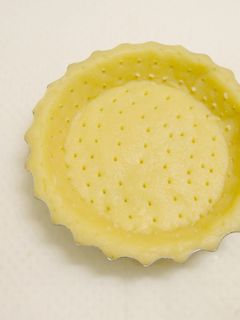
Cooking Instructions
- 1
Be sure to keep all of the ingredients chilled. After combining the ☆ ingredients to create salt water, put it in the refrigerator. Grease the pan with butter.

- 2
Add all of the ★ ingredients to a bowl. Use a scraper to mix together by covering everything with flour.

- 3
When the butter has become pebbly and crumbly, cut it up with the scraper.

- 4
Make a dent in the center and pour in the salt water.

- 5
Fold it into itself and bring the dough together to form one lump until the flour has been completely mixed in. Cover it with wrap and let it sit in the refrigerator for 3 hours.

- 6
Roll out the dough until it's 1-2 cm thick.

- 7
Lay out the dough into the tart mold and pierce with a fork. Gently push the sides of the dough into the mold. Leave it as-is in the refrigerator for 1 hour.

- 8
Cut off the edges of the dough, fill with pie weights, and bake for 20 minutes at 200°C.

- 9
Take out the pie weights, and let it finish cooking on its own for 5 minutes.

Similar Recipes
-

Quiche Lorraine (Bacon and Gruyère Tart) Quiche Lorraine (Bacon and Gruyère Tart)
This quiche is easy and delicious, and it can be enjoyed warm or cold, for breakfast, lunch or dinner.#GlobalApron #cheese #pancetta #pie #shallots #lunch #supper #dinner #breakfast #comfort #food
-

Okara Tart Base & Soy Milk Quiche Okara Tart Base & Soy Milk Quiche
I tried my best to come up with this recipe as I wanted to eat a healthy quiche.You can fill this quiche with anything that you have in your freezer. Recipe by Miffiii
-

My Tart Crust My Tart Crust
It won't break easily but is easy to handle. It's flaky and delicious .That's my tart crust.This crust won't shrink that much when it's baked. But if you are worried, use baking beans .Step 8: Flip over the dough and tart mold quickly! If you do it slowly, it will crack and you'll have to do it all over again.Step 6: When you bring the dough to room temperature in a microwave, heat for 20 seconds at 500W. Recipe by peko&poko -

Easy Tart Crust Easy Tart Crust
I've modified this recipe many times. When you make different tarts you will have to adjust it slightly, but this basic tart crust is easy to bake.Adjust your the baking time based on your oven's strength.You can make a batch and freeze it for later use. Recipe by Maria358 -

Crispy Tart Crust Crispy Tart Crust
I've always loved the crust part of tarts so much so that I always ate it last. Many recipes call for lining a mold with crust, adding the filling and baking it all together, but for tart crust lovers like me, they always end up tasting uncooked, and I've been disappointed many times. By baking the crust at a high temperature beforehand, it becomes crispy and nutty. The almond flour adds depth to the flavor, so even if the crust is thick, it will be delicious.Having baked many a tart without using pie weights, I've been able to come up with a way to bake a beautiful crust without the weights. If you want to use up the egg, just double the ingredient amounts and for 2 tarts' worth. You can freeze the unbaked dough, and it's on the sweet side too, so it's also delicious rolled and baked as cookies. Recipe by noi mama chan -

-
Basic Tart Crust Basic Tart Crust
This is a tart crust I always use.You can also freeze the tart dough from Step 7. Wrap tightly with plastic wrap, put into a plastic bag with a zip seal, and store in the freezer.The baking times may vary by ovens, so please keep an eye on the color of the crust as it bakes and adjust the baking times accordingly. Recipe by Otometeo -

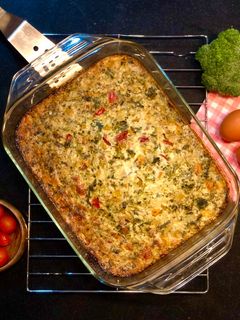
Crustless Quiche Crustless Quiche
Rebecca's quick and easy quiche that doesn't have the fuss of a cruss.
-
Peppery Crustless quiche Peppery Crustless quiche
Here’s a weekly dinner meal that is quick and fuss free to make. Best part is you can chuck in a bunch of different ingredients in your fridge.#mycookbook
-

Crustless quiche Crustless quiche
This came out really well. Nice and light with lots of flavor from all the veggies and spices. My fiance really loved it and he usually isn't a fan of quiche, he thinks it tends to be bland. But, he said this one was awesome. RavynBakes
 -

Crispy Crumbly Tart Crust Crispy Crumbly Tart Crust
I wanted to make a hard tart, but with less oil and moisture than what I've made up until now, so I took out one egg from the recipe and tested it out a few times.In Step 1, if you have parts that ball up and clump together, they will cause the crust to lose its texture when eating, so be sure to thoroughly break up all the clumps until the mixture is crumbly. To help with this, keep the butter in the fridge until just before using it.The crust will shrink a little when baked, so be sure to press the dough with your fingers to make it stand up just a little higher than the pan.It's okay even if you don't grease the tart pan with anything. For 20 cm [7.9 in] tart. Recipe by Koharumama

More Recipes

Comments (2)