
Stronger Bread Starter By Increasing the Yeast Content
I discovered this on a website I trust! The active wild yeast in bread starter will increase if you let it oxidize! So, if you close with a lid, oxygen won't get to the starter and stop producing yeast and produce alcohol instead.
● Don't screw the lid on your jar and mix it up 2 to 3 times a day.
● It's easy to keep the starter going, and it will produce more yeast quickly.
● Although raisin starter with 20% sugar is best suited for dough that's made directly with the starter or with a sponge, a sugarless starter is best for the liquid sponge method. If you are making a flour based sponge, try a 2 to 1 ratio of water to raisins only in your starter. Recipe by Raichi
Cooking Instructions
- 1
If the starter is exposed to air, it'll deplete the sugars and build up carbon dioxide. If it's not exposed to air, it'll start fermenting and produce alcohol.
- 2
If you want to let the yeast grow, it needs air to grow, thus don't cover your starter with a lid! That's the logic behind the instructions.
- 3
If you want to make a strong and active raisin starter, use a wide-mouth container so that comes into plenty of contact with air. Don't cover it with a lid, cover with paper towels or foil instead, and increase the number of times you mix it up. That alone makes all the difference.
- 4
Don't wash the raisins. If you are using tap water, filter it or use boiled and cooled water. If you use straight tap water, the starter may become acidic, so use soft water like spring water.
- 5
Don't wipe your starter container with a kitchen towel before use. If it has water droplets after washing it, it's fine. Sterilize the spoon mix the starter in boiling water.
- 6
Wash all of your equipment well using detergent, but don't wipe with a kitchen towel as the towels may have bacteria on it.
- 7
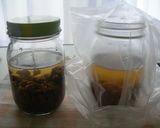
Here I made two batches of starter at once to demonstrate the theory, but just make the lidless version.
- 8
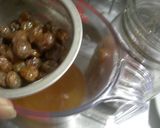
How to make the starter: Put the sugar and water that has been warmed up to about 30°C in the container and dissolve the sugar. Add the raisins.
- 9
Start the experiment! As you can see, the one on the left is covered with a lid. The one on the right has no lid. Both have the same amount of ingredients.
- 10
If doing this at room temperature: Put the starter jars in a warm place, and mix them up twice a day. The ideal room temperature is 26 to 30°C.
- 11
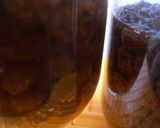
Day 2: The raisins are rising to the surface. You can see some fine bubbles in the lidded one. In the lidless one you can see big bubbles.
- 12
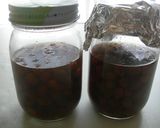
Day 4: The lid-covered one has lots of bubles! The lidless one has about the same amount of bubbles. The liquid in the lidless one is a bit darker.
- 13
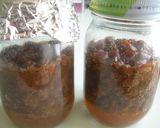
Day 5: The raisins are floating above the surface of the lid-covered on, and the liquid is foaming. If you mix it up, the foam increases and the liquid gets more cloudy.
- 14
The lidless one has a sweet-tart aroma and no detectable alcohol smell.
- 15
If you mix it up and look at it from the side, it has some fine bubbles. Strain off the raisins from both versions, and store in the refrigerator.
- 16
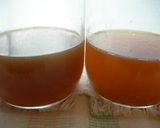
The left one is the lidless version, and the right one is the lidded version. The lidded version has a lighter, prettier color, and foams up like beer. The lidless version is cloudier and darker!! And when you mix it up, it stays quiet. It also tastes stronger, and has way more yeast!! Both are done.
- 17
Store them both covered. While they are stored in the refrigerator, open them up at least twice a month to expose it to air. Use within a month.
- 18
When there is only a little starter left, using the "extend" amounts to keep them going. You can keep them alive for years. Add 1 teaspoon of sugar once a month and store.
- 19
How to make the starter extension: The temperature to aim for for the raisin starter is 25 to 30°C.
- 20
Use your existing starter liquid as the mother. Put 30°C water in a clean container, add sugar and dissolve, then add the raisins and the mother starter. Cover with paper towels.
- 21
Put the container in a warm location. Observe its progress, using the photos on this page as reference.
- 22
You can use the raisins used to make starter mixed into dough to make bread.
- 23
If you use raisins to make starter, you shouldn't get mold. Raisins contain a powerful anti-fungal agent called propionic acid.
- 24
Raisin bread does not mold easily. If mold does occur, there are probably other reasons.
- 25
If something called acetic acid bacteria develops, a white film will develop on the surface of the liquid, and it will smell bad.
- 26
If that happens, just throw the starter out and try again If you introduce as much oxygen as possible, you can avoid this.
Cooksnaps
Did you make this recipe? Share a picture of your creation!

Similar Recipes
-

Bread (Sourdough) Starter Bread (Sourdough) Starter
The method for making a sourdough starter sponge is the same, regardless of which starter you use! The sponge puffs up and becomes filled with air bubbles, and it's just fun to watch it grow.The method is the same whichever starter liquid you use! I used raisin starter this time.Add the same amount of starter liquid and flour.You can use water instead of starter liquid from the 2nd day onwards, but if you use starter liquid you'll have a more fragrant, robust starter sponge. Recipe by Hirochan
-

Homemade Yeast French Bread (Using Straight Starter) Homemade Yeast French Bread (Using Straight Starter)
I was able to make a nice yeast, so I used the straight method to turn it into french bread.※ The recipe calls for 75% water, but using about 65~70% at first will make it easier to make (195-210ml).※ I used 36% natural yeast, but 15% should be enough for it to rise sufficiently, so please feel free to reduce as you see fit.(Don't forget to increase the amount of water in turn for this. Recipe by Panko625 -

Homemade Apple Leaven (Bread Starter) Homemade Apple Leaven (Bread Starter)
I've been making this for a while.There's a lot of wild yeast on the peel and core of the apple, so don't throw them out. It takes a bit more time to make this in the winter. If you add the same amount of boiled then cooled water as the starter you took out, plus sugar or honey to the remaining starter, let it ferment again and store in the refrigerator, the starter will stay alive for years. You can add 100% apple juice instead of the boiled then cooled water to feed the starter too. In that case, don't add any sugar. If there is only 1/3rd of the starter left, add the abovementioned starter additions, let it ferment at room temperature for 2 days or so, strain and store in the refrigerator. Recipe by Raichi -

How To Make Homemade Natural Leaven, Bread Starter How To Make Homemade Natural Leaven, Bread Starter
Several years ago, I wanted to make pizza and was searching on the internet, when I learned about natural leaven. Ever since then I've been captivated by natural leaven (natural yeast or sourdough) bread.In the winter, I put the jar next to my electric kettle or rice cooker. In any case, when the mixture is very foamy and bubbly, and it smells alcoholic, it's done. Add the same amount of water as the amount of starter you used as well as some honey, sugar or 100% fruit juice, and the starter will keep going for years. If using 100 % fruit juice, don't add any sugar. If the starter smells rotten, throw it out.When the starter is down to about 10g, add 200 g of water, 100 g of raisins, and 30 g of sugar and let it re-ferment. Recipe by Raichi -

Sake Lees Yeast - Liquid Bread Starter Sake Lees Yeast - Liquid Bread Starter
I think it's quite hard to measure sake lees yeast, so I hope this is helpful.It's possible to make fermentation liquid with only sake lees, but it takes a long time and it's difficult, so I recommend using liquid yeast from raisins or the like.The amount of bread flour to make sponge dough (starter dough) is the same as liquid yeast, so, for example, for the first day, use 100 g of both, then 50 g on the second day. Recipe by Miyanbo -

Pita Bread Using Homemade Bread Starter Pita Bread Using Homemade Bread Starter
I challenged myself to create a recipe for pita bread using my homemade raisin bread starter.Be patient rolling out the dough, letting it rise evenly.If the dough doesn't rise properly, open it up with a knife. Recipe by yukina007 -

Fizzy Bread Starter using Natural Leaven Fizzy Bread Starter using Natural Leaven
I referenced Yuriko Aida's book "Baking Bread with Homemade Yeast--Through the Seasons". Although the author uses only domestically grown wheat, I revised the recipe to more accessible ingredients.You can substitute bread (strong) flour for the whole wheat flour. I use Weck's tulip-shaped 1 liter jar. I recommend it since it's easy to stir the contents. Airtight jars with rubber gaskets are good, but I'm afraid of breakage from fermentation. You can also use a large bottle, or any container and wrap it in plastic wrap. Recipe by Surou -

Sake Lees Yeast ② - Liquid Bread Starter Sake Lees Yeast ② - Liquid Bread Starter
I figured I could simplifyand so I experimented with it. That recipe strains the yeast mixture, but this one uses all of the mixture.Not straining will enhance the taste of the sake lees and make it into a richer bread.Make sure to sterilize the containers. Step 7 shows the finished starter. The bubbles will become fine if you let it sit in the fridge in Step 6. After Step 7 and fermentation the big and small bubbles will become evenly dispersed. Recipe by Miyanbo -

Homemade Black Tea Bread Starter Homemade Black Tea Bread Starter
I heard bread prepared with homemade black tea starter is delicious, so I wanted to try making some.Use loose leaf tea.Mix up the contents of the container once a day, open the lid and let some air in.I slosh it around with the lid on to mix it. When it starts fermenting, you'll hear a popping sound. Recipe by Hirochan -

For Beginners: Yogurt Bread Starter (Leaven) For Beginners: Yogurt Bread Starter (Leaven)
Since this bread starter is made by adding flour to yogurt, it's easy to see how it's fermenting, unlike some other starters. You can store this starter in the refrigerator for about 5 days. If you leave a little leftover, use half the amount of water, bread flour and sugar in step 5, and incubate for 5-6 hours at room temperature you can grow more starter. If you do this twice, your starter will ferment better. If it takes on an "off" smell like a dishtowel, it's better to manfully throw it away.To get a bread starter going, in the spring, summer and fall you can just let it rest at room temperature. In midsummer when it's very hot, put it in a cool location in your room when you're at home, and put it in the refrigerator when you go out if your house will get very hot. You can also put it in an insulated polystyrene container with ice packs to keep it at under 25 °C. In the winter, put the starter jar on top of the refrigerator, near the stove, near your electric water kettle or in your boiler room. You could also make a fermentation box using a thermostat meant for tropical fish aquariums and an insulated box. But don't put the starter in a very warm location. Recipe by mipon -

French Bread with Homemade Bread Starter French Bread with Homemade Bread Starter
I don't like hard bread... but I really love french breads where you can taste the wheat. That's why I decided to make a soft version.Adjust the water content of the bread starter to control the texture of your bread. Recipe by moss green 7 -

Easy For Beginners: Raisin Bread Starter Rolls Easy For Beginners: Raisin Bread Starter Rolls
Ever since I discovered homemade natural bread starter or leaven, my bread baking experience has gotten so much richer. I've been making natural-starter bread referring to various books and online articles.In this recipe the starter liquid is used straight, without making an intermediary sponge. This is called the "straight method". With this method you can really enjoy the fragrance of the starter and the straightforward taste of the flour, and it's really delicious. I prefer using straight starter rather than the sponge method, since the dough is more tender and moist. Please watch the bread's color in the oven to judge its baking time. When it's golden brown and smells wonderful, it's done. If the bread won't brown well, that means the dough was over-proofed. Recipe by Raichi
More Recipes

Comments