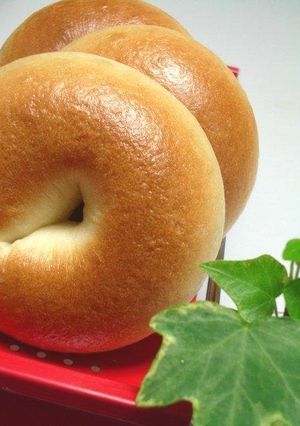
Soft Bagels
I like chewy bagels, but I like soft and dense ones as well. These bagels can be used in many ways and are easy to eat.
They're also good for sandwiches.
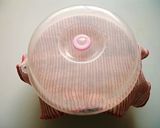
Cover the dough with a damp cloth from the first rising to the shaping stage (Since the rising time is not very long, it is technically called “floor time”). Cloth is not needed during the second rising.
For a smooth finish, remove the trapped air out of the dough really well before shaping the dough. Recipe by Masacchi
Soft Bagels
I like chewy bagels, but I like soft and dense ones as well. These bagels can be used in many ways and are easy to eat.
They're also good for sandwiches.
Cover the dough with a damp cloth from the first rising to the shaping stage (Since the rising time is not very long, it is technically called “floor time”). Cloth is not needed during the second rising.
For a smooth finish, remove the trapped air out of the dough really well before shaping the dough. Recipe by Masacchi
Steps
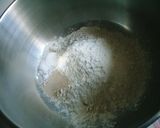
- 1
In a bowl, add bread flour and pile up the sugar and dry yeast on it. Pour lukewarm water (30℃) aiming at the dry yeast and mix the ingredients evenly with a spatula or by hand.
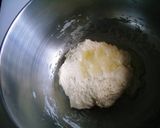
- 2
Kneading When the dough comes together, add salt and olive oil and start kneading. Once the olive oil is mixed into the dough, move it to a work surface.
- 3
Knead the dough by pushing it out then folding it in, using your body weight. When the room is humid and the dough is too sticky, dust the work surface with flour.
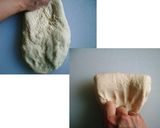
- 4
Kneading is done when the dough is smooth and you can see your fingers through it when stretched out, and the dough does not break when you pinch up the edges.
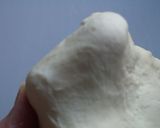
- 5
In order to proof the dough fully, make sure the surface is very smooth. Place the dough, with its seams down, into a bowl greased with olive oil.
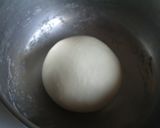
- 6
First Rising: Cover the bowl with a damp cloth and plastic wrap for 30 minutes at 30℃.
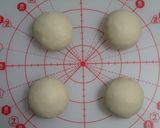
- 7
Resting time: Remove trapped air out of the dough. Divide dough into quarters and shape into balls. Cover them with a damp cloth with their seams on the bottom, then let them sit for 5 minutes.
- 8
Forming: Roll out the dough into rectangle.
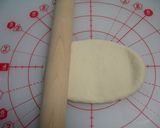
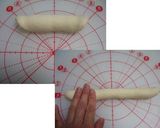
- 9
Roll up the rectangle, then roll out the resulting cylinder until it is about 20 cm in length.
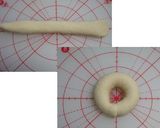
- 10
Push down on one end with fingers to make it wider and taper the other end. Wrap the narrower end with the wider end to make a ring. Tightly seal the seams!
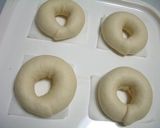
- 11
Second Rising: Place each dough onto a bagel-sized piece of parchment paper. Let them rest for 3 minutes in 30℃. While proofing the dough, preheat the oven to 210℃.
- 12
Kettling: In a deep skillet, bring 1 liter of water to a boil, remove from the heat (at around 80-90℃), and dissolve in the honey.
- 13
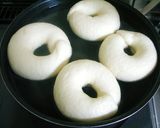
Gently dip dough into the water one by one and remove the parchment paper. Submerge the bagels for 30 seconds on each side. Scoop the dough out and drain on a dry cloth.
- 14
Baking: Place the dough onto the parchment paper that was removed before kettling, place the dough into the oven, reduce temperature to 200℃ and bake them for 12-15 minutes.
- 15
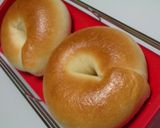
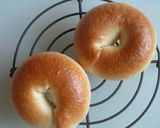
The freshly baked bagels have a crispy and crunchy surface and are soft and chewy inside.

- 16
The flavor of a crunchy freshly baked bagel comes back when you toast it.
Cooksnaps
Did you know that you can import recipes from anywhere into Cookpad with one click?
https://blog.cookpad.com/us/cookpad-recipe-import-feature-save-recipes-from-anywhere/
Download Cookpad app to plan your meals and store your cooking ideas in one safe place! https://cookpad.wasmer.app/us/download
Keywords
Similar Recipes
More Recipes
-


-


-


-


-


-


-

Smoked Salmon, Mushroom & Cheddar Breakfast Skillet

-


-


-


-


-


-


-


-

-

Kabocha Squash Bread and Kabocha Squash Paste Bread
-

-

-

Squid and Celery Chinese Savory Stir-Fry
-

-

-

Luxurious and Rich Blueberry Bagels

")


Comments