CookpadCookpad
Guest
Register or Log In
Save and create recipes, send cooksnaps and more
  • Search
  • Premium
    • Top Cooksnapped Recipes
    • Top Viewed Recipes
  • Premium
  • Challenges
  • FAQ
  • Send Feedback
  • Region
  • Your Collection
Your Collection
To start creating your recipe library, please register or login.
Sabu Mochi
Save this recipe to come back to it later.
  • Add Cooksnap
  • Add to folders
  • Print
  • Share
    • Copied!
    • Email
    • Facebook
    • Pin it
    • Twitter
  • Report Recipe
  • See report
  • Edit recipe
  • Delete
CookpadCookpad
A picture of Sabu Mochi.

Sabu Mochi

cookpad.japan
cookpad.japan @cookpad_jp

I tried re-creating and adapting a recipe my mother said she copied by watching my great-grandmother (my mother's grandmother on her father's side), who's from one of the Okinawa islands. The version my mother made is the 'deep fried' one using Joshinko flour. I think it's close to an Okinawan regional recipe called "Muchigumi tempura".

-If the dough doesn't become cohesive because the sweet potatoes have a lot of moisture in them, please adjust the amount of rice flour. If the dough looks like the Step 4 photo, it's good. The sweetness depends on the sweet potatoes you use, so please adjust if necessary. I tested this recipe many times, but I think if using the deep frying method, 60 g of sugar is sweet enough.
-You can cook the sweet potatoes in the microwave, but they are much more tasty if you steam them.
-Refrigerated or frozen dough is hard to work with (Step 5) if it's still cold, but it will be fine after kneading. I've added other notes in the directions. For an easy-to-make amount. Recipe by Sabumochi

Read more
Saved
Save this recipe to come back to it later.
Edit recipe
See report
Add to folders
Add CooksnapAdd Cooksnap
ShareShare
  • Copied!
  • Email
  • Facebook
  • Pin it
  • Twitter
PrintPrint
  • PrintPrint
  • Add CooksnapAdd Cooksnap
  • Report Recipe
  • See report
  • Delete
Share
  • Copied!
  • Email
  • Facebook
  • Pin it
  • Twitter
Save this recipe to come back to it later.
  • Add Cooksnap
  • Add to folders
  • Print
  • Report Recipe
  • See report
  • Edit recipe
  • Delete

Ingredients

  1. The batter:
  2. 160 gramspeeled Sweet potato
  3. 60 gramsJoshinko or mochiko
  4. 60to 70 grams Brown sugar
  5. Other ingredients, depending on the cooking method:
  6. 1Oil for deep frying
  7. 1Kinako
Cookpad Open in Cookpad App
Saved
Save this recipe to come back to it later.

Steps

  1. 1

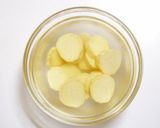
    Peel the sweet potato, and slice 1 cm thick. Put into a bowl of water. Heat up some water in a steamer.

    A picture of step 1 of Sabu Mochi.
  2. 2

    Key point 1: The potato was 180 g before peeling, and 160 g afterwards. This might serve as a good estimate for how much weight a medium-sized sweet potato will lose after peeling.

    A picture of step 2 of Sabu Mochi.
  3. 3

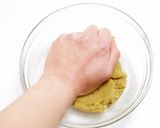
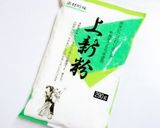
    Steam the sweet potato, and pass it through a sieve while still hot. Add the Joshinko rice flour and brown sugar and knead together well with your hands. It will be floury to begin with, but will gradually come together.
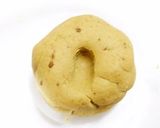
    A picture of step 3 of Sabu Mochi.
  4. 4

    Aim for a dough that is about the hardness of your earlobe. If you press it with your fingers it should leave a mark. The dough is done.

    A picture of step 4 of Sabu Mochi.
  5. 5

    Key point 2: You can wrap the kneaded dough in plastic wrap, put that in a freezer bag and freeze. However, do not defrost the dough in the microwave; let it defrost naturally. From this point on, just choose your preferred cooking method.

    A picture of step 5 of Sabu Mochi.
  6. 6

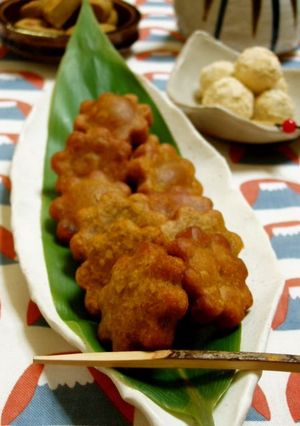
    Deep-fried Sabu-mochi (basic method): This is the original method. Press the dough out to about 1cm thickness as you would with cookies, and cut out into any shape you like, deep fry until crispy in 160 to 170°C oil.
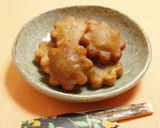
    A picture of step 6 of Sabu Mochi.
  7. 7

    Key point 3: When you deep fry these they will puff up a bit (especially if you use mochi flour. Joshinko flour doesn't puff up so much). When the outside becomes golden brown they are done. It's best to turn them over often.
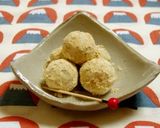
    A picture of step 7 of Sabu Mochi.
  8. 8

    Steamed sabu-mochi: Tear the dough into pieces about the size of a pingpong ball, and steam over high heat for about 15 minutes. Take out using a damp clean cloth, and knead for a bit, then roll up into a ball again and they're done. Serve coated with kinako (roasted soy flour), or with brown sugar syrup.

    A picture of step 8 of Sabu Mochi.
  9. 9

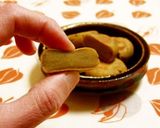
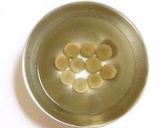
    Pan-fried sabu-mochi: Take 15 g portions of the dough, roll into balls and press to about a thickness of 1 cm. Pan-fry in a non-stick frying pan on both sides. These are delicious with walnuts kneaded in. If you cut them out into squares, they will look like kintsuba (square-baked sweetened bean paste).
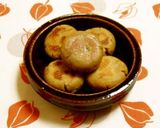
    A picture of step 9 of Sabu Mochi.
  10. 10

    This is how pan-fried sabu-mochi look like on the inside. It still has that mochi-like texture. This method is more suited to the version made with mochi flour.

    A picture of step 10 of Sabu Mochi.
  11. 11

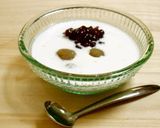
    Boiled sabu-mochi: Cook balls of the dough in boiling water for about 7 minutes. Put the cooked balls into cold water. This 'mochi' won't float to the surface like shiratama. If you leave them in water for too long they'll get water logged, so take them out within a short time.

    A picture of step 11 of Sabu Mochi.
  12. 12

    I recommend serving the boiled version in coconut milk with sugar added, plus some cooked sweet adzuki beans, zenzai-style. They also go well in milk with mashed bananas.

    A picture of step 12 of Sabu Mochi.
  13. 13

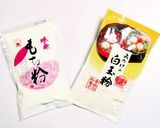
    Key point 4: If you find it hard to get a hold of mochi flour, use shiratama flour that has been broken or ground up. (This is the same with, "Mochi-ko muffins". )

    A picture of step 13 of Sabu Mochi.
  14. 14

    Key point 5: My mother told me that she used to make these with Joshinko so I followed her instructions, but with the exception of the deep fried and steamed methods, mochiko (or crushed shiratamako, which uses the same base ingredients) doesn't turn as hard even when cooled.

    A picture of step 14 of Sabu Mochi.
  15. 15

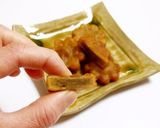
    Key point 6: This shows how the deep fried version looks when cooled down to room temperature (in the winter) and cut. It's still tender, but it tastes better if warmed up in the microwave. If they turn hard, please do the same.

    A picture of step 15 of Sabu Mochi.
  16. 16

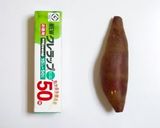
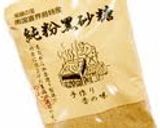
    This is the brown sugar I used. It's hard to see the writing, but comes from the island in Okinawa where my great-grandmother is from. I see it occasionally on sale in department store food halls (in Japan).

    A picture of step 16 of Sabu Mochi.
  17. 17

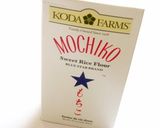
    This is a precious box of "Mochiko" that a friend who lives overseas got for me! I tried this out too and the results were great. And it was easy to knead too. If you can get this, please try it.

    A picture of step 17 of Sabu Mochi.
Saved
Save this recipe to come back to it later.
Edit recipe
See report
Add to folders
Add CooksnapAdd Cooksnap
ShareShare
  • Copied!
  • Email
  • Facebook
  • Pin it
  • Twitter
PrintPrint
  • PrintPrint
  • Add CooksnapAdd Cooksnap
  • Report Recipe
  • See report
  • Delete

Cooksnaps

Saved
Save this recipe to come back to it later.
  • Add Cooksnap
  • Add to folders
  • Print
  • Share
    • Copied!
    • Email
    • Facebook
    • Pin it
    • Twitter
  • Report Recipe
  • See report
  • Edit recipe
  • Delete

Copied!

cookpad.japan
cookpad.japan @cookpad_jp
on January 19, 2014 07:11

Did you know that you can import recipes from anywhere into Cookpad with one click?
https://blog.cookpad.com/us/cookpad-recipe-import-feature-save-recipes-from-anywhere/

Download Cookpad app to plan your meals and store your cooking ideas in one safe place! https://cookpad.wasmer.app/us/download

Read more

Comments

Guest
Add a comment
0/0

Similar Recipes

More Recipes

  1. A picture of Mango Mini Cake.

    Mango Mini Cake

    Deepa Rupani Deepa Rupani
  2. A picture of Tomato raw mango chutney.

    Tomato raw mango chutney

    Vidyutaa Kashyap Vidyutaa Kashyap
  3. A picture of Delicious Peach Chutney.

    Delicious Peach Chutney

    Sangita Vyas Sangita Vyas
  4. A picture of Drumstick Curry.

    Drumstick Curry

    Sampada Shrungarpure Sampada Shrungarpure
  5. A picture of Healthy Mango Oats Dryfruit Smoothie Bowl.

    Healthy Mango Oats Dryfruit Smoothie Bowl

    Rita Talukdar Adak Rita Talukdar Adak
  6. A picture of Ham and Bean Stew.

    Ham and Bean Stew

    ifuchi ifuchi
  7. A picture of Sprouts Dhokala.

    Sprouts Dhokala

    Surekha Dongargaonkar Surekha Dongargaonkar
  8. A picture of Mango Melange.

    Mango Melange

    Nutan Shah Nutan Shah
  9. A picture of Drumstick curry.

    Drumstick curry

    Karuna Naveen Chandwani Karuna Naveen Chandwani
  10. A picture of Takali (Tomato) Rasam.

    Takali (Tomato) Rasam

    Darshana Patel Darshana Patel
  11. A picture of Lemon, Cucumber & Mint Detox Water.

    Lemon, Cucumber & Mint Detox Water

    Julie T. Julie T.
  12. A picture of Asparagus and Cheese Roll Ups..

    Asparagus and Cheese Roll Ups.

    jcostanzo9581 jcostanzo9581
  13. A picture of Crab and Shrimp Salad in Belgium Endive Leaves.

    Crab and Shrimp Salad in Belgium Endive Leaves

    fenway fenway
  14. A picture of Buffalo Chicken Sweet Pepper Poppers`.

    Buffalo Chicken Sweet Pepper Poppers`

    summerplace summerplace
  15. A picture of Marscarpone and Honey Stuffed Strawberries.

    Marscarpone and Honey Stuffed Strawberries

    sammie27 sammie27
  16. A picture of Strawberry Yogurt Jello.

    Strawberry Yogurt Jello

    cookpad.japan cookpad.japan
  17. A picture of Seriously Delicious 100% Homemade Pizza.

    Seriously Delicious 100% Homemade Pizza

    cookpad.japan cookpad.japan
  18. A picture of Simple Soft & Fluffy Bread Rolls.

    Simple Soft & Fluffy Bread Rolls

    cookpad.japan cookpad.japan
  19. A picture of Sweet and Spicy Tsukune Kombu Maki Rolls.

    Sweet and Spicy Tsukune Kombu Maki Rolls

    cookpad.japan cookpad.japan
  20. A picture of Tataki Gobo - Pounded Burdock Root With Sesame Sauce.

    Tataki Gobo - Pounded Burdock Root With Sesame Sauce

    cookpad.japan cookpad.japan
  21. A picture of For Osechi! Cute & Extravagant With Decorative Vegetables - Chikuzen-ni.

    For Osechi! Cute & Extravagant With Decorative Vegetables - Chikuzen-ni

    cookpad.japan cookpad.japan
  22. A picture of For Osechi, Too! Chikuzen-ni With Lots of Root Vegetables.

    For Osechi, Too! Chikuzen-ni With Lots of Root Vegetables

    cookpad.japan cookpad.japan
  23. A picture of For Osechi Crunchy Pounded Burdock Root.

    For Osechi Crunchy Pounded Burdock Root

    cookpad.japan cookpad.japan
  24. A picture of Vanilla Squash Risotto.

    Vanilla Squash Risotto

    emily.c.salter emily.c.salter
  25. A picture of Marble cake.

    Marble cake

    Anna Angelova Anna Angelova
https://cookpad.wasmer.app/us/recipes/168229
Cookpad Open in Cookpad App

About Us

Our mission at Cookpad is to make everyday cooking fun, because we believe that cooking is key to a happier and healthier life for people, communities and the planet. We empower home cooks all over the world to help each other by sharing their recipes and cooking experiences.

Subscribe to Premium for exclusive features & benefits!

Cookpad Communities

🇺🇸 United States 🇬🇧 United Kingdom 🇪🇸 España 🇦🇷 Argentina 🇺🇾 Uruguay 🇲🇽 México 🇨🇱 Chile 🇻🇳 Việt Nam 🇹🇭 ไทย 🇮🇩 Indonesia 🇫🇷 France 🇸🇦 السعودية 🇹🇼 臺灣 🇮🇹 Italia 🇮🇷 ایران 🇮🇳 India 🇭🇺 Magyarország 🇳🇬 Nigeria 🇬🇷 Ελλάδα 🇲🇾 Malaysia 🇵🇹 Portugal 🇺🇦 Україна 🇯🇵 日本 See All

Learn More

Cookpad Premium Careers Feedback Blog Terms of Service Community Guidelines Privacy Policy Frequently Asked Questions

Download our app

Open Cookpad App on Google Play Open Cookpad App on App Store
Copyright © Cookpad Inc. All Rights Reserved
close