Mildly Sweet and Fluffy Milk Bread Bread Machine Version
I wanted to make bread for my son with lots of his favorite milk, and so this milk bread recipe was born.
Bread machine used: Panasonic (1 loaf type). I selected the 'bread dough' setting.
The unsalted butter should be at room temperature.
I used a SHARP oven for the rising of the dough.
Usually white sugar is used for making bread, but I used soft brown sugar. You can use whichever you like. Recipe by Banyangarden
Cooking Instructions
- 1
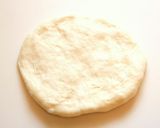
Put all the ingredients except the yeast in the bread pan and place the yeast in the yeast compartment. Press the Start button.
- 2
Baking settings differ depending on the bread machine, so use the setting that allows you to take out the dough after the first rise and shape as you like.
- 3
When the baking program ends (after the first rise), take out the dough from the bread pan.
- 4
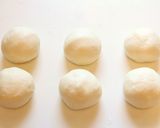
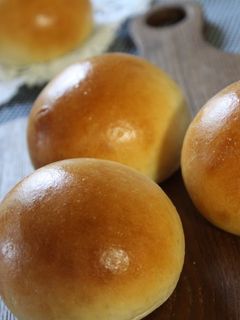
Weigh the dough, divide into 6 portions, and shape into balls. Note: the dough weighs about 400 g, so make 6 balls weighing around 66 g each.
- 5
To prevent them from drying out, cover the balls of dough with a damp tea towel. Leave to rest for 10 minutes (allowing the dough to rise).
- 6
Deflate the buns by evenly pushing out any air from the dough on a work surface or with the palms of your hands.
- 7
Reshape the dough into balls and place with the seam side down on a tray lined with a sheet of parchment paper.
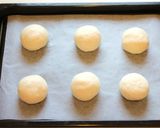
- 8
Cover the dough with plastic wrap, then with a moistened tea towel, and rise at 40°C for 15 minutes. Preheat the oven to 40°C in advance.
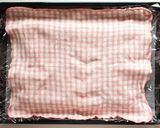
- 9
After letting the dough rise in the oven for 15 minutes, leave to rise at room temperature for another 10 to 15 minutes. The oven needs to be preheated for baking, so let the bread dough finish rising at room temperature.
- 10
Preheat the oven to 190°C. Start to preheat the oven as soon as you take out the tray with dough.
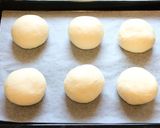
- 11
The dough is finished rising when it has doubled in size. If you want your bread dough to rise at room temperature without using the oven, allow the dough to rise until it looks like this.
- 12
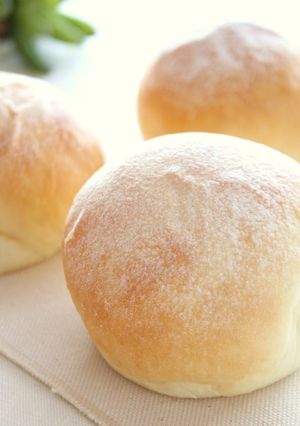
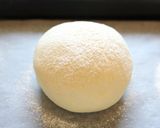
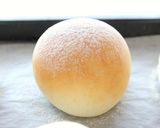
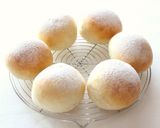
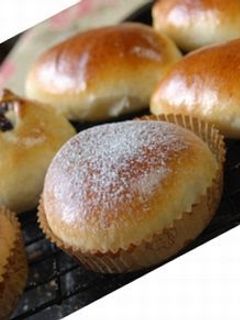
Sprinkle the top with joshinko flour. Use a tea strainer to sprinkle the flour over the entire surface. Just a little flour on top like this. You can use bread flour too.
- 13
Bake for about 9 minutes in a 190°C oven. When the areas of dough that aren't dusted in flour begin to brown, they are finished baking.
- 14
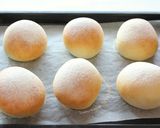
Transfer the bread from the tray to a cooling rack. Handle with care because the bread is very soft.
- 15
They are done when they have cooled on the cooling rack!
- 16
If your bread machine requires you to put the yeast and flour in the bread tin together, ensure that the yeast does not touch the salt directly.
- 17
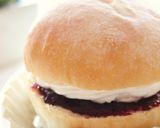
Sandwiching whipped cream between this sweet, milky bread is great. Suggestion: Create a sandwich of whipped cream and blueberry jam.
Cooksnaps
Did you make this recipe? Share a picture of your creation!

Similar Recipes
-

Basic Sweet Bread Dough (Light and Fluffy Version) Basic Sweet Bread Dough (Light and Fluffy Version)
I like dense and chewy bread, but depending on what you want to make sometimes a light bread is more suitable. For example, for bread with things kneaded into the dough, a lighter dough is better as it won't be so stretchy. And if the toppings/additions are on the heavy side, a light-textured bread is nicer. So this is a light-textured version of my basic sweet bread dough, for when you need it.Since this dough has a relatively high moisture content, it's easy to knead. It is a bit sticky though, so you will need to flour your work surfaces. Recipe by Yukiline
-

Condensed Milk Sweet Bread (Using a Bread Maker) Condensed Milk Sweet Bread (Using a Bread Maker)
I didn't want my leftover condensed milk to go to waste, so I tried making bread with it.Instead of making rolls, you can just use the bread course in the bread maker and this is also delicious. As the dough is really loose, if you don't coat with flour it'll stick to your hands. But be careful not to use too much. For 18 mini rolls. Recipe by Minimy -

Fluffy and Soft Basic Sweet and Savory Bread Dough Fluffy and Soft Basic Sweet and Savory Bread Dough
I came up with a dough recipe that could be used for both sweet and savory breads After much test baking, I settled on this recipe to make my favorite delicious, soft, and fluffy bread.Use your bread machine or kneading machine accordingly to make the dough until the 1st rising is done Keep kneading the dough diligently until the gluten is well developed Adjust the baking time depending on your oven. I bake them at 170°C for 15-20 minutes. Recipe by Lesser Panda -

Subtly Sweet Simple Time-Saver Milk Sugar Bread Subtly Sweet Simple Time-Saver Milk Sugar Bread
The sugar bread found in stores is too sweet, so I modified it to my preference.You can also knead by hand.The finished bread shown in the picture has withheld on the sugar. Adjust to your preference. Recipe by Kazuetei 2gou -

Sweet and Fluffy Honey Cookie Bread Sweet and Fluffy Honey Cookie Bread
I wanted to make a bread that would be a hit with the kids, so I came up with a strongly honey flavored cookie bread. Both the bread dough and the cookie dough have lots of honey in them! When freshly baked these are very crispy, and after some time they turn soft and tender. They're not just popular with kids, they're a hit with adults too!There's a generous amount of cookie dough in the recipe, so you can use a lot of it as topping. When the buns are still hot out of the oven you can't really taste them properly, so wait until they have cooled down a bit so that the cookie part is crispy. ♪ When the buns are completely cooled they become soft and moist. If you warm them up a bit in a toaster oven, they'll become crispy again! Recipe by Toiroiro -

Fragrant with Brown Sugar! Sweet Milk Bread Fragrant with Brown Sugar! Sweet Milk Bread
I tried this over and over again striving for a sweet and fragrant bread, failed time and again, and finally settled on this little number. I am picky about using the 3g of yeast, as well as the cube brown sugar. Also by adding in the mizuame syrup, you can then make a milder and softer bread.The brown sugar milk will be extremely hot upon taking it out of the microwave, so take care not to burn yourself! (let it cool down to skin temperature and then add in the dough). Cover with plastic wrap in order to keep it from drying out, and place a wet paper towel on top of that! It will get wet enough from the top of the wrap It will turn into a delicious and sweet bread just like that. Recipe by Nachuriru -
Fluffy Sweet Bread Rolls Fluffy Sweet Bread Rolls
Fluffy rolls and pastries made from this dough won't harden even after they've cooled down. I tried out various sweet bread dough recipes and this is the result.Bring the margarine to room temperature and cut it up before adding it to your bread maker. If you can, scatter the yeast around in the ingredients and let sit in the bread maker for one minute before starting the machine. Recipe by commeline -

Sweet Condensed Milk Bread Sweet Condensed Milk Bread
Soft, fluffy and delicious sweet condensed milk bread. Love this bread so much!
-
Basic Sweet Bread Dough Basic Sweet Bread Dough
I wanted to make a sweet bread dough that would go well with anything.Even if you don't add any fillings, these buns will be subtly sweet and delicious as is. Recipe by Panko625 -

Fluffy Light Sweet Honey Lemon Bread Fluffy Light Sweet Honey Lemon Bread
I make this bread whenever I get some tasty honey! It's a recipe that's been perfected over many attempts.Since there are a lot of ingredients that tend to weigh down the dough, I've used a very strong (high gluten) bread flour for half the flour. You can use all-very high gluten bread flour, but please at least try using it for half the amount of flour.Adjust the amount of moisture depending on what kind of flour you use.When you grate the lemon zest, be sure to grate the yellow part only (and stay clear of the pith)! For five 10.5 cm [4.1 in] diameter rolls. Recipe by Pu-kosan -

Basic Sweet Bread Dough Basic Sweet Bread Dough
I made this at home using ingredients I had on hand for making desserts so it has quite a rich feel to it.I took my basic bread dough recipe and just increased the amount butter and sugar. I wanted to make sure that it was easy to shape, so I made it extra soft. Recipe by Yukiline -

Sweet Hawaiian Bread Machine Bread Sweet Hawaiian Bread Machine Bread
This is a fluffy, light sweet bread, but not overly sweet. You can also make this in a mixer with dough hook attachment. You can also after first rise, roll into balls for rolls.
More Recipes
- chocolate chip cookie brownies
- Spring Quiche with Spring Cabbage & Fresh Onions
- Spring Color Beans and Cured Ham Quiche
- Sweet And Sour Pork Belly Slice
- Strawberry Swirl Vanilla Ice Cream
- Tinklee's Butterscotch Fudge
- Tinklee's Tiger Fudge
- Tinklee's Candy Cane Fudge
- Stuffed Cheese Buns
- hair growth secret

Comments