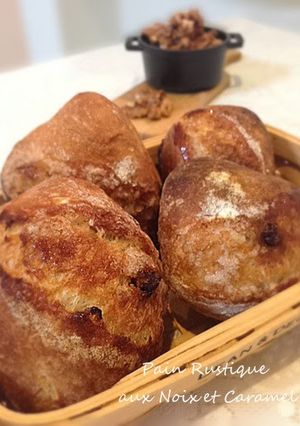
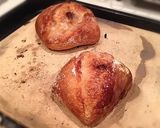
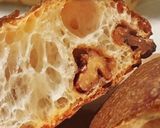
Walnut and Caramel Pain Rustique With Natural Bread Starter
I've been enjoying using Cinnamon-Scented Caramelized Walnutsin sweets and breads.
When I first made user Tan-chan's "Sugar Butter Top Rustique", I thought if I ever get good at baking it, I'd add caramelized walnuts to it. I slightly revised the recipe and posted it here.
Since the dough has a high moisture content, liberally dust your working surface from Steps 22-35.
All of the instructions are important and should be followed carefully.
While the recipe is long, since I have included the fine details, I recommend this method; with it, even a beginner like me can easily make this bread. For 5 7 x 8 cm rustiques [those in the photo were made with natural yeast]. Recipe by *ai*
Cooking Instructions
- 1
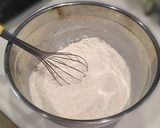
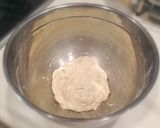
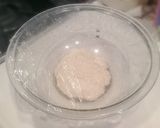
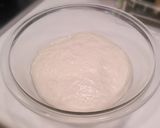
Combine the "A" dry ingredients in a bowl, and use a whisk to mix thoroughly.
- 2
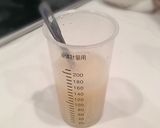
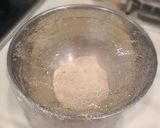
Combine the "B" ingredients in a separate container, and mix well. Adjust the water temperature depending on the room temperature.
- 3
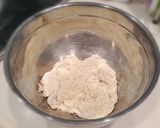
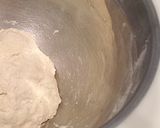
Add the wet ingredients to the dry ingredients, and mix with a spatula until no longer floury. * Repeat the motions of cutting and folding by scraping and pulling the dough from the bottom of the bowl.
- 4
Once the dough reaches the state shown in Step 3 (about 70% combined), use your hands to mix into a ball until the flour is almost completely incorporated.
- 5
For those who are able, use a spatula to gather the dough without using your hands.
- 6
Cover the bowl in plastic wrap or with a shower cap to prevent the dough from drying out, and let it sit for 30 minutes at 20-27℃.
- 7
After 30 minutes, bring the base of the dough over the top and fold four times, each in different directions. I use both my hands and a spatula for this step.
- 8
Bring the dough together, cover in plastic wrap and let it sit for another 30 minutes at 20-27℃. I changed bowls for the sake of clarity, but you may use the same bowl.
- 9
After 30 minutes, stretch and fold (punch down) the dough twice, rotating the dough 90 degrees after the first round, then the dough together.
- 10
Repeat Steps 8-9 a total of 2-3 times.
- 11
After letting the dough rest, punch it down, then knead. Depending on the consistency of the dough, repeat Steps 8-9.
- 12
While it depends on your desired texture, unlike regular bread dough, ideally, the dough for pain rustique should tear apart when pulled apart at a distance.
- 13
After kneading the dough, return it to the bowl, then cover it with plastic wrap or a shower cap.

- 14
While preventing the dough from drying out, allow it to rise either in the refrigerator or in a temperature up to 25℃, as you prefer. If you're in a hurry, place it in the oven on the bread-rising setting at 30℃.
- 15
Rising proportions: 3 times with natural leaven (Hoshino), 2.5 times with dry yeast I mark the height so that I can easily judge the height.
- 16
Rising time: 12 hours or more in the vegetable compartment of the refrigerator (depending on the temperature and amount of yeast) 3 hours or more at room temperature (depending on the room temperature and type of yeast)

- 17
Adjust the rising situation and amount of dry yeast to suit your lifestyle, climate, and desired bread texture.
- 18
Of course, the longer you allow it to rise, the deeper and more delicious the taste.
- 19
While it's a given that bread made with the natural leaven is tasty, dough made with 0.3 g of dry yeast and risen in the vegetable compartment of the refrigerator is very tasty, too.
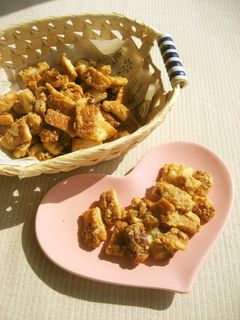
- 20
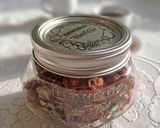
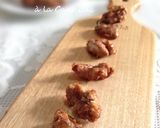
While the bread is rising, prepare the caramelized walnuts. They are easy to make and super delicious even eaten as-is.
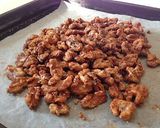
- 21
They are versatile and can also be preserved. The recipe gives an easy-to-make amount, so I recommend using the amounts given.
- 22
With cool dough risen in the refrigerator, remove it when it has risen 80-90 % to desired size, allowing it to finish rising at room temperature.
- 23
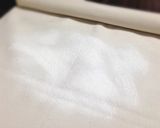
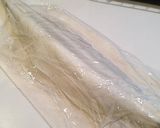
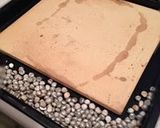
While the bread is rising, prepare a baker's couche (canvas cloth) by dusting it with all-purpose flour. Particularly for very moist dough.
- 24
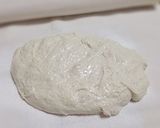
Once the dough is finished rising, use a bench scraper to gently transfer it to the prepared couche. * The dough that was at the bottom of the bowl should now be on top.
- 25
Cover to prevent it from drying, then allow it to rest for 30 minutes. If the temperature is too warm, then set it in the refrigerator for this step.
- 26
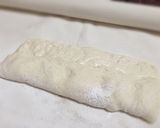
After 30 minutes, stretch the dough into a rectangular sheet about 15 x 25 cm. Do this gently, by lightly pulling on the four corners.
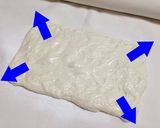
- 27
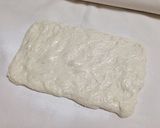
With the heel of your palm, flatten the dough; do not press out the trapped air (only gently and evenly distribute any large bubbles).
- 28
Place desired amount of the caramelized walnuts along the center of the dough.
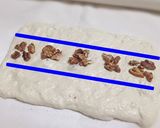
- 29
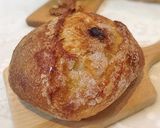
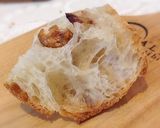
The walnuts should be placed in clusters to be distributed among the desired amount of finished pain rustique loaves.
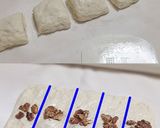
- 30
For even distribution, place a cluster in the center, then a cluster at each end, then place a cluster between the center and end clusters on each side.
- 31
Note: If the caramelized walnuts are exposed on the surface of the dough, they may burn and become bitter.
- 32
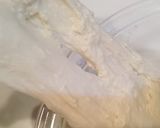
Although it takes some effort, carefully place the walnuts as shown in Steps 29 and 30 to prevent them from spilling out of the center. The photo shows how they should not look.

- 33
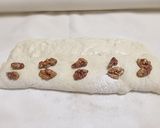
Referring to Step 18, fold the front 1/3 of the dough over the center. *Take care not to press out the air. *Do not press down on the dough more than necessary.
- 34
On top of the folded portion of dough, place a smaller portion of the caramelized walnuts, distributed in the same way as in Steps 29 and 30.
- 35
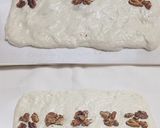
Fold the remaining 1/3 of the dough over the top of the walnuts. In effect, wrapping the caramelized walnuts in the dough by folding it into thirds.
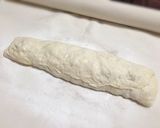
- 36
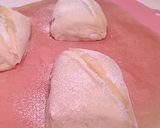
Coat a bench scraper with oil or flour, then divide the dough into 5 equal loaves. * If the seam on the top looks untidy, gently flip them over.
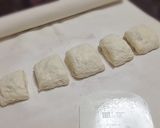
- 37
Place the loaves into a baker's couche with plenty of space in between. To make sure the loaves don't lose shape, gather the edges of the canvas to make walls for the pockets.
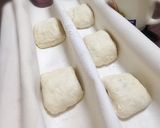
- 38
Gather the edges of the canvas and secure them with a clip or similar device.

- 39
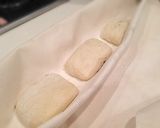
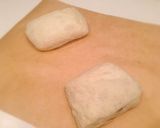
For those who don't have a baker's couche or canvas cloth, arrange the loaves on a sheet of parchment paper instead. The photo in Step 45 shows how the dough looks after baking them on a sheet of parchment paper.
- 40
Allow the dough to rise a second time to 1.5 times in size around 30℃.
- 41
--

- 42
While Steps 37 and 38 instruct to allow 5 loaves to rise, because of my particular my baking conditions, I separated the dough into two loaves.
- 43
To explain, my oven has areas that tend to burn, making it necessary to shift the loaves around while baking, which brings down the oven temperature; that is why I made two loaves instead of five.
- 44
Normally, I would divide the dough in Step 24, let it rest at a different temperatures to adjust the time, but this time, I changed the temperature of the rising time to adjust the time.
- 45
If you're baking conditions are not particular, such as mine, 5 loaves should fit on a single baking tray of a normal oven.
- 46
While waiting for the final proofing, melt the butter. This is a browned butter that I keep a stock of in my freezer.
- 47
Once the second proofing is over, gently place the loaves on parchment paper. The dough is very soft, so I recommend using a bench scraper coated in flour.
- 48
Sprinkle all-purpose flour over the loaves, then slash the tops once or twice.
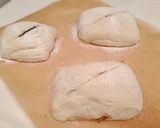
- 49
Since the loaves are as soft as marshmallows, they may be hard to slash, so I recommend dampening your knife and quickly sliding it through.
- 50
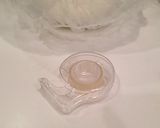
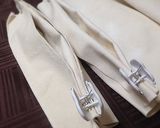
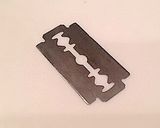
For this recipe, I grip the blade of the knife between my pointer finger and thumb, and slash the tops about 3 mm deep. The photo shows the blade I use.
- 51
Brush the slashed opening with melted butter, then sprinkle on the granulated sugar. I recommend using a generous amount of sugar.
- 52
Before baking, spritz the entire loaf (except for the slashed opening) with water. For those with a steam-oven function, spritz lightly.
- 53
Place the parchment paper on a heat-proof board or thick piece of cardboard. It should be a slippery surface to use to slide the parchment paper into the oven.
- 54
Preheat the oven with the baking tray inside on the maximum temperature setting. Reduce it to 230℃, then slide the loaves onto the baking tray while still placed on the parchment paper.
- 55
Quickly spritz the loaves inside the oven several times, then bake for 15-20 minutes and they're done. The baking time and temperature may vary depending on the oven.
- 56
For steam-oven baking, bake it on the steam-oven setting for 5-10 minutes. After that, bake it without the steam-oven setting for the remaining baking time.
- 57
--
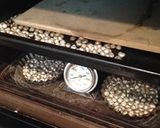
- 58
I lay pie stones at the bottom of my oven (TOSHIBA-ER-A9) with an oven thermometer.
- 59
Turn off the oven, then place a pizza stone (mine is DeLonghi) and pie stones on a baking tray to set in the center rack.
- 60
This is set-up is particular to my oven, which has horizontal air-flow. If your oven has vertical air-flow as shown, do not use this method.

- 61
While letting the loaves rest in Step 25, preheat the oven to 250℃ on hot-air mode. After preheating, set it on regular baking mode.
- 62
Since my oven is old, this is the timing I use for preheating to achieve an oven temperature of about 230℃ when the loaves are ready to bake.
- 63
Place the loaves on the pizza stone with an oven temperature of 230℃ (in my case, with an oven setting of 250℃), pour water over the pie stones in front of the pizza stone to steam-bake.
- 64
Quickly close the oven door, then let it sit for 3 1/2 minutes without turning on the oven to open up the slashed tops and allow the steam to evenly distribute.
- 65
After 3 1/2 minutes, pour 70 ml boiling water over the pie stones on the bottom rack to steam-bake. Turn on the oven.
- 66
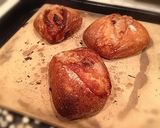
Step 65 should be done very quickly. The oven temperature should now be 180℃. Bake it at 250℃ for 10 minutes.
- 67
After 10 minutes, reduce the oven temperature to 230℃ and remove the parchment paper. After baking for 5 more minutes, they are done.
- 68
For those who have the same model oven as mine, try this method using a DeLonghi pizza stone.
- 69
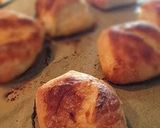
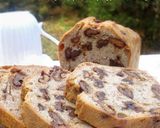
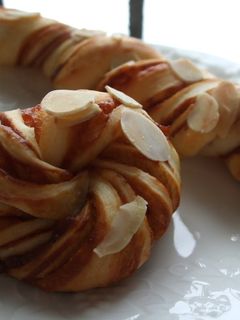
If the slashed tops do not open, or the dough doesn't rise while baking, try using the steam-baking techniques I listed in Steps 63 and 64.
- 70
The sugar tops are nice and crispy with a buttery aroma Biting into the crunchy cinnamon-scented caramelized walnuts is truly delightful.
- 71
Enjoy the combination of the fluffy and chewy dough with a subtle cinnamon scent and the crispy crust.
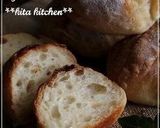
- 72
Even with an old oven, beginners at baking hard bread, like me, can bake a nice pain rustique with a shiny gluten film and various sized air bubbles.
- 73
Even with a high water content, you don't need any experience in bread making to succeed. Give it a try, even if it's your first time.

- 74
I recommend snacking on the cinnamon-scented caramelized walnuts as-is.
- 75
Here is a my recipe for "The Ultimate Walnut Caramel Pound Cake" using Cinnamon-Scented Caramelized Walnuts.
- 76
Here is my easy recipe for "The Ultimate Walnut Caramel Cookies".
https://cookpad.wasmer.app/us/recipes/170277-the-ultimate-walnut-caramel-cookie

- 77
This is the recipe I referred to for my bread doughuser Tan-chan's "Sugar Butter Top Rustique"
- 78
My favorite recipe for natural leaven by user putimiko's recipe for "Hoshino Natural Leaven Starter"
Linked Recipes
Cooksnaps
Did you make this recipe? Share a picture of your creation!

Similar Recipes
-

Pain de Campagne Made With Homemade Bread Starter Pain de Campagne Made With Homemade Bread Starter
I wanted to enjoy a simple bread.The proofing time varies depending on the room temperature and the type and strength of the starter used, so please adjust accordingly. Recipe by Panko625
-

Honey and Cinnamon Sugar-Topped Pull-Apart Bread Made With Natural Homemade Starter Honey and Cinnamon Sugar-Topped Pull-Apart Bread Made With Natural Homemade Starter
This is an egg yolk-less version of"Sugar-topped Honey Bread With Homemade Yeast". I adjusted the amount of milk used in the dough, and topped the loaf with cinnamon sugar.The kneading and rising terms are guidelines only. Since they will vary depending on circumstances, please adjust accordingly. I have used cinnamon sugar as a topping, but a sugar-only topping is delicious, too.If you wrap the bread with plastic, it will stick to the sugar on the top, so I wrap the sides with plastic and put a piece of kitchen parchment paper on top to prevent the bread from drying out. For 1 18 cm [7.1 in] square pan worth. Recipe by Lesser Panda -

Mocha Baguette with Homemade Bread Starter Mocha Baguette with Homemade Bread Starter
When I made a mocha-flavored version of my usual baguettes, they turned out great.Since the rising time depends on the climate, do a 'finger check' to see if the dough has risen enough. (To do the finger check: dip your finger in flour, press down into the center of the dough; it's ready if it leaves a mark. If the dough springs back, it's not finished rising. If the dough shrinks, it has risen too much.) Recipe by Miyanbo -

French Bread with Homemade Bread Starter French Bread with Homemade Bread Starter
I don't like hard bread... but I really love french breads where you can taste the wheat. That's why I decided to make a soft version.Adjust the water content of the bread starter to control the texture of your bread. Recipe by moss green 7 -
With Bread Crusts ✿ Caramel Almond Rusks With Bread Crusts ✿ Caramel Almond Rusks
I received delicious caramel rusks as a souvenir and I wanted to make something similar myself, so I created this recipe ♫Caramel is easy to burn, so be careful. Recipe by chaccoco -

Caramel Bread Pudding Caramel Bread Pudding
I really love Caramel Flan and Bread Pudding, so, how can I enjoy both??? So I made this recipe and turned out fabulous! My family loved it, and left over bread become tastier! 😘😘😘Note:The foil mould size:Diameter: 8.5 cmHeight: 3.5 cmPortion: 4 paxIf you use the same amount of recipe but with bigger tray or bigger mould, make sure to add more time in baking, around 1 hour 10 minutes perhaps (depend to your oven), do the toothpick test to know your bread pudding is well done.
-

Caramel Bread Pudding Caramel Bread Pudding
#MidnightCravingsIf it's all about midnight cravings then what could be tastier than a slice of the chilled creamy pudding ! And whats more ? It's a pudding without eggs that means vegetarians are also welcome to jump over !
-
Brioche Bread Pudding with Caramel Sauce Brioche Bread Pudding with Caramel Sauce
My husband loves bread pudding, and while I have yet to pinpoint the exact awesomeness that is our favorite from a local bakery, I have tweaked various recipes I've come across to settle on this little gem that has become my husband's favorite that I have made. Lol.We know the bakery uses Brioche, so that is now what I use. The bread pudding portion of this is a hugely altered version of a Paula Deen bread pudding. Her recipe called for 2 cups of sugar in the custard to only 3 cups of cubed bread. Like, "WHAT THE WHAT?".The sauce is my version of a caramel sauce recipe I found by Ree Drummond (The Pioneer Woman). Together they made an incredibly delectable dish!You can add nuts and/or raisins if you choose, but we really prefer ours "pure", just bread, custard, and extra sauce. I truly hope you enjoy this as much as we do!
-

Caramel Bread Pudding Caramel Bread Pudding
Being a dessert lover I am always experimenting with different desserts. Here is one of my post-dinner desserts. Bread pudding with my own twist with caramels. Do try out. It's super easy, quick to make and also it will definitely fulfil your sweet cravings as it did mine :D Enjoy!
-

Chocolate and Caramel Stick Bread Chocolate and Caramel Stick Bread
I love caramel cream and make it often. At the same time I baked bread in which to use the caramel cream!Step 5: You don't have be too neat. Just twist quickly.Step 6: I made different shapes. It is an easy dough to work with, so please enjoy your creations. Recipe by La Land -

Caramel Rusks * With Sandwich Bread Caramel Rusks * With Sandwich Bread
It's delicious to eat the crusts from the sandwiches as is, but I wanted to make them caramel flavoured, which my kids love, so I created this recipe.If you think there is not enough caramel sauce, you can add more sugar and butter for your desired amount.I used 3 tablespoons of sugar and 15 g of butter for my family, but this is for my kids so I recommend 6 tablespoons of sugar and 30 g of butter.If you use water instead of milk, the taste will be light. If you use nondairy creamer instead of milk, the taste will be rich. Recipe by *jUN* -
Caramel Flavored Marble Bread Caramel Flavored Marble Bread
Because 10 people made my Chocolate Marble Stick bread, I had the motivation to make marble bread again. This time I made the same dough as the chocolate marble stick bread. (It's been 2 years since I've made this caramel flavored bread...) It's been awhile since I've made marble bread but it's just as delicious as I remember.Please refer to the recipe listed for detailed instructions on how to make the basic sweet bread dough and the caramel fold-in sheet. Recipe by Yukiline
More Recipes

Comments