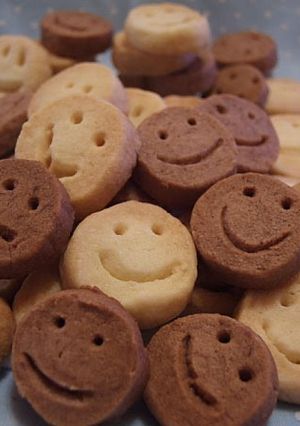
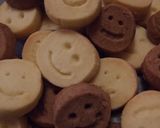
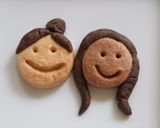
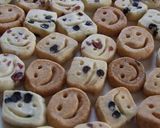
Smiley Face Shortbread
I adapted a recipe I saw in a cookbook I used to read a lot when I was staying overseas for a short time. I tried many recipes, but somehow the dough always came out too crumbly and didn't come together well. But once I added a little milk, the dough became a lot easier to handle.
I added a smiley face because it was cute.
-If the batter is too crumbly, it's difficult to draw on a face, so add milk.
-If you do not have cornstarch, then add the same amount of flour instead.
-It's easier to cut the dough after cooling in the fridge. It'll also easier to draw on the face.
-Adjust the cooling time depending on how big the dough log is. Be careful - it becomes difficult to draw a face once the butter starts melting. Recipe by yummykummy.
Steps
- 1
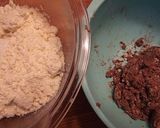
Bring the butter to room temperature, and soften in a bowl. Sift flour and cornstarch together.
- 2
Mix the softened butter lightly, and add sugar and salt to mix in (Just mix lightly until everything is well combined.)
- 3
Add the sifted dry ingredients to the bowl and mix. Add milk (or cream), and mix and knead until it becomes a dough. You can divide the dough in half and add cocoa to one portion if you like.
- 4
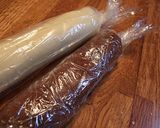
Spread out a sheet of plastic wrap, form the dough into long, thin logs and wrap. Chill in the refrigerator for about an hour (overnight is preferable).
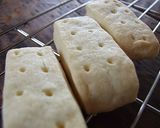
- 5
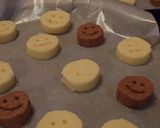
Cut the dough into 1 cm slices, and line up on a baking sheet. Draw faces on the slices using a chopstick and digging rather deeply. (The faces are optional.)
- 6
Bake for 20-25 minutes in a 170℃ (338 Fahrenheit) oven, and it's done! (Adjust the baking time depending on the thickness of the cookies and your oven.)
- 7
I made a version without cornstarch, replacing it with more flour. They came out quite crumbly. These are square-faced.
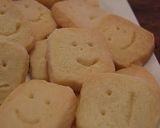
- 8
These are shaped like regular shortbread. Vary the thickness, size, shape... to your taste!
- 9
This is a version with faces with hair.
- 10
Add chopped dried fruit. The fruity acidity is really delicious.
- 11
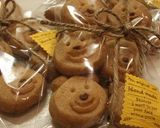
A bear shaped version with cute wrapping!
- 12
Kitty shaped version.

- 13
I used melted chocolate for hair. Straight bangs, side part, parted bangs... there are many variations!

Cooksnaps
Did you know that you can import recipes from anywhere into Cookpad with one click?
https://blog.cookpad.com/us/cookpad-recipe-import-feature-save-recipes-from-anywhere/
Download Cookpad app to plan your meals and store your cooking ideas in one safe place! https://cookpad.wasmer.app/us/download
Keywords
Similar Recipes
More Recipes
-


-


-

Japanese Green Peppers and Enokidake Mushrooms Fry

-

Golden Chicken and Autumn Vegetables

-

Pulao with Sprouted Basmati Rice, Coconut Milk and Vegetables

-

Slow Cooker Spaghetti Bolognese
 Cook1999
 -


-


-


-


-


-

Absolutely Delicious! Authentic Char Siu
-

Very Easy! Crispy Snowball Cookies
-

Healthy Tender "Roast" Chicken Made In a Pressure Cooker
-

Butter-Miso Sautéed White Fish
-

-

-
-

-

rosemary and toasted caraway shortbread

-

-

Cheap to Make : Easy Uiro Traditional Confectionery!
")
 Escabeche")


Comments