CookpadCookpad
Guest
Register or Log In
Save and create recipes, send cooksnaps and more
  • Search
  • Premium
    • Top Cooksnapped Recipes
    • Top Viewed Recipes
  • Premium
  • Challenges
  • FAQ
  • Send Feedback
  • Region
  • Your Collection
Your Collection
To start creating your recipe library, please register or login.
Basic Pizza Dough
Save this recipe to come back to it later.
  • Add Cooksnap
  • Add to folders
  • Print
  • Share
    • Copied!
    • Email
    • Facebook
    • Pin it
    • Twitter
  • Report Recipe
  • See report
  • Edit recipe
  • Delete
CookpadCookpad
A picture of Basic Pizza Dough.

Basic Pizza Dough

cookpad.japan
cookpad.japan @cookpad_jp

I think that kneading flour into dough is the ultimate Slow Food. When I'm leisurely kneading dough on a day off while listening to music, all my daily stress just disappears. The dough will become more delicious too.

The most important thing is to knead the dough thoroughly. Please knead it well for 20 to 30 minutes while listening to music. Just be careful not to knead your iPod into the dough! The other key is to rest the dough in the refrigerator. It will become very easy to flatten out. Recipe by Koba

Read more
Saved
Save this recipe to come back to it later.
Edit recipe
See report
Add to folders
Add CooksnapAdd Cooksnap
ShareShare
  • Copied!
  • Email
  • Facebook
  • Pin it
  • Twitter
PrintPrint
  • PrintPrint
  • Add CooksnapAdd Cooksnap
  • Report Recipe
  • See report
  • Delete
Share
  • Copied!
  • Email
  • Facebook
  • Pin it
  • Twitter
Save this recipe to come back to it later.
  • Add Cooksnap
  • Add to folders
  • Print
  • Report Recipe
  • See report
  • Edit recipe
  • Delete

Ingredients

4 servings
  1. 500 gramsBread (strong) flour
  2. 100 gramsCake flour
  3. 10 gramsDry yeast
  4. 1 tbspSugar
  5. 1/2 tspSalt
  6. 1 tbspSkim milk powder
  7. 2 tbspOlive oil
  8. 300 mlLukewarm water (less than 50 °C)
Cookpad Open in Cookpad App
Saved
Save this recipe to come back to it later.

Steps

  1. 1

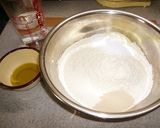
    Measure out the flour, dry yeast, sugar, salt and skim milk powder, and combine in a bowl.

    A picture of step 1 of Basic Pizza Dough.
  2. 2

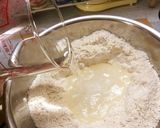
    Make a well in the middle of the flour, and add 90% of the lukewarm water. The water should not be hot to the touch, or the yeast will die.

    A picture of step 2 of Basic Pizza Dough.
  3. 3

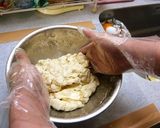
    Mix the contents of the bowl. If you cover your hands with plastic gloves the dough won't stick to them. If the dough is too stiff, add the rest of the lukewarm water. It can be on the stiff side.

    A picture of step 3 of Basic Pizza Dough.
  4. 4

    Mix in the olive oil. Knead the dough until it cleanly comes off the sides of the bowl (about 5 minutes).

    A picture of step 4 of Basic Pizza Dough.
  5. 5

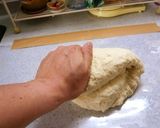
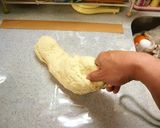
    Knead the dough on a work surface. I use a thick (3 mm) vinyl sheet as a kneading surface. Fold the dough towards you as you knead.

    A picture of step 5 of Basic Pizza Dough.
  6. 6

    Knead, or bash the dough on the work surface (it's great for releasing stress). Get rid of your stress for 20 minutes.

    A picture of step 6 of Basic Pizza Dough.
  7. 7

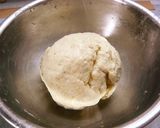
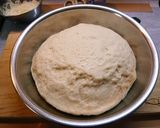
    When the dough is silky smooth and bouncy, the kneading is done. Leave to rise (1st rising) in a 37°C oven for about 1 hour.

    A picture of step 7 of Basic Pizza Dough.
  8. 8

    When the dough has about doubled in volume, the 1st rising is done. The rising time will vary depending on the season (temperature, humidity). It should double approximately in volume.

    A picture of step 8 of Basic Pizza Dough.
  9. 9

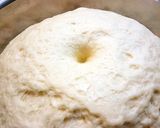
    Poke the dough with your index finger, to make sure the hole doesn't fill back up. Apparently this is called the "finger test". If the hole fills up, let the dough rise a bit more.

    A picture of step 9 of Basic Pizza Dough.
  10. 10

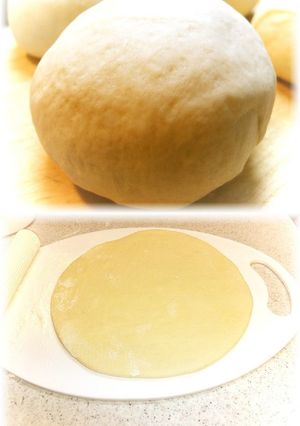
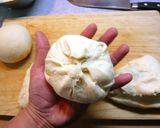
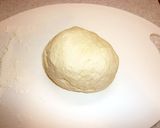
    Cut the dough into 4 portions with a pastry scraper (or a knife). Round off each portion of dough, so that they have a smooth, taut surface (rather like steamed buns).

    A picture of step 10 of Basic Pizza Dough.
  11. 11

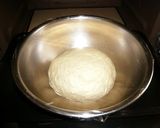
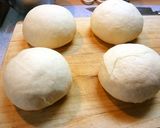
    Roll the dough balls on a work surface to make their surfaces really smooth.

    A picture of step 11 of Basic Pizza Dough.
  12. 12

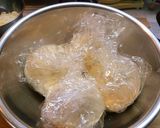
    (This is a key point) Rest the dough in the refrigerator. Wrap each ball of dough in plastic wrap, and rest for at least 2 hours (or up to half a day).

    A picture of step 12 of Basic Pizza Dough.
  13. 13

    Even in the refrigerator, the dough will rise in residual heat. Press down lightly to deflate the dough, and round off the dough again using bread flour (not listed) to dust your work surface.

    A picture of step 13 of Basic Pizza Dough.
  14. 14

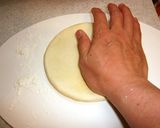
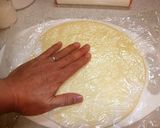
    Press each dough ball out with the fat part of your palm into a circle. Since the dough has rested in the refrigerator, it will be very easy to flatten.

    A picture of step 14 of Basic Pizza Dough.
  15. 15

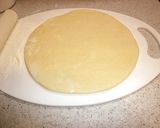
    You can flatten it to about 7-8 mm in thickness just using your hands, but use a rolling pin to make it about 5 mm thick. Make sure to keep the dough circular.

    A picture of step 15 of Basic Pizza Dough.
  16. 16

    Cover the dough circle with one of the pieces of plastic wrap you used to wrap the balls. Stroke with your hands to shape and smooth out the dough.

    A picture of step 16 of Basic Pizza Dough.
  17. 17

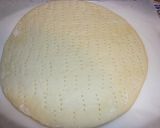
    Poke several holes in the dough with a fork to finish. Stab it repeatedly, but gently! The basic pizza crust is done.

    A picture of step 17 of Basic Pizza Dough.
Saved
Save this recipe to come back to it later.
Edit recipe
See report
Add to folders
Add CooksnapAdd Cooksnap
ShareShare
  • Copied!
  • Email
  • Facebook
  • Pin it
  • Twitter
PrintPrint
  • PrintPrint
  • Add CooksnapAdd Cooksnap
  • Report Recipe
  • See report
  • Delete

Cooksnaps

Saved
Save this recipe to come back to it later.
  • Add Cooksnap
  • Add to folders
  • Print
  • Share
    • Copied!
    • Email
    • Facebook
    • Pin it
    • Twitter
  • Report Recipe
  • See report
  • Edit recipe
  • Delete

Copied!

cookpad.japan
cookpad.japan @cookpad_jp
on March 03, 2014 06:45

Did you know that you can import recipes from anywhere into Cookpad with one click?
https://blog.cookpad.com/us/cookpad-recipe-import-feature-save-recipes-from-anywhere/

Download Cookpad app to plan your meals and store your cooking ideas in one safe place! https://cookpad.wasmer.app/us/download

Read more

Comments

Guest
Add a comment
0/0

Similar Recipes

More Recipes

  1. A picture of Gavar ki Sabji.

    Gavar ki Sabji

    Shilpa Shah Shilpa Shah
  2. A picture of Crunchy Granola.

    Crunchy Granola

    evamamo evamamo
  3. A picture of Smashing Pumpkin Cocktail.

    Smashing Pumpkin Cocktail

    Cluelesskitty Cluelesskitty
  4. A picture of Garlic-Lemon Pepper Chicken Wings.

    Garlic-Lemon Pepper Chicken Wings

    Sarvat Hanif Sarvat Hanif
  5. A picture of Coffee and Hazelnut No Churn Ice Cream.

    Coffee and Hazelnut No Churn Ice Cream

    Rianne Van setten Rianne Van setten
  6. A picture of Mix Vegetable. Kofta in Tomato Gravy.

    Mix Vegetable. Kofta in Tomato Gravy

    Hetal Poonjani Hetal Poonjani
  7. A picture of Keto Green Tea with Lemon and Hibiscus.

    Keto Green Tea with Lemon and Hibiscus

    Ryan Ryan
  8. A picture of Castella Cake.

    Castella Cake

    Isabel Isabel
  9. A picture of Keto black tea with hibiscus.

    Keto black tea with hibiscus

    Ryan Ryan
  10. A picture of Spiced Chai (Cooking With Spice Cookbook).

    Spiced Chai (Cooking With Spice Cookbook)

    Cluelesskitty Cluelesskitty
  11. A picture of Cheddar Chicken Casserole.

    Cheddar Chicken Casserole

    Nikki Zazz Nikki Zazz
  12. A picture of Taylor's Family Favorite Fried Rice.

    Taylor's Family Favorite Fried Rice

    Taylor Topp Comacho Taylor Topp Comacho
  13. A picture of low calorie teriyaki chicken drumsticks.

    low calorie teriyaki chicken drumsticks

    jasmine82 jasmine82
  14. A picture of Parmesan Zucchini & Squash.

    Parmesan Zucchini & Squash

    Kristy Kristy
  15. A picture of Pork Chops and Scalloped Potatoes.

    Pork Chops and Scalloped Potatoes

    fenway fenway
  16. A picture of Italian Bread-Style Okara Bread.

    Italian Bread-Style Okara Bread

    cookpad.japan cookpad.japan
  17. A picture of A Healthier Breakfast: Tofu Banana Oatmeal.

    A Healthier Breakfast: Tofu Banana Oatmeal

    cookpad.japan cookpad.japan
  18. A picture of "Cottage Cheese" from Soy Milk.

    "Cottage Cheese" from Soy Milk

    cookpad.japan cookpad.japan
  19. A picture of Macrobiotic Baked Rice Bran & Natto Dumplings.

    Macrobiotic Baked Rice Bran & Natto Dumplings

    cookpad.japan cookpad.japan
  20. A picture of Mike's Quick 6 lb Party Wing Pack.

    Mike's Quick 6 lb Party Wing Pack

    MMOBRIEN MMOBRIEN
  21. A picture of Taylor's Family Favorite Fried Rice.

    Taylor's Family Favorite Fried Rice

    Taylor Topp Comacho Taylor Topp Comacho
  22. A picture of High Protein Chickpea Curry.

    High Protein Chickpea Curry

    cookpad.japan cookpad.japan
  23. A picture of Macrobiotic White Miso Cauliflower Soup.

    Macrobiotic White Miso Cauliflower Soup

    cookpad.japan cookpad.japan
  24. A picture of Clams Casino Over Linguine.

    Clams Casino Over Linguine

    Taylor Topp Comacho Taylor Topp Comacho
  25. A picture of Meat-free Chickpea Gyoza.

    Meat-free Chickpea Gyoza

    cookpad.japan cookpad.japan
https://cookpad.wasmer.app/us/recipes/154179
Cookpad Open in Cookpad App

About Us

Our mission at Cookpad is to make everyday cooking fun, because we believe that cooking is key to a happier and healthier life for people, communities and the planet. We empower home cooks all over the world to help each other by sharing their recipes and cooking experiences.

Subscribe to Premium for exclusive features & benefits!

Cookpad Communities

🇺🇸 United States 🇬🇧 United Kingdom 🇪🇸 España 🇦🇷 Argentina 🇺🇾 Uruguay 🇲🇽 México 🇨🇱 Chile 🇻🇳 Việt Nam 🇹🇭 ไทย 🇮🇩 Indonesia 🇫🇷 France 🇸🇦 السعودية 🇹🇼 臺灣 🇮🇹 Italia 🇮🇷 ایران 🇮🇳 India 🇭🇺 Magyarország 🇳🇬 Nigeria 🇬🇷 Ελλάδα 🇲🇾 Malaysia 🇵🇹 Portugal 🇺🇦 Україна 🇯🇵 日本 See All

Learn More

Cookpad Premium Careers Feedback Blog Terms of Service Community Guidelines Privacy Policy Frequently Asked Questions

Download our app

Open Cookpad App on Google Play Open Cookpad App on App Store
Copyright © Cookpad Inc. All Rights Reserved
close