CookpadCookpad
Guest
Register or Log In
Save and create recipes, send cooksnaps and more
  • Search
  • Premium
    • Top Cooksnapped Recipes
    • Top Viewed Recipes
  • Premium
  • Challenges
  • FAQ
  • Send Feedback
  • Region
  • Your Collection
Your Collection
To start creating your recipe library, please register or login.
Hand-Kneaded Chocolate Danish
Save this recipe to come back to it later.
  • Add Cooksnap
  • Add to folders
  • Print
  • Share
    • Copied!
    • Email
    • Facebook
    • Pin it
    • Twitter
  • Report Recipe
  • See report
  • Edit recipe
  • Delete
CookpadCookpad
A picture of Hand-Kneaded Chocolate Danish.

Hand-Kneaded Chocolate Danish

cookpad.japan
cookpad.japan @cookpad_jp

Out of every type of bread, danishes are my favorite. I can't make enough of this chocolate danish combination.

Fold -> Roll out -> Chill...This process takes time but don't rush! Chilling it will let it roll out easier.
Once the butter has melded into the dough, the folding process is finished. This makes the dough have nice layers when baked.
When placing in the refrigerator, please wrap it with plastic wrap. For 6 danishes. Recipe by mei kitchen

Read more
Saved
Save this recipe to come back to it later.
Edit recipe
See report
Add to folders
Add CooksnapAdd Cooksnap
ShareShare
  • Copied!
  • Email
  • Facebook
  • Pin it
  • Twitter
PrintPrint
  • PrintPrint
  • Add CooksnapAdd Cooksnap
  • Report Recipe
  • See report
  • Delete
Share
  • Copied!
  • Email
  • Facebook
  • Pin it
  • Twitter
Save this recipe to come back to it later.
  • Add Cooksnap
  • Add to folders
  • Print
  • Report Recipe
  • See report
  • Edit recipe
  • Delete

Ingredients

  1. 200 gramsBread (strong) flour
  2. 1 tspInstant dry yeast
  3. 120 mlMilk
  4. 3 tbspSugar
  5. 1/2 tspSalt
  6. 20 gramsButter
  7. 80 gramsButter insert sheet
  8. 1Chocolate bar
  9. 1 dashMilk for glazing
Cookpad Open in Cookpad App
Saved
Save this recipe to come back to it later.

Steps

  1. 1

    Thinly spread out the butter insert sheet on top of plastic wrap (20 cm x 20 cm), cover with the wrap and place in the refrigerator.

    A picture of step 1 of Hand-Kneaded Chocolate Danish.
  2. 2

    Mix the sugar into the milk and warm in the microwave for 40 seconds to dissolve the sugar. (It should be warm to the touch. Adjust the time according to your microwave.)

  3. 3

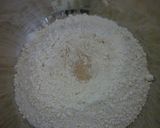
    Put the flour into a bowl, hollow out the center, and add in the yeast. Put the salt around the edges. (Don't let the yeast and salt touch).

    A picture of step 3 of Hand-Kneaded Chocolate Danish.
  4. 4

    Pour the Step 2 milk onto the yeast and mix in with the flour. Mix the salt in last.

  5. 5

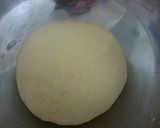
    When it has all come together, remove from the bowl, mix in the butter, and knead.

  6. 6

    It'll be sticky at first, but as you continue kneading, it will become glossy and smooth. Please knead for at least 15 minutes.
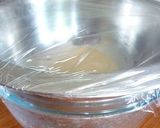
    A picture of step 6 of Hand-Kneaded Chocolate Danish.
  7. 7

    First Rising. I use this method: Put boiling water into a bowl. Suspend the bowl with the bread dough over the hot water bowl. Cover with wrap and put it in the microwave.

    A picture of step 7 of Hand-Kneaded Chocolate Danish.
  8. 8

    Don't let the hot water touch the bread dough bowl. If the water cools off during the rising, it's okay to replace it with more boiling water.

  9. 9

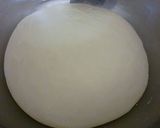
    After about 45 minutes, the dough will have risen about 2 or 3x the original size. The amount of time depends on the temperature and atmosphere, so if it's doesn't rise well, just keep waiting.

    A picture of step 9 of Hand-Kneaded Chocolate Danish.
  10. 10

    If you push a finger into the dough and it doesn't bounce back, then the first rising is complete. Remove the gas and flatten out the dough.
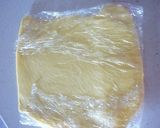
    A picture of step 10 of Hand-Kneaded Chocolate Danish.
  11. 11

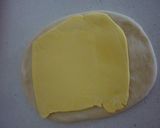
    Spread out until a little bit large than the butter insert sheet. Place the butter sheet onto the dough, as shown in the photo, and fold into three layers. Place in the refrigerator for 5 minutes.

    A picture of step 11 of Hand-Kneaded Chocolate Danish.
  12. 12

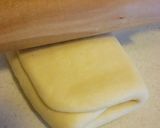
    Remove from the refrigerator and roll it out (leaving the three layers), and fold it into three layers again. Place in the refrigerator for another 5 minutes. Repeat this process 4-5 times.

    A picture of step 12 of Hand-Kneaded Chocolate Danish.
  13. 13

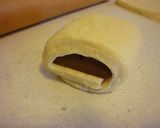
    Lastly, roll out the dough to a thickness of about 5 mm and separate into 6 oblong shapes. Put the chocolate onto the dough and wrap it up, placing the edge of the dough on the bottom.

    A picture of step 13 of Hand-Kneaded Chocolate Danish.
  14. 14

    Let rise a second time (30 minutes). I use this method: Place on a baking tray, lightly spray the surfaces with water, and cover lightly with a large plastic bag.

  15. 15

    Place into an oven warmed to 40°C and let rise until the dough is twice the original size.

  16. 16

    Coat the surfaces with milk and bake for 15-20 minutes in a 180°C oven, then they are done.

Saved
Save this recipe to come back to it later.
Edit recipe
See report
Add to folders
Add CooksnapAdd Cooksnap
ShareShare
  • Copied!
  • Email
  • Facebook
  • Pin it
  • Twitter
PrintPrint
  • PrintPrint
  • Add CooksnapAdd Cooksnap
  • Report Recipe
  • See report
  • Delete

Cooksnaps

Saved
Save this recipe to come back to it later.
  • Add Cooksnap
  • Add to folders
  • Print
  • Share
    • Copied!
    • Email
    • Facebook
    • Pin it
    • Twitter
  • Report Recipe
  • See report
  • Edit recipe
  • Delete

Copied!

cookpad.japan
cookpad.japan @cookpad_jp
on January 29, 2014 01:01

Did you know that you can import recipes from anywhere into Cookpad with one click?
https://blog.cookpad.com/us/cookpad-recipe-import-feature-save-recipes-from-anywhere/

Download Cookpad app to plan your meals and store your cooking ideas in one safe place! https://cookpad.wasmer.app/us/download

Read more

Comments

Guest
Add a comment
0/0

Similar Recipes

More Recipes

  1. A picture of Cow Patties, aka Chocolate Peanut Butter Oatmeal Cookies.

    Cow Patties, aka Chocolate Peanut Butter Oatmeal Cookies

    Hailey Debity Hailey Debity
  2. A picture of Guvar besan sabji.

    Guvar besan sabji

    pinal Patel pinal Patel
  3. A picture of Brad's Schnitzel Oscar Burger.

    Brad's Schnitzel Oscar Burger

    wingmaster835 wingmaster835
  4. A picture of Mango Lassi.

    Mango Lassi

    Pabi Chettri Pabi Chettri
  5. A picture of Aam panna shots.

    Aam panna shots

    chef Nidhi Bole chef Nidhi Bole
  6. A picture of Lemon Dal/ Lemon Tuwar Dal For Summer.

    Lemon Dal/ Lemon Tuwar Dal For Summer

    Navnita Jaiswal Navnita Jaiswal
  7. A picture of Mango Lassi.

    Mango Lassi

    Beena Radia Beena Radia
  8. A picture of Diet, Date biscuits 🫓 🫓.

    Diet, Date biscuits 🫓 🫓

    Kulsoom Bukhari Kulsoom Bukhari
  9. A picture of Mango popsicle.

    Mango popsicle

    Laju Gehani Laju Gehani
  10. A picture of Lemon Chaska Cooler Recipe.

    Lemon Chaska Cooler Recipe

    Namrata sarmah Namrata sarmah
  11. A picture of Crockpot Stuffed Peppers.

    Crockpot Stuffed Peppers

    April Burnes April Burnes
  12. A picture of Roasted pork butt roast.

    Roasted pork butt roast

    alisha alisha
  13. A picture of Tinklee's Butterscotch Bars.

    Tinklee's Butterscotch Bars

    tinklee tinklee
  14. A picture of Oreo Truffles.

    Oreo Truffles

    Kelly O'Dell Kelly O'Dell
  15. A picture of Just for my Men Awesome Steak.

    Just for my Men Awesome Steak

    Nikki Zazz Nikki Zazz
  16. A picture of Rachael Ray's Super Sloppy Joes.

    Rachael Ray's Super Sloppy Joes

    Angela Angela
  17. A picture of Best Combination! Shaved Ice.

    Best Combination! Shaved Ice

    cookpad.japan cookpad.japan
  18. A picture of Easy Sushi Vinegar for Storing.

    Easy Sushi Vinegar for Storing

    cookpad.japan cookpad.japan
  19. A picture of Shepherd's pie with sweet potatoes.

    Shepherd's pie with sweet potatoes

    Wm Glesener Wm Glesener
  20. A picture of Sublime Grated Onion Sauce.

    Sublime Grated Onion Sauce

    cookpad.japan cookpad.japan
  21. A picture of Scrambled Eggs a la Genovese.

    Scrambled Eggs a la Genovese

    cookpad.japan cookpad.japan
  22. A picture of Toast a la Genovese.

    Toast a la Genovese

    cookpad.japan cookpad.japan
  23. A picture of Feather-light and Gently Flavored Strawberry Bread.

    Feather-light and Gently Flavored Strawberry Bread

    cookpad.japan cookpad.japan
  24. A picture of Fig Compote.

    Fig Compote

    cookpad.japan cookpad.japan
  25. A picture of Easy Cheese and Black Pepper Folded Bread.

    Easy Cheese and Black Pepper Folded Bread

    cookpad.japan cookpad.japan
https://cookpad.wasmer.app/us/recipes/170564
Cookpad Open in Cookpad App

About Us

Our mission at Cookpad is to make everyday cooking fun, because we believe that cooking is key to a happier and healthier life for people, communities and the planet. We empower home cooks all over the world to help each other by sharing their recipes and cooking experiences.

Subscribe to Premium for exclusive features & benefits!

Cookpad Communities

🇺🇸 United States 🇬🇧 United Kingdom 🇪🇸 España 🇦🇷 Argentina 🇺🇾 Uruguay 🇲🇽 México 🇨🇱 Chile 🇻🇳 Việt Nam 🇹🇭 ไทย 🇮🇩 Indonesia 🇫🇷 France 🇸🇦 السعودية 🇹🇼 臺灣 🇮🇹 Italia 🇮🇷 ایران 🇮🇳 India 🇭🇺 Magyarország 🇳🇬 Nigeria 🇬🇷 Ελλάδα 🇲🇾 Malaysia 🇵🇹 Portugal 🇺🇦 Україна 🇯🇵 日本 See All

Learn More

Cookpad Premium Careers Feedback Blog Terms of Service Community Guidelines Privacy Policy Frequently Asked Questions

Download our app

Open Cookpad App on Google Play Open Cookpad App on App Store
Copyright © Cookpad Inc. All Rights Reserved
close