


Candy Eyes (Made from Royal Icing) 👀

Edible candy eyes come in handy for all sorts of fun projects. However, they can be a little expensive. I saw a small package at my local supermarket for almost $7.00 the other day!
I found a recipe online that looked pretty easy, and since I already had all of the ingredients and equipment, I gave it a try. I’m pleased to say that the consistency and taste of these homemade eyes are much better than the store-bought version!!
This recipe came from Sarah‘s Bake Studio
Candy Eyes (Made from Royal Icing) 👀
Edible candy eyes come in handy for all sorts of fun projects. However, they can be a little expensive. I saw a small package at my local supermarket for almost $7.00 the other day!
I found a recipe online that looked pretty easy, and since I already had all of the ingredients and equipment, I gave it a try. I’m pleased to say that the consistency and taste of these homemade eyes are much better than the store-bought version!!
This recipe came from Sarah‘s Bake Studio
 Open in Cookpad App
Steps
- 1
Assemble your ingredients.

- 2
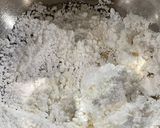
Combine all the ingredients in a big bowl.
- 3
Use a hand mixer to beat on medium speed for 10 minutes until stiff peaks form.


- 4
Add water about half a teaspoon at a time until the icing thins.
This can be a little bit tricky. You want to achieve what is considered “15 second icing”. That means when you run a knife through the icing, it takes about 15 seconds for the surface of the icing to reform.

- 5
Place about 1/3 of the icing into a separate bowl, and add black food coloring until it achieves a nice, dark color. You may not get pure black, but try to get something close.

- 6
Prepare the piping bags by placing the tips into two separate bags, then standing them upright in glasses, so that they can be filled.
Put the white icing into the bag with the #2 tip, and put the black icing into the bag with the#1 tip.
- 7
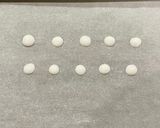
Pipe small white circles onto the surface of the parchment paper on top of the cookie sheet. You can make any size or shape that you prefer. Keeping the dots relatively small will allow them to dry more quickly and thoroughly.

- 8
Immediately follow up with the black icing. Pipe small black dots on the eyes. You want to do this while the white icing is still wet, so only work in batches of 10 to 12 eyes at a time until you get the hang of it.

- 9
Keep going! This is fun! Make more! 👀

- 10
Make a LOT more. 👀 👀👀

- 11
Let the eyes dry overnight. Check to see if they are dry enough and give them more drying time if necessary.
Store the eyes in a sealed container at room temperature. They will be good for at least 6 months, and probably longer than that.Put them on all kinds of things! Pancakes, cookies, cupcakes, rice crispy treats, candy, fruit!

- 12



Keywords
Similar Recipes
More Recipes
-


-

Sweet sour refreshing fruit salad

-


-


-


-


-

✨ Creamy Malai Potato Kofta Curry 🥔🤍 | Soft Koftas in Rich Silky Gravy

-


-

 Shelley Ford
 -


-


-
Homemade Garam masala/ mix masala powder

-

Baby potatoes kashmiri dum aloo

-

Stir Fried Beef Noodles (乾炒牛河)

-


-


-

Navaratri Special Sago and Bhagar Thalipith with chatani
-


-


-













Comments (9)