How To Make Vegan Kimchi
To be honest, I have never really tried Korean cuisine, even tho my eldest daughter is a huge Korean fan. Yes, she watches Korean drama and idolizes K-Pop groups. When she heard that I will make some Korean dishes for the month of October, she jumped with joy. So, what made me decided to make some Korean recipes?
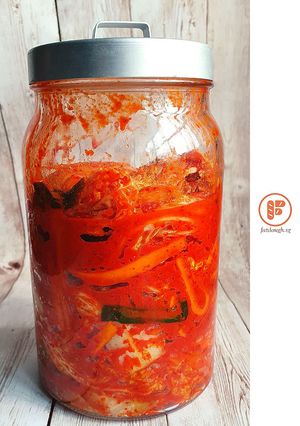
I received a jar of Korean chili sauce from @chillibellasg and I thought this would be a great chance for me to explore uncharted territory: Korean cuisine. What better way to kickstart this series than this humble vegan kimchi? Making kimchi really does takes a bit of time and effort, but, I guarantee, the end results will make all that sweat worthwhile.
If you are wondering what kinda recipes go well with kimchi, you can check out @IzzyPreps website. I still dream of her Kimchi Grilled Cheese Sandwich.
How To Make Vegan Kimchi
To be honest, I have never really tried Korean cuisine, even tho my eldest daughter is a huge Korean fan. Yes, she watches Korean drama and idolizes K-Pop groups. When she heard that I will make some Korean dishes for the month of October, she jumped with joy. So, what made me decided to make some Korean recipes?
I received a jar of Korean chili sauce from @chillibellasg and I thought this would be a great chance for me to explore uncharted territory: Korean cuisine. What better way to kickstart this series than this humble vegan kimchi? Making kimchi really does takes a bit of time and effort, but, I guarantee, the end results will make all that sweat worthwhile.
If you are wondering what kinda recipes go well with kimchi, you can check out @IzzyPreps website. I still dream of her Kimchi Grilled Cheese Sandwich.
Cooking Instructions
- 1
Peel and discard the outer layer of the cabbage.
Peel and wash each cabbage layer thoroughly.
Lay layers of cabbage onto a clean plate.
Sprinkle some salt over the top.
Place another layer of cabbage over the top.
- 2
Pressing as you stack.
Repeat the process until all the layers of cabbage are stacked and seasoned.
Set aside for 30 mins.
While the cabbage is resting, add soy sauce, sugar, pineapple juice and water into a bowl.
- 3
Stir until well combine or until the sugar has dissolved.
Add ginger, garlic, onion and chili flakes into a blender.
Add in the soy sauce mixture as well.
Blitz until smooth.
Transfer into a bowl and set aside.
The cabbage should have rested for 30 mins.
- 4
Before touching the cabbage, make sure your hands are thoroughly cleaned.
Flip the layers of cabbage onto another clean plate.
Sprinkle with salt, pressing and stacking.
Repeat the process with the remaining layers of cabbage.
Set aside to rest for 30 mins.
- 5
This is the 2nd flip. There will be a total of 4 flips.
While the cabbage is resting, prepare the carrot and scallions.
Toss the carrot and scallions with the chili mixture, making sure they are well coated.
Set aside.
It should be time for the 3rd flip, season, press and stack.
Set aside to rest for 30 mins.
- 6
While the cabbage is resting, sterilize the jars and lids in simmering water for 5 mins.
It should be time for the 4th and last flip, season, press and stack.
Set aside to rest for 30 mins.
You can wash the dishes while waiting.
After 30 mins, wash each layer of cabbage thoroughly under running water to remove excess salt.
- 7
You can pad the cabbage dry with kitchen paper, but I prefer to place them onto plates and allow them to air dry naturally. It will take about 2 hrs, flipping halfway thru.
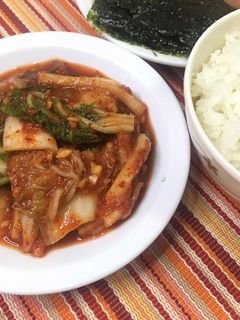
Once the cabbage has dried, transfer the carrot and scallions chili mixture into a large mixing bowl.
Toss in 2 layers of cabbage.
- 8
Coat each layer well with the chili mixture.
Repeat the process for the remaining layers of cabbage.
Transfer into the sterilized jars. Press with the back to a spoon to compact the kimchi.
Sealed and set aside in a cool and dry place for 24 hrs.
- 9
After 24 hrs, remove the lid and using the back of a spoon, press and compact.
If bubbles start to form, it is a good indication that it is fermenting well and there is still room to press and compact.
Seal and keep in a cool and dry place.
- 10
Repeat this process every 24 hrs up to a total of 72 hrs or 1 week.
The longer you allow it to ferment, the tangier and flavorful the tastes will be.
Once you are satisfied with the taste, chill and keep in the fridge.
It can be kept for up to 1 to 2 months.
Be sure to use clean utensils to consume the kimchi.
- 11
Here's the difference between 72 hrs and 7 days aged:
The 7 days aged kimchi is definitely far superior in terms of flavors and aftertaste. But, it might too overpowering. The 72 hrs aged kimchi does has that tanginess and spiciness. It will be perfect if the kimchi isn't the star of the dish.

Cooksnaps
Did you make this recipe? Share a picture of your creation!

Similar Recipes
-

Vegan kimchi Vegan kimchi
Real kimchi contains fish product, but I wanted to make easy vegan version, and it turned out so good. Earth
Earth -

Vegan Kimchi Vegan Kimchi
Vegans and vegetarians can enjoy this Kimchi because there is no animal products in it. Follow this easy recipe and l am sure you’ll enjoy your flavourful Kimchi! Please avoid using stainless steel bowls when you are preparing chilli paste and combining all ingredients.YouTube https://youtu.be/mz_F1SFTk14
-

Vegan kimchi Vegan kimchi
This is my ex mother in law recipe korean I just took out the tiny shrimps and burying it in the ground for a month. True Story
-

Homemade Kimchi Homemade Kimchi
Kimchi is a Korean dish made from napa cabbage, chili flakes, garlic, ginger, and fish sauce. It’s spicy, tangy, and full of flavor, thanks to the fermentation process. Kimchi is usually served as a side dish but can also be added to other meals. It’s not only tasty but also good for your digestion because of the probiotics it contains. It’s a key part of Korean cuisine and a must-try for anyone who loves bold flavors! Enjoy!
-
Homemade Kimchi Homemade Kimchi
On my first try, it was a fail. But on my second try, it was a success!🥳And it was perfect!😍😋 Try it and add it to your plan😉
-

Easy Kimchi Easy Kimchi
I fell in love with kimchi but always in doubt whether it's halal or not. Found a video by korean cook, maangachi. Her portion is quite big, so i had reduced the measurement coz i just do it for 1 cabbage only
-

Korean Kimchi Korean Kimchi
I . LOVE . KIMCHI it’s so basic in the Korean culture and it’s delicious, I made some myself , it takes some time but it’s so worth it .... want kimchi try this out 🥬
-

My Simple Kimchi Recipe My Simple Kimchi Recipe
I absolutely love kimchi and can eat it with every meal. Store-bought kimchi is quite expensive, but making it at home isn't too costly, so if you're willing to spend an afternoon making it, you can have enough to last almost a month. I've made kimchi many times, but this is the recipe I use most often!The time for soaking the napa cabbage in salt water is included in the total cooking time!Make sure to prepare a large container with a tight-fitting lid to store the kimchi. To prevent it from becoming too sour, I open the container once a week to take out a portion to use. Avoid opening the container frequently.Depending on the temperature, the fermentation speed of the kimchi can vary, so you can adjust the amount of rice flour accordingly. Too much rice flour will cause it to ferment very quickly!
 Translated from Cookpad Vietnam
 -

Korean Kimchi Korean Kimchi
This recipe is for homemade Korean Kimchi. Kimchi is a traditional Korean side dish made from salted and fermented vegetables such as napa cabbage seasoned with gochugaru or Korean chili powder, spring onions, garlic, fish sauce, and more. It is a staple in Korean cuisine and has been well-received by many nationalities.Recipe by: HomebasedChefVideo: youtu.be/Rd2GwCmkQeg
-

Authentic Kimchi Authentic Kimchi
I learned how to make kimchi from 2 Korean friends. Each version tasted different, so I combined the best of both to come up with my own version.Brine the Chinese cabbage in salt properly beforehand.The ingredients will keep for more than a month in the refrigerator, so even if you don't use them all up in one batch, if you make another batch before the previous one is eaten up you can alway enjoy delicious kimchi.Dice some daikon radish, salt it for a little while, and mix with these ingredients to make ggakdugi pickles. Great for kimchi hot pots! Recipe by takaya. (This recipe uses 2 heads of Chinese cabbage.)
-

Homemade Radish Kimchi Homemade Radish Kimchi
If you love kimchi but want something extra crunchy, Radish Kimchi (Kkakdugi, 깍두기) is a great choice! The crisp radish soaks up all the spicy, garlicky flavors as it ferments, making it super refreshing and addictive. It’s easy to make and goes perfectly with rice, stews, or even on its own. The best part? It gets better with time! Enjoy! -

Storeable Homemade Cabbage Kimchi Storeable Homemade Cabbage Kimchi
After many attempts, I finally found my own perfect flavor.You can also use fish sauce or ami no shiokara, but this is the easiest and most delicious seasoning.If the kimchi is too soupy, add some katakuriko (potato starch) to the hot water.I like it just like this. Recipe by ca1219

More Recipes

Comments (2)