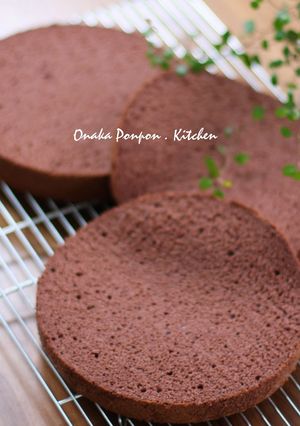
Fluffy and Moist Chocolate Sponge Cake
I arranged my fluffy and soft plain sponge cake to make this chocolate sponge. I added honey and starch syrup, and adjusted the amount of fat so as to make a fluffy and moist, but not dry sponge cake.
You have to beat the eggs well, but do not beat too much. After that, the texture must be made fine with a hand mixer at a lower-speed. Fold in the mixture using a spatula with a cutting motion and rotate your bowl against the direction of the spatula. Do not over-mix but make sure the cocoa liquid is combined evenly. After mixing, the volume of the batter may drop, but do not worry. When it bakes, it will rise. Recipe by Lesser Panda
Cooking Instructions
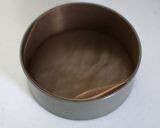
- 1
Prepare the cake tin. Grease the tin with oil thinly and line with baking parchment. I cut a piece of parchment paper into a round shape to fit it in. Measure the ingredients.
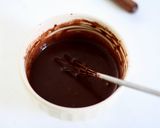
- 2
Put the ☆ ingredients into a heat-proof dish and warm them up. Add the pure cocoa powder and mix well. To keep hot, place the dish over a bain-marie or on top of the oven while it's preheating.
- 3
Preheat the oven to 170°C. I usually start to preheat the oven while I whisk the eggs.
- 4
Beat 3 eggs and 1/2 and add the sugar in 3 batches. Continue to beat until fluffy. Add the mizuame starch syrup (or honey) to the mixture.
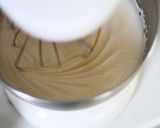
- 5
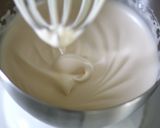
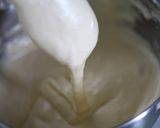
Beat until the mixture forms a thick ribbon when the hand mixer is lifted. Lower the hand mixer speed to low and beat the mixture for 3 to 5 minutes to make its texture silky-smooth.
- 6
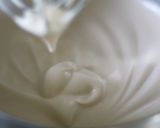
Beat constantly until the mixture forms a thin ribbon that disappears slowly when the mixer is lifted. The texture must be very smooth and delicate.
- 7
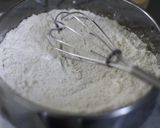
Sift the cake flour and cornstarch together through a fine sieve. Whisk the flour mixture in the sieve with a whisk.
- 8
Sift 1/2 of the Step 7 flour mixture into Step 6 and mix gently with a spatula. When the flour is evenly combined, add the rest of the flour mixture.
- 9
Fold in the mixture with a spatula gently until no longer lumpy. Add a few drops of vanilla oil.
- 10
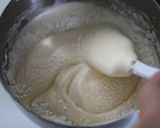
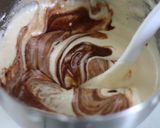
Fold in until the flour is combined well. Add the ☆ cocoa liquid in 3 or 4 batches. Pour the liquid onto a spatula first and drizzle over the liquid overall. Stir well quickly.
- 11
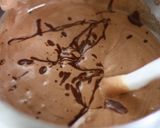
Fold in the mixture by scooping up from the bottom in a circular motion from various positions until the cocoa liquid is well combined.
- 12
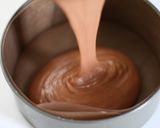
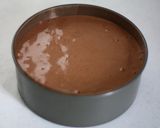
Pour the batter into the prepared cake tin from a high point. Do not scrape the batter on the sides of the bowl with a spatula, but tilt the bowl to pour the batter.
- 13
The batter left on the sides of the bowl tends to contain more fat, so it is better not to put it into the cake tin. If you want to put it in, pour it along the sides of the cake tin.
- 14
Give several sharp taps to the cake tin to remove the excess air. Pop the bubbles on the surface with a toothpick and put the tin into the oven quickly.
- 15
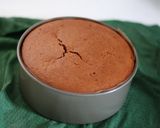
Lower the oven temperature to 160°C and bake for about 35 minutes. When you press the centre of the batter with your finger and it springs back, it is done. If it sinks, continue to bake.
- 16
If you want to be sure, use a skewer. When an inserted skewer in the centre comes out clean, it is done. Adjust the baking time according to your oven at home.
- 17
The baking time affects the result. If the cake is removed from the oven too early it might collapse. It is important to se as it goes.
- 18
Do not overcook either. Overcooking may harden the edges or dry the sponge.
- 19
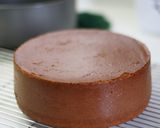
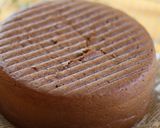
After removing the tin from the oven, drop the cake tin from about 30 cm to get rid of the excess steam. The sponge will settle down to the same height as the sides of the cake tin.
- 20
Remove the sponge from the tin and peel off the baking parchment gently.
- 21
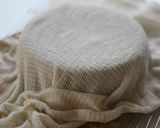
Cover the sponge with a moistened tea towel and leave to cool. After completely cooled, remove the tea towel and wrap the sponge with cling film or a plastic bag.
- 22
Unfortunately, this sponge has a crack on the surface. When I mixed with the hand mixer, it was so fast that I mixed the eggs too long, which might cause this.
- 23
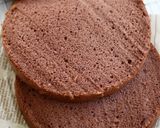
I sliced the sponge into 3 pieces horizontally.
- 24
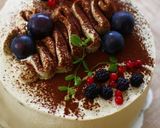
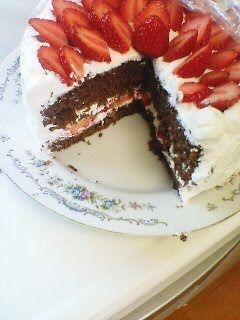
The next day I drizzled with syrup to make a coffee-mocha decoration cake -.
- 25
Chocolate cream decoration -.
https://cookpad.wasmer.app/us/recipes/144826-chocolate-decoration-cake

Linked Recipes
Cooksnaps
Did you make this recipe? Share a picture of your creation!

Similar Recipes
-
Moist and Fluffy Cocoa Sponge Cake Moist and Fluffy Cocoa Sponge Cake
Through a lot of trial and error, I came up with my own recipe for cocoa sponge cake. The scent and flavor of the cocoa made this cake come out just the way I wanted it.The cocoa might clump, so make sure you sift very well. When you add the flour, mix in cutting motions to fold it in. Recipe by Maimama
-

Fluffy and Moist Sponge Cake Fluffy and Moist Sponge Cake
I experimented with various ratios of the dry ingredients and finally came up with this sponge cake.If you raise the temperature of the egg mixture too high before you whip it, you will end up with a lot of air bubbles and the batter will be lumpy. So cool it down if it's too hot. If you have a thermometer, check the temperature of the butter before you add it to the batter. This process has an impact on the shape of the cake when it's baked (the dome on top falls depending on the temperature of the batter). Recipe by Shi-chan -

Moist and Fluffy Sponge Cake Moist and Fluffy Sponge Cake
I wanted to quickly make a tall, moist, and fluffy sponge cake and I finally did it!! It's even taller than I thought it'd be. I hope you give this a try.When making the meringue, it's important to set the speeds on the electric mixer exactly as I have written. Once you add the flour, quickly mix it all up. Recipe by Piyoppi -

Fluffy Sponge Cake Fluffy Sponge Cake
This is a sponge cake I've made for a long time. If you would like a chocolate sponge cake, reduce the flour by about 10 g and add about 20 g of cocoa.Step 1: If using an electric mixer, beat on high speed until you can draw an S on the surface of the batter, about 1-2 minutes.Step 4: If the temperature of the melted butter is too high, it will remove all the air from the batter and result in a deflated cake. Recipe by Yuuyuu0221 -

Light and Moist Chocolate Sponge Cake Light and Moist Chocolate Sponge Cake
I learned this recipe from my mother. The sponge is moist, light and delicious!! Chocolate cakes made with this sponge base is the best! Try my milk sponge recipe too!For 18 cm [7.1 in] (or 20 cm) diameter cake (see notes for other sizes)).(Recipe by Mareko) -

Moist and Fluffy Matcha Sponge Cake Moist and Fluffy Matcha Sponge Cake
I made this matcha sponge cake to make a matcha dome cake.If the warm water to warm the milk and butter cools down, make sure to bring it back to approximately 60℃. You shouldn't mix too much at step 10, but if you don't mix it just right, the butter will sink. You could use regular letter paper instead of parchment paper. For 18 cm [7.1 in] cake pan. Recipe by Rearea cheese -

Soft and Fluffy Sponge Cake Soft and Fluffy Sponge Cake
I bake this every year for Christmas and birthdays, but a 18 cm pan wasn't big enough, so I tried baking in a 21 cm pan.I wrote in Step 5 how to mix in the butter and milk into the batter, but if you've followed the recipe exactly, you can add it directly to Step 4. However, there's a high possibility that the batter would sink, so it's best to keep the two steps separate. Recipe by ko-ko -

Moist & Fluffy Swiss Roll Sponge Cake Moist & Fluffy Swiss Roll Sponge Cake
I looked up a lot of recipes and I tried different quantities. In the end, this is the "perfect" recipe that I arrived at. My sponge cakes have never failed ever since!-By using a hand whisk, not a plastic spatula, the flour and egg mixture will mix nice and evenly. Do not mix vigorously. Incorporate as much air as possible by making use of the wires of the whisk to whip through the mixture.-When you cool the sponge cake, wrap tightly with cling film. When you peel off the film the brown skin of the sponge will stick to the cling film and you'll be able to give it a nice golden brown color to both sides of the cake. If you wrap with cling film after it's completely cooled, the film shouldn't stick anymore, so do this before it cools completely. For one 28 x 28 cm [11.0 x 11.0 in] baking sheet. Recipe by Marimo1016 -

Foolproof Fluffy Cocoa Sponge Cake Foolproof Fluffy Cocoa Sponge Cake
I tried baking a cocoa-flavored sponge cake for Valentine's Day.Beat the eggs thoroughly in a double boiler.You won't be able to slice the sponge cake nicely until it's completely cooled.If the skewer doesn't come out clean, bake a little longer at 170℃ until it is done. Recipe by *Anna* -

Fluffy Basic Sponge Cake Fluffy Basic Sponge Cake
I modified another recipe of mine to make this cake.After pouring the batter into the pan in Step 3, drop the pan at a height to release the air bubbles.The baking time will differ according to your oven.Make sure the parchment paper is higher than the sides of the pan. Recipe by bvivid -

Light and Moist Sponge Cake Light and Moist Sponge Cake
One day, I found a moist sponge cake at a pastry shop that was just to my liking.I wanted to make it myself, so this is a recipe I came up with through trial and error.- You can change this into a cocoa sponge cake by swapping out 5g of the 55g of cake flour with cocoa powder.- You can use margarine in place of the butter. (You can omit both in a pinch.) Recipe by Kubokki- -

Easy Chocolate Sponge Cake Easy Chocolate Sponge Cake
My first attempt on Chocolate Sponge Cake!
More Recipes
- Crispy Garlic Chicken Sauté
- Shiso Sandwiched in Pan-Fried Chicken
- Perfect potpourri
- Honey Mustard Chicken
- Juicy Kara-age Chicken with Yuzu Pepper and Shio-koji
- Juicy Kara-age Chicken with Yuzu Pepper and Shio-koji
- Grilled Teriyaki Chicken with Crispy Skin
- Fragrant Butter Chiffon Cake with Caramelized Apples
- Delicious Cream Bread Rolls
- Garlic and Pepper Seasoned Chicken Breast with Lemon

Comments