
Yogurt Pull-Apart Bread
I just wanted to use up some leftover plain yogurt, so I added a lot of it.
The dough is made simply by mixing yogurt into it, but I didn't want to go out of my way to make something extra to top the bread but I still wanted some sort of simple topping, so I was pondering this problem for a while.
I used a 21 cm frying pan with a removable handle to bake this bread. A 21 cm frying pan can hold about 346 ml, but an 18 cm square baking pan can hold about 324 ml. So the bread should come out to about the same size. Calculate the capacity of whatever pan you want to use to bake the bread in this way. For a domed bread loaf, just put the dough in the pan. For a square Pullman type loaf, calculate the amount of dough by dividing the capacity of the pan by 3.5. Recipe by Osshosan
Cooking Instructions
- 1
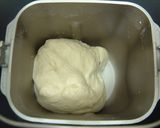
Put all the ingredients except for the ones marked in a bread machine, and select the "dough" program. Leave it up to the machine until the 1st rising is complete!
- 2
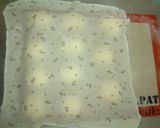
Divide the dough into equal pieces (the number is up to you), round off each piece and rest for 15 to 20 minutes. THE dough is rather sticky, but keep working on it!
- 3
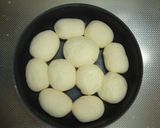
Deflate the dough again, and round off each portion once more.

- 4
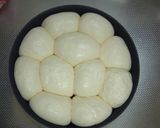
Put the dough balls in the baking pan, mist with water and leave for the 2nd rising, about 40 to 50 minutes.
- 5
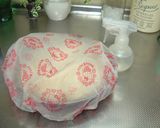
Put the pan in a bag or something to prevent the dough from drying out. I use a shower cap that I got at a 100 yen shop.
- 6
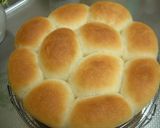
When the dough has doubled in volume and has filled up the pan, it's done rising. I start preheating the oven 6-7 minutes before the dough has finished rising, since that's how long it takes my oven to heat up. Use that as a guideline.
- 7
Bake for 10 minutes at 180°C, then lower the temperature to 170°C and bake for another 5 to 10 minutes. Adjust the baking times to your oven.
- 8
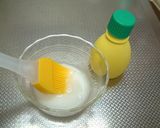
Make the icing with the ingredients. I brushed it on with a pastry brush, but you can also drizzle it on - it wil look very nice. Adjust the consistency of the icing to taste.
- 9
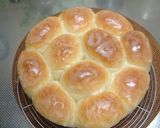
When the bread has cooled down a bit, brush with the icing. The amounts given will just cover the top of the loaf. If you don't work fast it will be hard to brush the icing on.
- 10
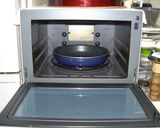
Incidentally, my oven has a turntable, and I baked the bread in a frying pan with a removable handle. Since the oven has a lot of space between the ceiling and the top of the bread, the bread came out in the color shown in the top photo. If it looks like the top of your loaf is browning too fast, cover with aluminum foil.
- 11
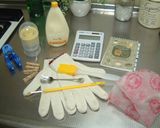
These are handy to have baking tools. From the top right going counterclockwise: a notepad to make notes; a calculator; shortening in a tube; an oil spreader; clothespins; protective gloves; a silicon pastry brush; an ice cream scooper; a stick to mix up egg; a shower cap. I try to adapt all kinds of tools.
- 12
Attention: If you use yogurt that's been in the refrigerator for a while, it may become watery and hard. This makes a big difference in the dough. I used yogurt that was just bought. If the dough is too stiff, adjust with more yogurt or milk.
Cooksnaps
Did you make this recipe? Share a picture of your creation!

Similar Recipes
-

Simple Yogurt Bread Simple Yogurt Bread
I was really into tofu bread and was making it everyday, but one day I ran out of tofu!!So I used leftover yogurt instead and it resulted in these sweet bread.The baking time will vary depending on the oven, so adjust accordingly. Recipe by manamon
-

Soft Yogurt Bread Soft Yogurt Bread
I don't like yogurt so much, but I want to eat it as much as possible, so I make breads or sweets using it.Letting the dough sit for a while at Step 4 lets the dough loosen up. If you don't let the dough sit for a while before rolling it out, the dough will soon shrink. This is the same reason to let the dough sit for 15 minutes at Step 2 after the 1st proofing. Recipe by La Land -

Fluffy Yogurt Whey Mountain-Shaped Bread Fluffy Yogurt Whey Mountain-Shaped Bread
I like drained yogurt and I often eat it, but there is always a ton of whey leftover.I rremembered that a friend of mine, who used to be a chef, made bread using whey, so I adapted her method to my tastes.- The baking time and temperature will vary depending on the oven, so adjust accordingly.- You can also bake this bread from to to finish in the bread machine!- I use low-fat milk in this recipe. Recipe by putimiko -

Banana Yogurt Monkey Bread Banana Yogurt Monkey Bread
This is a variation of my banana yogurt bread.When dividing the dough, don't be too concerned about having equally sized portions. If they vary a bit that's cute too. After forming each ball of dough, if you don't pinch the bottom tightly closed, the syrup will make the bread hard. If that happens, try microwaving the bread for a few seconds. Recipe by La Land -

Fruit Bread (White Yogurt Bread) Fruit Bread (White Yogurt Bread)
I thought that it would be pretty if I made white bread with assorted colorful dried fruits. After several attempts I was successful.I couldn't get a hold of them this time, but if you add green maraschino cherries or angelica to the mix, the bread should be even prettier.I used lemon and orange peel, dried pineapples, dried apricots, dried apple, dried cranberries and dried mangoes this time. Choose your dried fruits so that you don't have just very sour or very sweet types; go for a good balanced mix. Have fun trying out your favorite fruits. Recipe by La Land -

Yogurt Brioche Bread, Soft as a Cloud Yogurt Brioche Bread, Soft as a Cloud
It had been a long time since I made a dough properly, those soft ones that enchant you when you make them. This dough requires care and attention to achieve an excellent result. But the time invested ultimately brings great satisfaction. This brioche bread is perfect for both sweet and savory uses. Adjust the sugar according to your needs. You can make a braid, a loaf, or, as I did, many small balls that you can fill to your liking.
 Translated from Cookpad Italy
 -

Banana Blueberry Yogurt Bread Banana Blueberry Yogurt Bread
This is a very simple recipe perfect for baking with kids, and it doesn't require any special tools. The texture is very moist, somewhere between bread and cake. It takes about 10 minutes to prepare, and then the oven does the rest!
 Translated from Cookpad Taiwan
 -

Quick Bake Vanilla Yogurt Bread in a Bread Maker Quick Bake Vanilla Yogurt Bread in a Bread Maker
This is a refreshing bread with rich vanilla yogurt flavor. It became popular on 09/11/14. The yeast amount was adjusted on 12/08/06.Origin of this recipeI love A-jin's 'Rich Vanilla Yogurt (Recipe ID: 18329221)' so much that I decided to turn it into bread! (❀´∀`❀)♬♫
 Translated from Cookpad Japan
 -

Easy Homemade Yogurt Bread Starter That Anyone Can Make Easy Homemade Yogurt Bread Starter That Anyone Can Make
When I was making a raisin bread starter, I learned that I could make starter using all kinds of ingredients.Yogurt ferments quickly. In the summer this can be made in a day. It can be stored for about 2 months, but try to use it up quickly. Starter can be used in cooking as well as for bread, so try experimenting. Recipe by Raichi -

Steamed Bread That Stays Fluffy - Yogurt Version Steamed Bread That Stays Fluffy - Yogurt Version
I'm into making steamed bread and I enjoy it long. It's easy to make but so delicious! Steamed bread is just as good as cake.Wrap the lid of the steamer with a towel. When they have cooled, wrap each one with plastic wrap and keep at room temperature. This is a low calorie, filling and delicious snack. Recipe by Asamato -
Banana Yoghurt Bread Banana Yoghurt Bread
This is a simple, easy, kinda healthy cake. All you need to do is mixing ingredients one by one and to bake. I used brown sugar. When you use brown sugar, I recommend you to use packed 1/4 cup(or more) to content your sweet tooth. This would be really moisture cake, and you could feel like eating cheese cake when you cool it in your fridge. Enjoy :)
-

For Beginners: Yogurt Bread Starter (Leaven) For Beginners: Yogurt Bread Starter (Leaven)
Since this bread starter is made by adding flour to yogurt, it's easy to see how it's fermenting, unlike some other starters. You can store this starter in the refrigerator for about 5 days. If you leave a little leftover, use half the amount of water, bread flour and sugar in step 5, and incubate for 5-6 hours at room temperature you can grow more starter. If you do this twice, your starter will ferment better. If it takes on an "off" smell like a dishtowel, it's better to manfully throw it away.To get a bread starter going, in the spring, summer and fall you can just let it rest at room temperature. In midsummer when it's very hot, put it in a cool location in your room when you're at home, and put it in the refrigerator when you go out if your house will get very hot. You can also put it in an insulated polystyrene container with ice packs to keep it at under 25 °C. In the winter, put the starter jar on top of the refrigerator, near the stove, near your electric water kettle or in your boiler room. You could also make a fermentation box using a thermostat meant for tropical fish aquariums and an insulated box. But don't put the starter in a very warm location. Recipe by mipon


More Recipes

Comments