Izakaya Pub-style Kotchori Kimchi (Turnip Salad)
At my parents' house, my husband put ground sesame seeds and soy sauce on his light pickled turnips since he doesn't like pickled dishes... then it occurred to me to add sesame oil.
This has now become a standard dish in our home.
When I told my friend about it, she said that it's just like kotchori salad that they serve at Japanese gastro-pubs, That's how I learned about choregi salad.
Season the turnip by rubbing in plenty of salt and drawing out the water. This step makes optimizes the minimal amount of seasonings.
It's hard to explain how much the turnips should be rinsed, so rinse lightly, then adjust to taste. (You may not be able to stop at just tasting it!) For 500 g's worth of turnip. Recipe by Tomomikicchin
Cooking Instructions
- 1
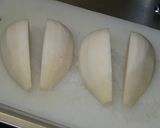
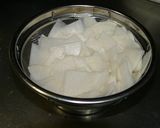
Cut off the top and bottom of the turnip, then peel if so desired. Quarter lengthwise.
- 2
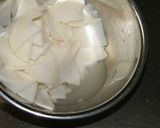
Slice into 2 mm thicknesses. You can either use a slicer, or a knife.

- 3
Put the turnip slices from Step 2 into a bowl, add 1 tablespoon salt, mix, then set aside for about 15 minutes. This is a lot of salt, but it will get rinsed off.
- 4
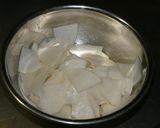
Water will be released from the turnip. Gently rinse off excess water. At this point, the turnips should be well seasoned (with salt).
- 5
Put them in a strainer, and leave them for a few minutes to drain excess water. If you don't have time, move on to the next step, however, the result may be slightly watery.
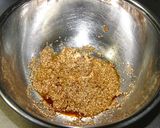
- 6
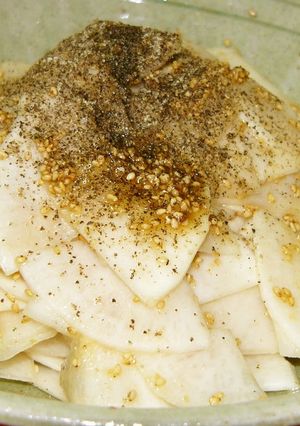
In a large bowl, combine the seasonings: 3 tablespoons ground sesame seeds, 1 tablespoon sesame oil, 1 teaspoon soy sauce, then black pepper to taste.
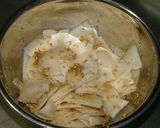
- 7
Be sure to thoroughly combine the turnip with the seasoning until the consistency is even.
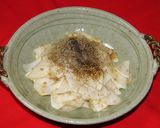
- 8
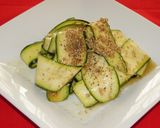
Transfer to a plate. Sprinkle on some black pepper to produce a flavor for the grown-ups that goes well with drinks. I piled it on in this photo shown.
- 9
Korean-Style Zucchini SaladFor a sophisticated texture of summer, try this seasonal zucchini Korean-style choregi salad.
Cooksnaps
Did you make this recipe? Share a picture of your creation!

Similar Recipes
-

Tofu Kimchi Salad Tofu Kimchi Salad
I like tofu! I was brought up with it, so I never thought it tastes plain. But I mixed with some spicy kimchi for my husband. Now even my 3 years old daughter gobble them up😆
-

Izakaya Style Shio-koji Salad with Pea Sprouts and Cabbage Izakaya Style Shio-koji Salad with Pea Sprouts and Cabbage
I use a salt-based dressing for this salad which my husband loves. He likes it so much that we run out right away.I recommend this dish because it contains plenty of vitamins and minerals!It's much tastier if you let it sit in the fridge for about 10 minutes after mixing. Cabbage loses its crunchiness and moisture if you let it sit for too long. I find it best to let it sit for about 10 minutes.It's also good mixed with cucumbers and carrots. Recipe by Rugyaraga-
-

Konnyaku Kimchi Konnyaku Kimchi
I made this konnyaku kimchi for my husband who's on a diet.Fry up both sides of the konnyaku until they brown a little to give them a texture that will absorb the flavors well. Adjust the amount of sugar depending on the spiciness. Recipe by Taishi-n -

Kimchi Hot Pot Kimchi Hot Pot
Hot pot is excellent for cold nights. Kimchi hot pot is my favorite dish, and I wanted to make it with ingredients in my fridge..I learned from a Korean friend that the point of kimchi hot pot is to stir fry the kimchi with sesame oil before adding the soup ingredients. Recipe by meg115 -

Easy Kimchi Easy Kimchi
I fell in love with kimchi but always in doubt whether it's halal or not. Found a video by korean cook, maangachi. Her portion is quite big, so i had reduced the measurement coz i just do it for 1 cabbage only
-

Radish Kimchi Radish Kimchi
When I have chance to pickup a Korean radish, I get one, smaller sized as I am the only one who likes kimchi in our household. This is pretty easy, but if you can't get Korean pepper paste, sub 1 Tbl chili powder and 1 Tsp. Cayenne (hot) for each Tbl. Of the Gochujung. Adjust the Cayenne to your heat level.I eat this with rice dishes, and not just Korean rice dishes.You can sub turnips for the Korean radish. Some people say to use a Daikon radish, but I find turnips are closer to a Korean radish.
-

Kimchi Bokkeum (Kimchi Stirfry) Kimchi Bokkeum (Kimchi Stirfry)
One of my favorite dishes from childhood.Serve it over or with steamed rice and finish if you'd like with a little drizzle of toasted sesame oil.As with any good stir fry, super high heat and small quantities cooked quickly produce the best results.
-

Delicious Kimchi Hot Pot For One Delicious Kimchi Hot Pot For One
I wanted to enjoy the kimchi's flavor so I came up with this recipe.Similar hints to Steps 4-5 were written in a food lover's book, so I took that into consideration and wrote in my own adaptation here.Proper sauteing (Steps 4-5) is the magic to making it even more delicious!Before adding the kimchi to the pot, heating it in the frying pan releases extra flavor.It's even more delicious if you oysters, crab legs, or canned crab!I use a small enough pot for one person. After lowering the heat, wait just awhile and then enjoy it while it's hot. For 1 serving. Recipe by harapecoci -

Cucumber Kimchi Cucumber Kimchi
Generally speaking, cucumber kimchi does not hold up texturally as well as Napa cabbage kimchi, and you'll find that it begins to go soggy more quickly. Best to make a smaller batch (you can halve this recipe) if you don't think you can eat it within 2 to 3 weeks because there just aren't as many good uses for overripe cucumber kimchi as with the Napa cabbage kind.A common question:HOW RIPE DOES THE KIMCHI HAVE TO BE BEFORE I REFRIGERATE/EAT IT?You can eat the kimchi whenever you want. Fresh, just after it's been made, all the way up to when it's so incredibly old, ripe and stinky you could choke out a subway system by placing an open jar in one of the vents. It remains safe for human consumption for A VERY LONG TIME.But as to when to refrigerate, just go out once a day every day to taste a piece, and when it gets to the ripeness you like, stick it in the fridge. It'll continue to ripen, but slowly.P.S. Yes, you do see a few pieces of turnip in there. I think I had one or two that needed to be used up on the day I made this batch. ;) -

Korean Kimchi Korean Kimchi
This recipe is for homemade Korean Kimchi. Kimchi is a traditional Korean side dish made from salted and fermented vegetables such as napa cabbage seasoned with gochugaru or Korean chili powder, spring onions, garlic, fish sauce, and more. It is a staple in Korean cuisine and has been well-received by many nationalities.Recipe by: HomebasedChefVideo: youtu.be/Rd2GwCmkQeg
-

Kkakdugi (Cubed Radish Kimchi) Kkakdugi (Cubed Radish Kimchi)
When kimchi was not available at supermarkets (about 25 years ago) I was taught how to make these pickles by a Japanese-Korean friend. Using juicy winter daikon radish, I could make tasty kkakduki.Compared to Japanese chili, Korean chili is sweeter. Usually kkakduki is made with finely powdered chili. You can use it for making hot pots or other dishes, so freeze it until needed. Recipe by kebeibiko -

Kkakdugi (Cubed Radish Kimchi) Kkakdugi (Cubed Radish Kimchi)
I made this at my daughter's request.Since the spice of red chili powder varies depending on the type, be sure to check the taste while seasoning. The yangnyeom from Step 14 is enough for 3-4 daikon radishes worth of kkakdugi. Store the leftover yangnyeom in the freezer, then the next time you make kkakdugi, all you have to do is pickle the daikon. Recipe by kanako8224
More Recipes

Comments