
Foolproof Croissants
These are the croissants that I finally succeeded in making on my 6th attempt. I have failed many times with all the recipes that I read. I even thought that this was not my thing. In this recipe, I note what I have learned from my mistakes, and hopefully these will be helpful hints for others like me who have been failing at their attempts. If you follow this recipe and the croissants still don't come out right, let me know, so I can give you advice! Good luck and enjoy making delicious croissants.
I updated the recipe to make it very easy to follow.
1. Do not knead the dough! 2. Keep the dough chilled at all times! Chill it! 3. Keep your working surface dusted lightly with flour, and dust the dough with a lot of flour until it has a grainy texture. Keep the dough moving while rolling it out. 4. If the butter comes out, cover it lightly with the flour! 5. Roll up the dough loosely so it has space to rise. 6. Make sure to rise the dough until it doubles its original size. 7. Coat the butter with cake flour! Recipe by asaco*
Steps
- 1
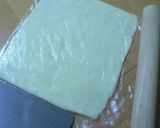
Place the butter (brought to room temperature) in a plastic bag, and roll it out to a 2 mm thickness with a rolling pin. Using a bench scraper, adjust the size of the butter to a rectangular15 x 18 cm sheet (taking care not to tear the plastic bag) and chill in the freezer for 15 minutes. Take it out of the freezer, tear open the plastic bag, dust the butter lightly with cake flour, place it in a new plastic bag, and let it rest again in the freezer.
- 2
In a bowl, combine all of the ★ ingredients, with the sugar and the salt on one side of the bowl, and the dry yeast at the opposite side. Combine the lukewarm water and egg separately, and pour it over the dry yeast. Add the butter.
- 3
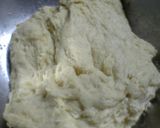
With a spatula, mix briskly. Never knead the dough!! Once it comes together, slam the dough against the bowl about 30 times. Through this process, you can gather any fine remnants. The dough should be sticky. (This is where I previously failed by kneading the dough too much.)
- 4
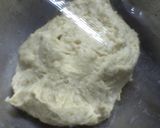
The surface of the dough should be rough. Wrap the bowl as-is with plastic wrap and let the dough rise in the oven at 40℃ for 30-40 minutes or until it doubles its original size.
- 5
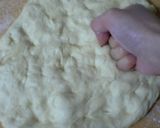
Place the dough on a working surfce lightly dusted with flour and punch it with your fist to release the trapped air (do not knead!). Roll the flattened dough into a ball with the punched side inside, then wrap it in a tightly squeezed damp cloth and let it rest in the chill compartment of your refrigerator for 30 minutes (In past attempts, I failed here by not chilling the dough).
- 6
Take the dough out of the refrigerator (it should be chilled) and punch it again with your fist to release the trapped air. Dust the surface with plenty of flour until the surface feels rough. Dust the rolling pin with flour and remove the trapped air from the dough with it.
- 7
On a lightly floured working surface (I recommend putting flour in a tea strainer and continue dusting the dough), roll the dough to a rectangular sheet about 30 x 20 cm. This size works best for wrapping the butter. (In the past, I rolled the dough without measuring and failed.)
- 8
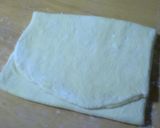
Place the frozen butter on one side of the dough and fold the other side over it, covering the butter. Use a rolling pin to slowly seal the dough by rolling it from the folded edge to prevent air pockets. Be careful not to let the butter touch the edges while sealing the dough.
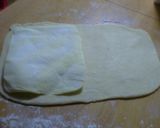
- 9
Once the butter is inside and the edges are sealed, flip the dough upside down, brush off the excess flour, and press gently on the dough with your hands to blend the butter with the dough. Do not press it too hard. Be careful not let the dough get too warm.
- 10
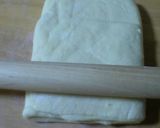
Once the edges of the dough are firmly sealed, slowly roll the rolling pin over the dough to blend it with the butter. If there are any air pockets, poke them with a toothpick to release the air out. If the hole is too large, lightly coat with cake flour to seal the dough to prevent the butter from coming out. Be sure to keep your working surface well dusted to prevent the dough from sticking!
- 11
Once the trapped air is released, put the dough in a plastic bag and let the dough rest in the refrigerator for 30 minutes. If you wish to put it in the freezer, check it after about 7 minutes so that it doesn't completely freeze. It's important to keep the dough chilled!

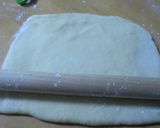
- 12
Lightly dust your working surface, hands, and the rolling pin with cake flour. Roll out the dough starting from the center. Gently pound it with the rolling pin and roll it out from top to bottom and side to side. It may not spread out easily at first, but roll it out slowly and gently. Be careful not to let the dough to stick to the working surface! Keep dusting the rolling pin as well.
- 13
While rolling out the dough, check the bottom and keep dusting your working surface lightly (make sure to dust lightly). The dough will not create layers unless it is thinly rolled out.
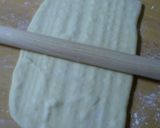
- 14
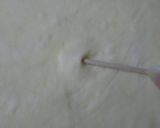
A few small air pockets will start to form toward the end of the rolling out the dough. Pierce any air pockets from the side with a toothpick, press it from the opposite side with your finger to release the air. Press any pierced holes with your finger to seal them. You don't need to worry about small air pockets.
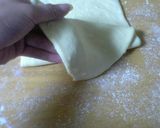
- 15
Roll out the dough to a sheet about 45 x 20 cm and fold it in thirds, while aligning the edges. Put the dough in a plastic bag and let it rest in the refrigerator for 30 minutes. Repeat this process 3 times. Make sure that the dough can slide on the working surface without sticking, by keeping the dough and the rolling pin well dusted. If the butter spills out, coat it with cake flour.
- 16
When rolling out the dough from the second time onward, be sure to roll it in the opposite direction from the previous one. For example, the right edge of the dough in the photo in Step 15 should be turned 90° to face the front. Fold the seamed side inside when folding. After the third round, put the dough in the refrigerator and chill it for 20 minutes to chill the dough, since it will have soften during this process.
- 17
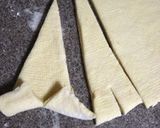
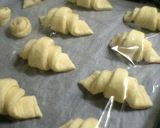
Using a bench scraper, trim the dough into a 45 x 20 cm sheet, trimming off the rough edges. Be sure to firmly press the dough to cut through. Cut the dough into triangular pieces as shown. Do not touch the cross-section of the dough! If the dough is too floury when shaping, tap off any excess flour. Roll the triangular pieces up loosely to make space for rising. Do not roll them up tightly!
- 18
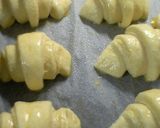
Preheat the oven to 40℃ with the baking sheet inside for 4 minutes, turn off the oven, then place the rolls on the baking sheet, spray the rolls with water, then loosely cover it with plastic wrap. (The butter will melt if it is over 30℃!). Make sure to wrap it loosely! It's fine if it is not sealed around the edges!!
- 19
Let the dough rise in the oven for about 1 hour or until the rolls doubles in size. The rising time will vary according to the season, so check the dough from the outside of the oven door and wait until it doubles in size!! (Do not open the oven door!! As long as the butter does not melt, it's fine!) Be careful especially in the summer time and reduce the rising time to prevent the butter from melting.
- 20
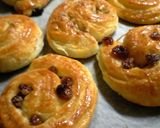
Preheat the oven to 200℃. Meanwhile brush egg wash on the surface of each roll. Bake in the oven at 200℃ for 18-20 minutes. Once they are finished baking, immediately brush on the simple syrup and they are done.

- 21
I made Danish pastries by adding raisins and walnuts to the same dough. If you have a sweet tooth, substitute the syrup with a jam glaze (simmer the jam in granulated sugar and water) or your favorite syrup.
Cooksnaps
Did you know that you can import recipes from anywhere into Cookpad with one click?
https://blog.cookpad.com/us/cookpad-recipe-import-feature-save-recipes-from-anywhere/
Download Cookpad app to plan your meals and store your cooking ideas in one safe place! https://cookpad.wasmer.app/us/download
Similar Recipes
More Recipes
-


-

Beetroot Salad with Corn and Pomegranate
-


-


-


-


-


-


-

-


-


-


-
-

-

Veggies and chicken with cheese

-


-


-

Bitter Sweet Cocoa Shortbread Cream Puffs
-


-

-

Home-made Satsuma-age Fish Cakes


Comments