Rose-Pistachio Cheesecake
Whole recipe of this cheesecake on my channel https://youtu.be/p8x5ajhwIQk
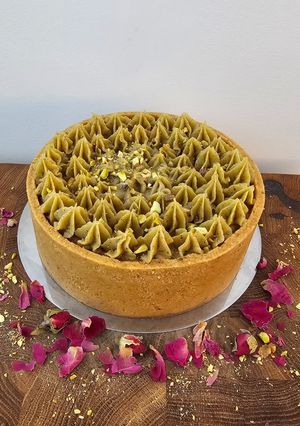
I wanted to share my absolute favorite flavor combination: delicate rose and vibrant pistachio. This cheesecake has a crispy restructured sablé crust, a super creamy double-layered baked filling, and is topped with a smooth pistachio white chocolate ganache.
Rose-Pistachio Cheesecake
Whole recipe of this cheesecake on my channel https://youtu.be/p8x5ajhwIQk
I wanted to share my absolute favorite flavor combination: delicate rose and vibrant pistachio. This cheesecake has a crispy restructured sablé crust, a super creamy double-layered baked filling, and is topped with a smooth pistachio white chocolate ganache.
Steps
- 1
In a mixer bowl, combine the dry ingredients: all-purpose flour, almond flour, powdered sugar, and salt. Mix until uniform.
- 2
Add the cold cubed butter (85g). Mix until the texture resembles fine breadcrumbs.
- 3
Add the egg yolks one at a time and mix just until it forms a uniform, crumbly dough that can be rolled out. Do not overmix.
- 4
Divide the dough into two parts. Place each half between two sheets of parchment paper and roll out to a thickness of 2-3 mm. (Note: If your oven is large enough, you can roll the dough out into one large sheet).
- 5
Prick the dough with a fork in several places to prevent air bubbles from forming while baking.
- 6
Transfer the rolled-out dough on a flat surface into the freezer for 1 hour. Repeat with the second piece of dough.
- 7
Bake at 160°C (320°F) for 15–20 minutes until golden brown.
- 8
Let the shortbread crusts cool completely—they are very fragile while still hot.
- 9
Once cooled, use a blender or food processor to pulse the baked crusts into fine crumbs along with the crushed pistachios.
- 10
Pour the crumb mixture into a bowl and add the melted butter. Mix thoroughly until you get a moist crumb. When mixed correctly, the mass should clump together when squeezed, not fall apart. If it's too dry, add a little more melted butter.
- 11
Place a sheet of foil on your workspace, and put a slightly smaller sheet of parchment paper on top. Place an 18 cm (7-inch) pastry ring on the parchment and tightly wrap the outside of the ring with the foil. (I used a double layer of foil). Place the wrapped ring on a sturdy cake board or baking sheet.
- 12
Start by forming the sides of the crust (about 6 cm high and medium thickness), pressing firmly with a spoon or a glass. Then form the bottom, pressing tightly with a flat lid. When tamping the base with a glass, press firmly into the corners to distribute the dough evenly.
- 13
Blind bake the empty crust at 160°C (320°F) for 10-12 minutes. This sets the shape of the sides so they don't get soggy later.
- 14
One hour before baking the cheesecake, preheat your oven to 110°C (230°F). Place an empty, dry roasting pan at the bottom of the oven (no water yet).
- 15
Using a paddle attachment, mix the cream cheese, powdered sugar, and cornstarch until combined.
- 16
Add the eggs one at a time. Mix each egg just until incorporated (about 20–30 seconds). Important: Do not rush, and do not increase the mixer speed. Whipping excess air into the batter is the main cause of cracks and cheesecake "bloating."
- 17
Add the heavy cream and mix until smooth.
- 18
Divide the batter into 2 equal parts. The bottom layer will be the pistachio layer. Mix 2–3 tablespoons of the cheese mass into the pistachio paste and rub thoroughly until smooth. Then, fold this mixture back into the first half of the batter and gently mix with a spatula until uniform.
- 19
Into the second half of the cheese mass, add the rose water and fold gently with a spatula.
- 20
Pour the pistachio layer into the cooled crust first. Tap the pan gently on the table to level it. (Pistachio paste is heavier, so this makes a great stable base layer).
- 21
Carefully spoon or pipe the rose layer on top. Lightly tap the pan on the table again to level the surface and release any trapped air bubbles.
- 22
Open the oven and carefully pour boiling water into the hot roasting pan at the bottom (it will instantly create steam). Immediately place the cheesecake on the rack directly above it and close the door.
- 23
Bake at 110°C (230°F) for 1 hour 45 minutes to 2 hours 10 minutes. (I baked for 2 hours and 5 minutes). The edges (about 3–4 cm from the side) should look set and matte, while the center (5–8 cm in diameter) should still have a slight jiggle, like a thick jelly or panna cotta.
- 24
Turn off the oven. Immediately remove the pan with the hot water!
- 25
Leave the cheesecake in the turned-off and closed oven for 1 hour without the water.
- 26
Crack the oven door slightly open and let the cheesecake cool for another 40 minutes.
- 27
Take the cheesecake out. If you see condensation on the sides of the pan, gently blot it away with a paper towel.
- 28
Let it cool completely at room temperature (about 3-4 hours), then transfer to the refrigerator for 12 hours or overnight.
- 29
Melt the chocolate in the microwave in short 15–20 second bursts, stirring each time, until semi-liquid. It shouldn't be hot—just warm enough to start melting. It’s okay if there are still soft chunks; this prevents it from being "shocked" by the hot cream.
- 30
Pour the heavy cream into a saucepan and bring it to a simmer (look for small bubbles around the edges and active steam). Do not boil it for too long, or the moisture will evaporate and your ganache will become too stiff.
- 31
Pour the hot cream over the chocolate. Let the mixture sit undisturbed for 1–2 minutes so the heat can reach the bottom.
- 32
Gently stir the mixture with a spatula in circular motions, starting from the center. It might look a bit grainy or strange at this point—that's completely normal.
- 33
Add the pistachio paste. You'll see the ganache take on a beautiful green color! Give it another gentle stir.
- 34
Check the temperature with your finger—it should be warm, but not burning hot. Add the softened butter.
- 35
Submerge an immersion blender into the mixture at an angle to avoid trapping air bubbles. Emulsify the ganache on low or medium speed for 1 minute. You will see the magic happen: the mixture will become perfectly smooth, glossy, and elastic.
- 36
Cover the ganache with plastic wrap "in contact" (the wrap should touch the surface of the cream) to prevent a skin from forming.
- 37
Refrigerate for at least 4–6 hours (or overnight, if you have the time).
- 38
Before piping: Take the ganache out of the fridge and let it sit for 10–15 minutes at room temperature to soften slightly. Transfer it to a piping bag with a nozzle and decorate your cold cheesecake!
Keywords
Similar Recipes
More Recipes
-


-


-

Non-Fried Egg Yolk & Veggies Pakora

-


-


-

Egg Bread Roll | Crispy & Tasty Breakfast Recipe

-
")
Dad's Favourite Ofe Akwu (Banga Stew)

-

Oats Cranberry and Nuts Cookies

-
")
Crunchy & Fluffy Nutty Sabudana Khichdi (Rainy Day Special)

-

Crispy Protein-Rich Soya-Veggie Pakoda

-


-


-


-
")

-
")
Papad ki Sabzi (Paporor Sobzi)

-


-


-
-
")
Sheem Paturi (Flat Beans Curry - Bong Style)

-
")
Oanh’s French Vegetable Potage (Soup)

-


-


Comments