CookpadCookpad
Guest
Register or Log In
Save and create recipes, send cooksnaps and more
  • Search
  • Premium
    • Top Cooksnapped Recipes
    • Top Viewed Recipes
  • Premium
  • Challenges
  • FAQ
  • Send Feedback
  • Region
  • Your Collection
Your Collection
To start creating your recipe library, please register or login.
Homemade Yoghurt
Save this recipe to come back to it later.
  • Add Cooksnap
  • Add to folders
  • Print
  • Share
    • Copied!
    • Email
    • Facebook
    • Pin it
    • Twitter
  • Report Recipe
  • See report
  • Edit recipe
  • Delete
CookpadCookpad
A picture of Homemade Yoghurt.

Homemade Yoghurt

Felice
Felice @morinoko
Connecticut, United States

Delicious homemade yoghurt you can make without special tools. This technique for making your own yoghurt comes from the book "The Art of Fermentation". There's more than one way to do this but here are the methods and tools I used. The trickiest part is keeping the milk warm for an extended period of 6-8 hours so the yoghurt cultures can do their job, as they need to be kept at a certain temperature to ferment the milk.

You just need something like an insulated lunchbox, cooler, styrofoam box, etc. I used a thermos of hot water to help keep the inside warm too. Of course, if you have a yoghurt maker (incubator), that works too! Here is how you can do it without one.

Read more
Saved
Save this recipe to come back to it later.
Edit recipe
See report
Add to folders
Add CooksnapAdd Cooksnap
ShareShare
  • Copied!
  • Email
  • Facebook
  • Pin it
  • Twitter
PrintPrint
  • PrintPrint
  • Add CooksnapAdd Cooksnap
  • Report Recipe
  • See report
  • Delete
Share
  • Copied!
  • Email
  • Facebook
  • Pin it
  • Twitter
Save this recipe to come back to it later.
  • Add Cooksnap
  • Add to folders
  • Print
  • Report Recipe
  • See report
  • Edit recipe
  • Delete

Ingredients

8 servings
  1. 1 liter (1 qt)whole milk
  2. 1 Tbspplain yoghurt with active cultures
  3. Tools/Equipment:
  4. 1Thermometer to measure temperature of milk
  5. 1-4 Jarsor containers to hold your 1 liter of milk/yoghurt (I use a 1 liter jar, but you can use 2-4 smaller ones)
  6. 1Insulated cooler, lunchbox, etc. to use as an "incubator" to keep your yoghurt warm while it's culturing. I use 2 soft insulated lunch boxes, putting one inside the other
  7. 1thermos that can hold some hot water to help warm your "incubator"
Cookpad Open in Cookpad App
Saved
Save this recipe to come back to it later.

Steps

  1. 1

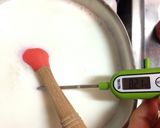
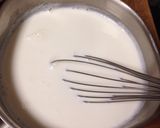
    Heat milk over low heat to 82°C/180°F. Stir frequently.

    A picture of step 1 of Homemade Yoghurt.
  2. 2

    Remove from heat and let milk cool to 43-46°C (110-115°F). Meanwhile let 1 Tbsp of the regular yoghurt come to room temperature. Also prep your equipment as below if you don't have a special "yoghurt maker" or incubator.

    A picture of step 2 of Homemade Yoghurt.
  3. 3

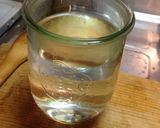
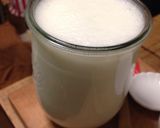
    As your milk is getting closer to the correct temperature, prepare your containers, thermos, etc. I put hot water in my jars so they warm up and don't cause the milk temperature to drop when I pour in the milk.
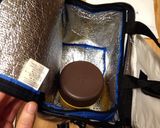
    A picture of step 3 of Homemade Yoghurt.
  4. 4

    I don't have an incubator so I use an insulated cooler. I pour boiling water into a smaller thermos cup, put the lid on and put it inside the cooler. I close to cooler to let it warm up when the milk is getting close to cooling down.

    A picture of step 4 of Homemade Yoghurt.
  5. 5

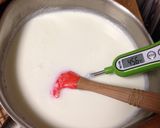
    When the yoghurt reaches the correct temperature of 43-46°C (110-115°F), mix in the 1 Tbsp of regular yoghurt that you let come to room temperature.

    A picture of step 5 of Homemade Yoghurt.
  6. 6

    Pour the hot water out of your yoghurt container(s) and then pour in the milk. Close the lid.

    A picture of step 6 of Homemade Yoghurt.
  7. 7

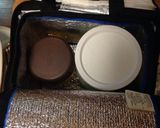
    Put the filled container(s) into your homemade "incubator" or yoghurt maker, and close the lid.
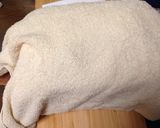
    A picture of step 7 of Homemade Yoghurt.
  8. 8

    To help the temperature stay warm, I wrap my insulated coolers in 2 towels.
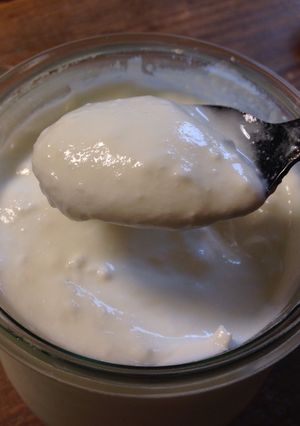
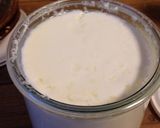
    A picture of step 8 of Homemade Yoghurt.
  9. 9

    Let the milk incubate for 6-8 hours, without disturbing the incubator or containers. After 6-8 hours, when you open it up, you'll see that your milk has magically turned into yoghurt! Remove from the incubator and cool before eating.

    A picture of step 9 of Homemade Yoghurt.
  10. 10

    Note: Don't let it incubate for too long or the yoghurt will curdle instead.

  11. 11

    To make your next catch, keep one tablespoon of the yogurt aside, and repeat all the steps!

Saved
Save this recipe to come back to it later.
Edit recipe
See report
Add to folders
Add CooksnapAdd Cooksnap
ShareShare
  • Copied!
  • Email
  • Facebook
  • Pin it
  • Twitter
PrintPrint
  • PrintPrint
  • Add CooksnapAdd Cooksnap
  • Report Recipe
  • See report
  • Delete

Cooksnaps

Saved
Save this recipe to come back to it later.
  • Add Cooksnap
  • Add to folders
  • Print
  • Share
    • Copied!
    • Email
    • Facebook
    • Pin it
    • Twitter
  • Report Recipe
  • See report
  • Edit recipe
  • Delete

Copied!

Felice
Felice @morinoko
on April 07, 2016 03:35
Connecticut, United States
I grew up in Southern Germany and Ohio, and spent 10 years in Japan. I love bread baking, #German food, and healthy, homestyle cooking in general inspired by my family and the seasons.Follow my cooking adventures on Instagram :)https://instagram.com/morinoko_
Read more

Comments (2)

cuckoocooking
cuckoocooking @cook_3224001
April 28, 2016 17:43
I've been looking for a frugal (poor folks') recipe for yogurt to use! THANK YOU for this recipe!
Guest
Add a comment
0/0

Similar Recipes

More Recipes

  1. A picture of Brad's Pork Carnitas Grilled Burritos with Avocado Salsa.

    Brad's Pork Carnitas Grilled Burritos with Avocado Salsa

    wingmaster835 wingmaster835
  2. A picture of Stir-Fried Noodles with Duck Leg.

    Stir-Fried Noodles with Duck Leg

    Nicky Nicky
  3. A picture of Cluster beans (Kothavarankaai) vaththal kuzhambu.

    Cluster beans (Kothavarankaai) vaththal kuzhambu

    Lakshmi Sridharan Ph D Lakshmi Sridharan Ph D
  4. A picture of Insalata Caprese (Caprese Salad).

    Insalata Caprese (Caprese Salad)

    Jibita Khanna Jibita Khanna
  5. A picture of Skillet Asian Dumplings.

    Skillet Asian Dumplings

    Maggie Conlon Maggie Conlon
  6. A picture of Super Bowl Sausage Bread.

    Super Bowl Sausage Bread

    cindybear cindybear
  7. A picture of Pachai Mor Kuzhambu.

    Pachai Mor Kuzhambu

    ZMA ZMA
  8. A picture of Donuts (Baked, Not Fried).

    Donuts (Baked, Not Fried)

    Ashley Smith Ashley Smith
  9. A picture of Funfetti Cookies.

    Funfetti Cookies

    Ashley Smith Ashley Smith
  10. A picture of White Chocolate Chip Cookies.

    White Chocolate Chip Cookies

    Ashley Smith Ashley Smith
  11. A picture of Coconut Cream Pie Bars.

    Coconut Cream Pie Bars

    fenway fenway
  12. A picture of Vegan thai peanut tofu stir fry.

    Vegan thai peanut tofu stir fry

    Adam Adam
  13. A picture of Super healthy vegan granola.

    Super healthy vegan granola

    Adam Adam
  14. A picture of Low-Carb Beef Stew.

    Low-Carb Beef Stew

    Christina Hansen Christina Hansen
  15. A picture of Jamerican Curry Chicken & Rice Soup.

    Jamerican Curry Chicken & Rice Soup

    FitzRoyG FitzRoyG
  16. A picture of Jamerican Curry Chicken & Rice Soup.

    Jamerican Curry Chicken & Rice Soup

    FitzRoyG FitzRoyG
  17. A picture of Blueberry Chia Jam.

    Blueberry Chia Jam

    Adam Adam
  18. A picture of Vegan thai peanut tofu stir fry.

    Vegan thai peanut tofu stir fry

    Adam Adam
  19. A picture of Super healthy vegan granola.

    Super healthy vegan granola

    Adam Adam
  20. A picture of Beef Miso Soup.

    Beef Miso Soup

    SpottedByD SpottedByD
  21. A picture of Buttermilk Dressing.

    Buttermilk Dressing

    Loooooois Loooooois
  22. A picture of Low-Carb Beef Stew.

    Low-Carb Beef Stew

    Christina Hansen Christina Hansen
  23. A picture of The Cam Slam.

    The Cam Slam

    Ryan Ryan
  24. A picture of Tofu Steak.

    Tofu Steak

    SpottedByD SpottedByD
  25. A picture of Cashew Chocolate Cake in pressure cooker method.

    Cashew Chocolate Cake in pressure cooker method

    deepa deepa
https://cookpad.wasmer.app/us/recipes/677339
Cookpad Open in Cookpad App

About Us

Our mission at Cookpad is to make everyday cooking fun, because we believe that cooking is key to a happier and healthier life for people, communities and the planet. We empower home cooks all over the world to help each other by sharing their recipes and cooking experiences.

Subscribe to Premium for exclusive features & benefits!

Cookpad Communities

🇺🇸 United States 🇬🇧 United Kingdom 🇪🇸 España 🇦🇷 Argentina 🇺🇾 Uruguay 🇲🇽 México 🇨🇱 Chile 🇻🇳 Việt Nam 🇹🇭 ไทย 🇮🇩 Indonesia 🇫🇷 France 🇸🇦 السعودية 🇹🇼 臺灣 🇮🇹 Italia 🇮🇷 ایران 🇮🇳 India 🇭🇺 Magyarország 🇳🇬 Nigeria 🇬🇷 Ελλάδα 🇲🇾 Malaysia 🇵🇹 Portugal 🇺🇦 Україна 🇯🇵 日本 See All

Learn More

Cookpad Premium Careers Feedback Blog Terms of Service Community Guidelines Privacy Policy Frequently Asked Questions

Download our app

Open Cookpad App on Google Play Open Cookpad App on App Store
Copyright © Cookpad Inc. All Rights Reserved
close