Basic Shortcrust Pastry
This is the basic shortcrust pastry that I've been making for a long time. I've been using a food processor to make this recently, and it's become much easier and convenient to make.
When you make it, be quick with your hands. If the dough is too sticky, as you go through the recipe steps, chill the dough in the refrigerator from time to time. (This a layered dough so if the butter melts, it won't have that light crispy texture.) If you use unsalted butter, add 1/4 teaspoon of salt to the mixture. Recipe by Yukiline
Steps
- 1
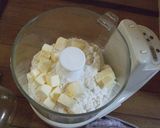
In a food processor, add in the bread flour, cake flour, and butter and blend it. (Make sure that the butter is still cold. Even better if you refrigerate the flour.)
- 2
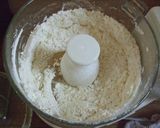
Once it is crumbly, it's done. (At this point, it shouldn't be finely mixed yet and the butter should still be slightly chunky.)
- 3
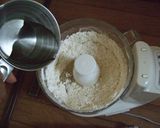
Add in the water and blend. Set it to pulse mode if you have it. If you don't have that setting, turn the machine on and off to pulse (try to use as few pulses as possible).
- 4
Once the dough looks like this picture where the dough is starting to come together, it's ready. Tip for this step is to make sure the consistency isn't too smooth yet-- leave some lumps of butter and let the dough be a bit floury.
- 5
When preparing by hand Make sure that the butter and the dry ingredients are mixed together well by using your fingertips. Then, while adding in the cold water, use a scraper to cut in the butter and mix the dough together. Once the dry ingredients have been incorporated, it's done. (Mix until there are still some lumps of butter.)
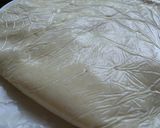
- 6
Cover it with a plastic wrap and put it in the fridge to rest for an hour. At this point, you should be able to see spots of the butter and flour in the dough.
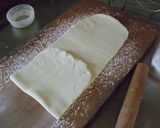
- 7
Cover a countertop with flour and roll out the dough into a long rectangular shape. Using the flour on the surface, fold the dough into thirds. If you have a lot of flour on the countertop, use a decorating brush or something to brush some off as you form the dough.
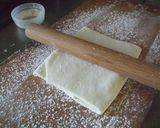
- 8
Rotate the dough by 90 degrees, fold it into thirds, and then roll it back out. Repeat this process 2 more times. (Total of 3 times.)
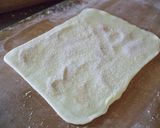
- 9
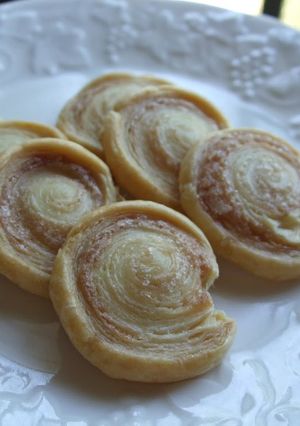
This time I made sweet roll dough. I rolled it out into a 30 cm by 18 cm shape and coated the top with some water. I made a mixture of two tablespoons of granulated sugar and some cinnamon powder, and sprinkled it over the dough. I then rolled it.
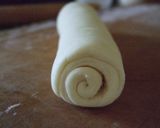
- 10
While rolling up the dough, adjust the shape so it stays together. Cover it with plastic wrap and set it in the fridge for 30 minutes to rest.
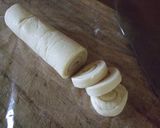
- 11
Next, cut it into 5 mm wide slices.
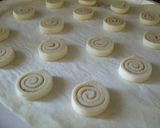
- 12
In a preheated oven at 375℉ (190℃), bake for 20 minutes.
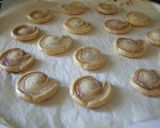
- 13
They are done. The cinnamon and sugar I gently rolled into the dough melted perfectly. They are very cute mini pastries when done.
Cooksnaps
Did you know that you can import recipes from anywhere into Cookpad with one click?
https://blog.cookpad.com/us/cookpad-recipe-import-feature-save-recipes-from-anywhere/
Download Cookpad app to plan your meals and store your cooking ideas in one safe place! https://cookpad.wasmer.app/us/download
Keywords
Similar Recipes
More Recipes
-


-


-


-


-


-


-

Chipotle Ranch Grilled Chicken Salad

-

Sam's Green Chile Cheese Cornbread

-


-


-


-


-

Oven Baked Drumettes and Onions

-

Fluffy French Toast Made With Frozen Bread
-

-

Spinach Lasagna with Sun-Dried Tomato Sauce

-

Stewed Daikon Radish and Chicken Drumettes
-

-

-

Melt-in-your-mouth Molten Chocolate Cake


Comments