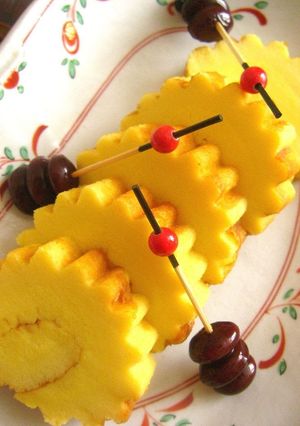
Honey Datemaki Rolled Omelet for Osechi
I don't like store-bought datemaki. I adjusted the ingredients little by little to get to this recipe.
You can make this using 20cm square molds that are commonly available in shops, but since the dimensions are quite small, the rolls become thick. So it will probably be difficult to roll up until you get used to doing so.
Line the mold with parchment paper! Recipe by Run
Steps
- 1
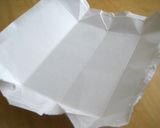
Put all the ingredients in a food processor or blender, and puree thoroughly. Pour this mixture in a mold lined with parchment paper.
- 2
Bake in a preheated 200°C oven for 10 minutes. Lower the temperature to 180°C, and bake for another 10 minutes or until browned.
- 3
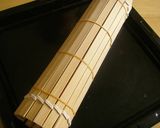
Place the cooked 'cake' on an oni-sudare (bamboo mat made from wide bamboo sticks) with the browned side down. Peel off the kitchen parchment paper and roll up the 'cake.' Or use a regular sushi rolling mate.
- 4
Secure the bamboo mat in 4 places with elastic bands. Leave until it has cooled down completely (about 3 hours), and it's done. To keep the datemaki, wrap up in plastic and refrigerate. It tastes better chilled.
- 5
I don't use a square mold often enough to justify buying one, so I make my own. Make a 21 to 22 cm square mold using an opened up milk carton. Secure with staples, and cover the surface with aluminum foil.
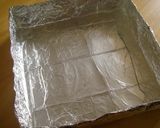
- 6
To open up the milk carton, don't use scissors but instead carefully peel apart the glued parts. This way you'll end up with a piece big enough to make a box with as shown in Step 5.
Cooksnaps
Did you know that you can import recipes from anywhere into Cookpad with one click?
https://blog.cookpad.com/us/cookpad-recipe-import-feature-save-recipes-from-anywhere/
Download Cookpad app to plan your meals and store your cooking ideas in one safe place! https://cookpad.wasmer.app/us/download
Similar Recipes
More Recipes
-


-
")
Stuffed Mushrooms (Spirit of '76 Cookbook)

-


-

")
-

-

-

-

-

-

-


-

Mike's Upstanding Deviled Eggs

-


-


-


-


-

 boiler2326
 -

-
-

-

-

Foolproof Soy-sauce Seasoned Eggs
-

-

-

Simple Fall Colored Wine Simmered Apples


Comments