Basic Pie Dough (Voitaikina in Finnish)
This dough is based on recipes taken from two Le Cordon Bleu cookbooks--one in Japanese and one in Finnish. It makes an amazingly light and crispy dough with a nice flavor. I altered the recipe by combining the best of both recipes, without reducing the amount of ingredients. It's a western style recipe. If you're trying to lose weight, stay away from this!
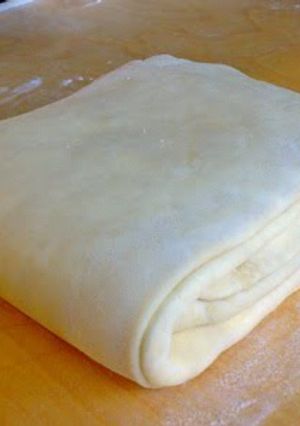
The trick to rolling the dough into a nice square is to not roll in a vertical or horizontal direction, but diagonally. By rolling in an "X", you will automatically get a square shape.
The process is easy, but you must repeatedly chill and rest the dough, so it takes time. I recommend making the dough the day before you plan to bake a pie. It's hard to handle once the butter melts, so it's easiest to make during the cold season. It will keep in the freezer for 3 to 4 months. Recipe by karviainen
Basic Pie Dough (Voitaikina in Finnish)
This dough is based on recipes taken from two Le Cordon Bleu cookbooks--one in Japanese and one in Finnish. It makes an amazingly light and crispy dough with a nice flavor. I altered the recipe by combining the best of both recipes, without reducing the amount of ingredients. It's a western style recipe. If you're trying to lose weight, stay away from this!
The trick to rolling the dough into a nice square is to not roll in a vertical or horizontal direction, but diagonally. By rolling in an "X", you will automatically get a square shape.
The process is easy, but you must repeatedly chill and rest the dough, so it takes time. I recommend making the dough the day before you plan to bake a pie. It's hard to handle once the butter melts, so it's easiest to make during the cold season. It will keep in the freezer for 3 to 4 months. Recipe by karviainen
Steps
- 1
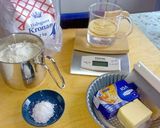
About the ingredients: You can use a mixture of cake and strong bread flour in place of all-purpose flour. Adjust the amount of salt if using salted butter. If unsalted, use about 10 g of salt.
- 2
Combine the (A) ingredients in a large bowl, and thoroughly mix. Create a well in the middle of the mixture. Pour in the (B) ingredients. Stir the dry ingredients, as if tossing them from the bottom of the bowl, covering the moist sections. Repeat this until the dough becomes crumbly. Do not knead.
- 3
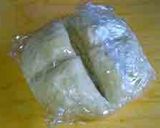
Once it has reached an even crumbly texture, bring it together into a ball, and wrap in plastic wrap. Let it chill in the refrigerator for 1 hour. By making a cross in the top, as shown in the photo, it will chill more evenly, and will make it easy to roll out into a square.
- 4
Pound down the butter from the (C) ingredients with a rolling pin, and roll it into an 8-mm thick square. This step is easier if you sandwich the butter in plastic wrap or put it in a vinyl bag. Chill this in the refrigerator.
- 5
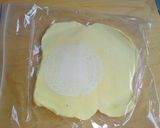
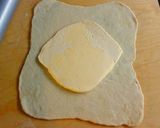
Roll out the dough from the A and B ingredients, place butter on top as shown, then fold in the corners as though wrapping the butter. Cover the butter completely, without allowing any to show, then even out the thickness by pounding with a rolling pin.
- 6
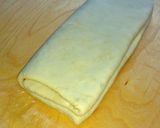
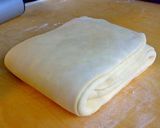
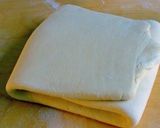
[Fold the dough into fourths] Using a rolling pin, roll the butter-wrapped dough into a long rectangle. To fold the dough into fourths, bring both ends to meet in the center, then fold it in half, as shown. Wrap in plastic wrap, then chill in refrigerator for 20 to 30 minutes.
- 7
Fold the dough into thirds: Roll the long dough even longer, then fold into thirds (rotating the dough 90°). Wrap in plastic wrap, then chill in refrigerator for 20 to 30 minutes again.
- 8
Repeat Step 6 and 7, chilling in between, which will make a total of 144 layers (4 x 3 x 4 x 3 = 144). After the 3rd or 4th time rolling the dough, the butter will start to stick out, so be sure to dust your working surface well with flour, and shake off any excess.
- 9
The dough is ready. It will keep in the refrigerator for 3 to 4 days. Use it for making Christmas tarts, quiches, or other dishes.
- 10
Addendum: The best way to get a nice crisp crust is to bake the chilled dough at a high temperature (over 200℃) and for a short time! Depending on your type of refrigerator, you may not be able to chill the dough thoroughly enough in just 20 or 30 minutes. In that case, it might be best to let it chill in the freezer.
Cooksnaps
Did you know that you can import recipes from anywhere into Cookpad with one click?
https://blog.cookpad.com/us/cookpad-recipe-import-feature-save-recipes-from-anywhere/
Download Cookpad app to plan your meals and store your cooking ideas in one safe place! https://cookpad.wasmer.app/us/download
Keywords
Similar Recipes
More Recipes
-


-


-

Rosemary, Herbal, Refreshing Masala Tea, Fresh Rosemary, for Good Health

-


-

-
")

-


-

Rudolph Christmas Chocolate Bites .

-


-

Vickys Home 'Grown' Christmas Candy Canes

-


-
-

-
-
-


-

Kuroneko-san's Green Tea and Cream Cheese Muffins

-

-

-


Comments