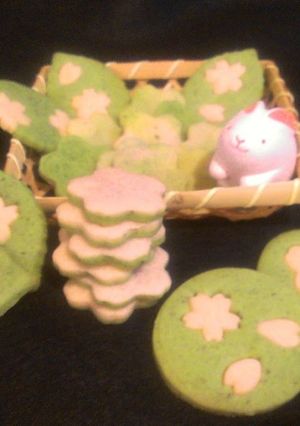
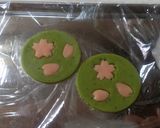
Sakura and Matcha Cookies
I thought sakura flavoured, sakura patterned cookies would be so cute, so I decided to make them. At first cutting out the sakura patterns is fun, but it is a lot of work and can be tedious and tiring. This is why I recommend doing the reversible and marbled cookies.
The dough can be sticky, so make sure to dust it with plenty of flour.
Roll out the dough over a sheet of plastic wrap before cutting out the pattern.
Dust the pattern cutter with flour as well.
To keep the colour from browning too much in the oven, cover the cookies with aluminum foil before baking. Recipe by Monakasan
Steps
- 1
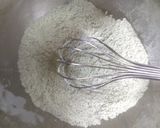
Prepare by bringing the butter and eggs to room temperature. Sift together the flour and matcha for the matcha dough.
- 2
Add the minced sakura leaves and mix it into the matcha dry ingredients.
- 3
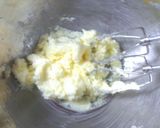
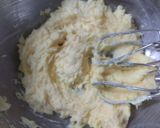
In a separate bowl, use a hand mixer to mix in 100 g of softened butter on high speed until it turns a creamy consistency. Add in the sugar (this is for both the matcha and sakura doughs).
- 4
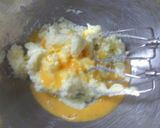
Add 1 beaten egg into the creamed butter and sugar in 2 batches. Mix on low speed so it doesn't separate.
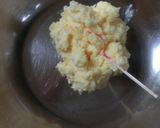
- 5
Once the egg is fully incorporated, divide the mixture into 2 portions (135 g each) and move one portion into a separate bowl.
- 6
Add the pink food colour to the Sakura bowl now (before adding in any flour). Mix while checking to see that the pink is a nice colour.
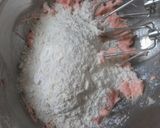
- 7
Add the flour and salt to the sakura batter and mix on low speed. The dough will fly around a bit at first, so use a rubber spatula to scrape down the sides of the bowl.
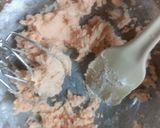
- 8
Once the dough has come together, bring it into a rounded ball shape in the bowl, and cover it with plastic wrap. Chill the dough in the refrigerator for 2 hours.
- 9
Omitting the food colour, complete the matcha dough using the same process.

- 10
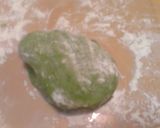
Remove the dough from the refrigerator, and knead it until it is workable for rolling out. Dust the dough with flour (because the dough will be sticky).
- 11
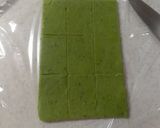
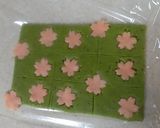
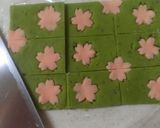
Lay out a sheet of plastic wrap, and roll the dough into a sheet about 3 mm thick. Use the knife to trace out the 4.5 x 3 cm cookies, so you can place the cutouts in a nice pattern.
- 12
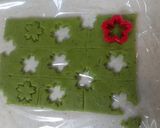
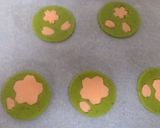
Thinking about the overall balance of the pattern, use a sakura shaped cookie cutter to cut out shapes in the dough. (I bought mine at the 100 yen shop.) Dust the removed shapes thoroughly with flour.
- 13
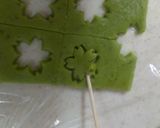
If you have trouble removing the shapes with the cutter, use a toothpick to gently lift the edge of the petal and remove the flower.
- 14
Follow the same process to cut the shapes out of the sakura dough. Transfer the sakura dough cutouts into the holes left in the matcha dough. Press the dough down lightly to blend the two doughs into one sheet. (Don't press too hard).
- 15
Take the resulting cookie sheets and transfer them each onto a tray. Wrap with plastic and let it chill for 15 minutes in the freezer. While the dough is resting, line the baking sheets with parchment paper, and preheat the oven to 160℃.
- 16
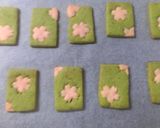
When the dough is firm and almost cold enough to freeze, remove it from the freezer and cut out the cookies with a knife. Press along the cutting lines with the knife blade and the stiffened dough should cut cleanly.
- 17
Space the cut cookies evenly on the baking sheet, and bake for 5 minutes at 160°C. Cover with aluminum foil, and continue to bake for an additional 6-7 minutes.

- 18
When the cookies have finished baking, cool them on the baking sheet for about 10 minutes. After 10 minutes, you can move them to a tray to finish cooling.
- 19
When the cookies have cooled, touch the reverse side to check for doneness. If the reverse is soft, cover the cookies again with aluminum foil, and bake in a 160°C oven for 2-3 minutes.
- 20
The cookies will be slightly soft at 160°C. If you want harder crunchier cookies, bake at 170°C before adding the aluminum foil, and 180°C after adding the aluminum foil.
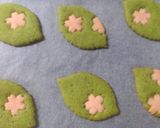
- 21
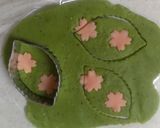
If you want to make leaf-shaped cookies, press the leaf cutter shape into the rolled dough to leave an impression of where you will cut the cookies. Use these impressions to cut out the sakura pattern in a balanced way.

- 22
Add the sakura dough cutouts to the holes you have made, and then use the leaf cutter to cut the cookies out along the lines you already created for the cookies.
- 23
Round shapes are also cute. If you used a cookie cutter, remove the excess dough around the cookies, wrap them in plastic, and chill in the freezer for about 10 minutes.
- 24
Once the cookies are half frozen, they are hard enough not to bend out of shape, and can be saved. You can wait to transfer the cookies to the cookie sheet before adding sakura shapes to the holes.
- 25
Finished leaf cookies. The cooking time will vary depending on the size of the leaves. Cook for about 5 minutes before covering with aluminum foil, and then cook until they seem done.
- 26
If you stack the matcha dough on top of the sakura dough and roll them out together, you can make reversible cookies. If you have dough remaining, lightly stick pieces of the dough together and roll them out to make marbled cookies.

Cooksnaps
Did you know that you can import recipes from anywhere into Cookpad with one click?
https://blog.cookpad.com/us/cookpad-recipe-import-feature-save-recipes-from-anywhere/
Download Cookpad app to plan your meals and store your cooking ideas in one safe place! https://cookpad.wasmer.app/us/download
Keywords
Similar Recipes
More Recipes
-


-


-


-

-


-


-


-


-


-
")
A Simple Christmas Cake (that even Santa will love)

-

 jagerlad
 -
 Cookies")
Witzy (from Suzy's Zoo) Cookies
-

Pot au Feu with Pancetta and Chunky Vegetables
-

Canned Mackerel Sandwiches From the U.S.
-

-
 With Lots of Mushrooms")
Hayashi Rice (Hashed Beef Stew) With Lots of Mushrooms
-

Taiwanese Hot and Sour Soup with Leftover Vegetables
-

Soy Beans and Hijiki Seaweed Side Dish
")


")


Comments (2)