 Authentic home cooking from Spain, with US measurements.
Mallorcan Ensaimadas – The Authentic Recipe!
Watch the video for this recipe here: https://goo.gl/sugLHo
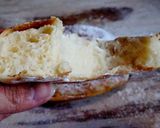
Have you ever tried Mallorcan ensaimadas? They’re fluffy, tender, and delicious. You can fill them with whatever you like best. Ready to make your own ensaimadas?
Mallorcan Ensaimadas – The Authentic Recipe!
Watch the video for this recipe here: https://goo.gl/sugLHo
Have you ever tried Mallorcan ensaimadas? They’re fluffy, tender, and delicious. You can fill them with whatever you like best. Ready to make your own ensaimadas?
Steps
- 1
First, make the sourdough starter: Dissolve 2 1/2 teaspoons (10 grams) of fresh yeast in 1 1/2 tablespoons (20 ml) of warm water. Once dissolved, mix with 1/3 cup (40 grams) bread flour and knead until you form a small ball. Place it in a lightly oiled bowl, cover with plastic wrap, and let it rest for about 4 hours or overnight in the fridge. I prefer to leave it overnight to better manage my time.
- 2
Now, make the dough: In a stand mixer or similar, add the eggs, sugar, and the sourdough starter (broken into small pieces). In a cup, dissolve the remaining 2 1/2 teaspoons (10 grams) fresh yeast in the 7/8 cup (210 ml) warm water until fully dissolved. Add half the flour and half the yeast-water mixture to the mixer and start mixing. Once combined, add the remaining flour and yeast-water mixture.
- 3
Knead for about 30 minutes. To prevent the dough from overheating, knead in 10-minute intervals, letting it rest a few minutes between each. After 30 minutes, the dough should be elastic and pull away from the sides of the bowl.
- 4
Lightly flour your work surface and knead by hand for another 15 minutes. The dough is ready when you can stretch a small piece until it forms a thin, almost transparent membrane without tearing.
- 5
Once well kneaded, divide the dough. For large ensaimadas, use about 10 1/2 oz (300 grams) of dough; for individual ones, use 3–3 1/4 oz (80–90 grams) each. Let the dough rest for 10 minutes to make it easier to handle.
- 6
Now, shape the ensaimadas: Roll out a portion of dough into a rectangle (lightly oil the surface so the dough doesn’t stick). Spread plenty of room-temperature lard over the dough. Gently stretch the dough from the edges to make it wider and thinner, almost transparent.
- 7
Once stretched, cut a small strip from one edge and place it on the opposite edge. Roll up the dough from the long side, like a jelly roll. Repeat with all portions, then let them rest for 15 minutes to relax the gluten and make shaping easier.
- 8
Prepare baking sheets lined with parchment paper. Take each rolled piece, gently stretch it with your hands, and shape it into a spiral. Leave about two finger-widths of space between each so they have room to rise. Use one baking sheet for large ensaimadas, and space out the small ones so they don’t stick together as they rise.
- 9
Cover with lightly oiled plastic wrap to prevent drying out, and let them rise for 11 to 15 hours. Yes, you heard right—11 to 15 hours! These need a very slow rise. I put them in the oven at 6 pm and baked them around 9 am the next day.
- 10
After the long rise, the ensaimadas will have expanded and taken on their classic shape. Remove the plastic wrap and bake at 320–350°F (160–175°C) for about 15 minutes. Watch closely—they can burn quickly! They’re ready to enjoy; we couldn’t resist trying one fresh from the oven. So soft and delicious!
- 11
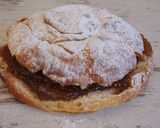
If you want to fill them, wait until they cool, slice them like a cake, and fill with whatever you like: whipped cream, pastry cream, or candied pumpkin (cabello de ángel).

- 12
The most traditional filling in Mallorca is candied pumpkin (cabello de ángel).
- 13
For best results: I made the sourdough starter the morning before and kept it well covered in the warmest part of the fridge. The next day, I took it out an hour before using so it wasn’t too cold. This dough needs a lot of kneading, so it’s best to start with a mixer and finish by hand. Be sure to do the windowpane test—stretch a small piece until it forms a thin membrane without tearing. That’s how you know the dough is ready!
- 14
Don’t be afraid to use plenty of lard—the more you use, the flakier the result. Stretching the dough is easier than it looks, so don’t worry if it tears a little; you’ll be rolling it up anyway. Traditionally, these were filled with candied pumpkin before baking. If you want to fill them before baking, place a line of candied pumpkin next to the strip you cut to form the center, then roll up as usual.
- 15
If you make a lot, I recommend freezing them right after shaping into spirals. Wrap well with plastic wrap once frozen. When you want to bake them, take them out 15–17 hours ahead to thaw and rise again. That way, you’ll have freshly baked ensaimadas.
- 16
You can also freeze them after baking once they’re cool. Keep in mind, like puff pastry, they don’t stay fresh for long. Filled and refrigerated, they last a bit longer, but plain ones get firm by the next day. They’re still good with hot chocolate or coffee, but not as soft and fluffy.
Cooksnaps
Keywords
Similar Recipes
More Recipes
-


-


-


-
")

-

 Akshita
 -


-


-

Japanese Green Peppers and Enokidake Mushrooms Fry

-


-


-

-

Thick Omelet with Butternut Squash and Peas

-

")
-


-
Thick Omelet with Butternut Squash and Peas
-


-

Vanilla Cupcakes with Dazzling of Chocolate
Menaaz Cassim -


-


-

Stuffed meat & bell pepper pasta

")
 Escabeche")


