 Authentic home cooking from Italy, with US measurements.
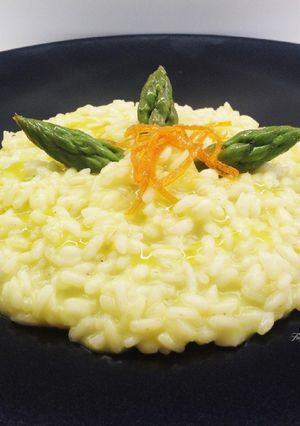
Risotto with Asparagus and Orange
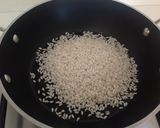
I toast the rice dry, without oil or sautéing, because otherwise the fat can burn or the rice doesn't toast properly. In a hot pan (preferably stainless steel or aluminum for even heat distribution), add the rice without any fat and toast it over low heat. Gently stir so you don't break the grains, and test with your fingers until the grains feel hot (about 122–140°F / 50–60°C). This is an important step. We haven't added anything yet, so the flavor of the grain is the focus of the dish, and we've reduced the fat content. At this point, you can start adding other ingredients. The first important detail is that during cooking, the rice should always be covered with liquid; this way, the starches are released and the grains don't break. This also ensures the rice cooks evenly: if the liquid doesn't cover the rice, the grains on top won't cook like those fully submerged or at the bottom of the pot. Using a whisk to stir the rice helps the starches emulsify, making the risotto even creamier! For perfect creaminess, add cold acidified butter (chill it in the freezer for a bit). The temperature shock will make the risotto even creamier and more balanced, while also reducing the fat content. If you want to make the risotto easier to digest, add a tablespoon of vinegar when finishing. I use only water, not broth.
Risotto with Asparagus and Orange
I toast the rice dry, without oil or sautéing, because otherwise the fat can burn or the rice doesn't toast properly. In a hot pan (preferably stainless steel or aluminum for even heat distribution), add the rice without any fat and toast it over low heat. Gently stir so you don't break the grains, and test with your fingers until the grains feel hot (about 122–140°F / 50–60°C). This is an important step. We haven't added anything yet, so the flavor of the grain is the focus of the dish, and we've reduced the fat content. At this point, you can start adding other ingredients. The first important detail is that during cooking, the rice should always be covered with liquid; this way, the starches are released and the grains don't break. This also ensures the rice cooks evenly: if the liquid doesn't cover the rice, the grains on top won't cook like those fully submerged or at the bottom of the pot. Using a whisk to stir the rice helps the starches emulsify, making the risotto even creamier! For perfect creaminess, add cold acidified butter (chill it in the freezer for a bit). The temperature shock will make the risotto even creamier and more balanced, while also reducing the fat content. If you want to make the risotto easier to digest, add a tablespoon of vinegar when finishing. I use only water, not broth.
Steps
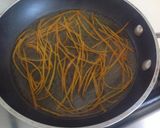
- 1
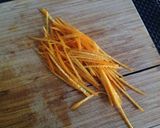
Peel the orange with a vegetable peeler, being careful not to remove the white pith. Cut the peel into thin matchsticks and blanch them in a saucepan for 2–3 minutes. Then drain and dry them.
- 2
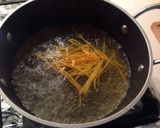
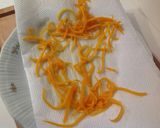
In a small saucepan, combine the sugar, the juice of one orange, and the juice of half a lemon. Heat and add the orange peels. Simmer over low heat until the syrup thickens. Let cool.
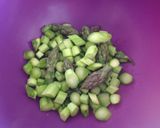
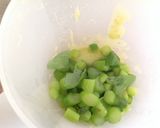
- 3
Trim the tough ends off the asparagus. Use a vegetable peeler to peel the stalks, leaving the tips whole, and dice the rest of the stalks. Boil in salted water for about 6–7 minutes, then transfer to ice water to set the color.

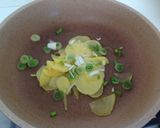
- 4
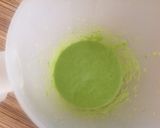
In a hot skillet, add a drizzle of olive oil, the green onion sliced into rings, and the potato thinly sliced. Add salt, cook to soften, then add 1/2 cup (about 120 ml) of the asparagus cooking water and cook until the potato is tender. Let cool, then blend with the asparagus (except the tips, which you'll season with oil and pepper), a couple of basil leaves, and a drizzle of olive oil. The mixture should be smooth and fluid. Adjust salt to taste.
- 5
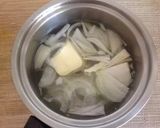
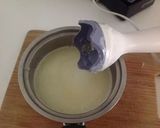
Make the risotto: In a small pan, add half a sliced onion, a generous tablespoon of butter, and a little water. Cook for about 15 minutes, then blend with an immersion blender and set aside. This step helps prevent the fats from burning in the risotto.
- 6
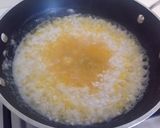
In a hot pan, add the rice and toast it without any fat. Toasting the rice is important because it helps release starch and, without added fat, the recipe is much lighter. When the rice feels hot to the touch, it's ready.
- 7
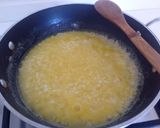
Begin adding broth (or just water to highlight the main ingredient) a little at a time. Add the blended onion with water and butter. Cook over high heat, adding more broth as it is absorbed. Stir gently each time you add broth to avoid breaking the grains. After 5 minutes, add the juice of one orange.
- 8
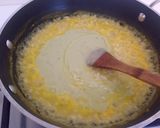
After another 5 minutes, add the asparagus cream. Continue cooking. When the rice is cooked, turn off the heat. Do not let it dry out—keep it very loose, as it will thicken. Remember to add the cheese, and plating will thicken it further. Now add the robiola and black pepper, and stir in a splash of broth (or water).
- 9
If it seems too thick, add more water. Let rest, covered, for 30 seconds, then serve, garnishing with the asparagus tips and candied orange peel.

- 10
Note: If you want to make it easier to digest, add a tablespoon of vinegar when finishing the risotto.
Similar Recipes
More Recipes
-


-
 Pinwheel cookies(No Oven Recipe)")
Whole wheat flour (Aata) Pinwheel cookies(No Oven Recipe)

-


-


-


-
")
MOTHER'S DAY SPECIAL, MOM'S FAV PATISAPTA PITHA (#CA26 #mother's_day'26)

-


-

-


-


-


-

Sugar free Keto Almond Spice cookies

-


-

Beef and cauliflower with creamy parmesan sauce

-


-


-


-


-


-


-


-


-

"Lovonio Tomato chutney" #weekRed

-


