
Egg & Dairy-Free Decorated Cake
I made this cake for my daughter's birthday.
The sponge is a variation of Patricio Garcia de Paredes' recipe that I re-arranged for a smaller amount.
You only need to mix ingredients together for the sponge, so it's simple.
Soy milk whipped cream is especially hard to whip when you're trying to get it to form stiff peaks. Chilling it beforehand or adding a little lemon juice makes it a bit easier. Recipe by Meifan
Steps
- 1
Lightly grease a cake tin with oil and line with parchment paper (bottom and sides.) Preheat the oven to 180°C.
- 2
Add the dry ingredients marked with ◎ to a bowl and mix with a whisk to incorporate air. Add the wet ingredients marked with ☆ to a separate bowl and mix together well.
- 3
Add the wet ingredients into the dry ingredients in one go and mix with a whisk until there are no lumps left.
- 4
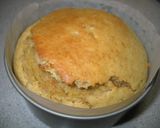
Pour the mixture into the cake tin and bake for about 30 minutes at 180°C. Insert a skewer into the middle to check if it's done; if it comes out clean, it's ready.
- 5
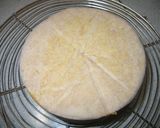
Leave the cake in the tin and cool for approx. 10 minutes. Flip the cake out onto a wire rack and cool for a further 30 minutes. It'll dry out less if you leave the parchment paper attached.
- 6
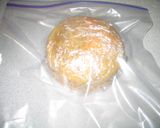
Peel off the paper and tightly wrap with cling film. Put the cake inside a plastic bag and cool in the refrigerator. (If you cool it for 1-2 hours it'll be easier to decorate.)
- 7
Add the soy milk whipped cream to a bowl along with the beet sugar and whip until stiff peaks form. This cream is harder to stiffen than normal heavy cream, so if you're having trouble add a little lemon juice.
- 8
Take the cake out of the refrigerator and slice a little off the top to level it out. Slice the cake in half to create 2 layers. Wrap the top layer in cling film to prevent it from drying out.
- 9
Spread cream over the top of the lower cake layer and add some fruit over the top. Spread cream over the top of the fruit as well.
- 10
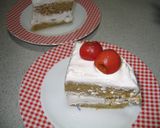
Unwrap the top cake layer and place it on top of the bottom later. Spread cream over the top and along the sides of the cake. Decorate the top of the cake with fruit and other decorations.
- 11
Place a cake dome over the top of the cake and leave it in the fridge until the cream has set. Leave it to chill in the fridge until it's ready to eat.
- 12
Cut and serve.
Cooksnaps
Did you know that you can import recipes from anywhere into Cookpad with one click?
https://blog.cookpad.com/us/cookpad-recipe-import-feature-save-recipes-from-anywhere/
Download Cookpad app to plan your meals and store your cooking ideas in one safe place! https://cookpad.wasmer.app/us/download
Keywords
Similar Recipes
More Recipes
-
")

-

-

-

-

-

-

Ray's' Reese's Cream Cheese Dipper

-


-


-

Starter Avocado Soup with Spicy Grilled Shrimp

-


-

Brown Rice Amazake Bread in a Bread Maker

-
 Cooked in a Pressure Cooker")
Hummus (Chickpea Paste) Cooked in a Pressure Cooker
-

Simple Egg-Free Whole Wheat Cookies
-

*Macrobiotic*Sweet & Sour Pork Style Stir-fry♪
-

 Irishlad59
 -

Crispy Sakura Cookies for Spring
-

●Yeast made from Home-grown Germinated Brown Rice●
-

Chocolate Mousse with Brown Rice Amazake
-


Comments