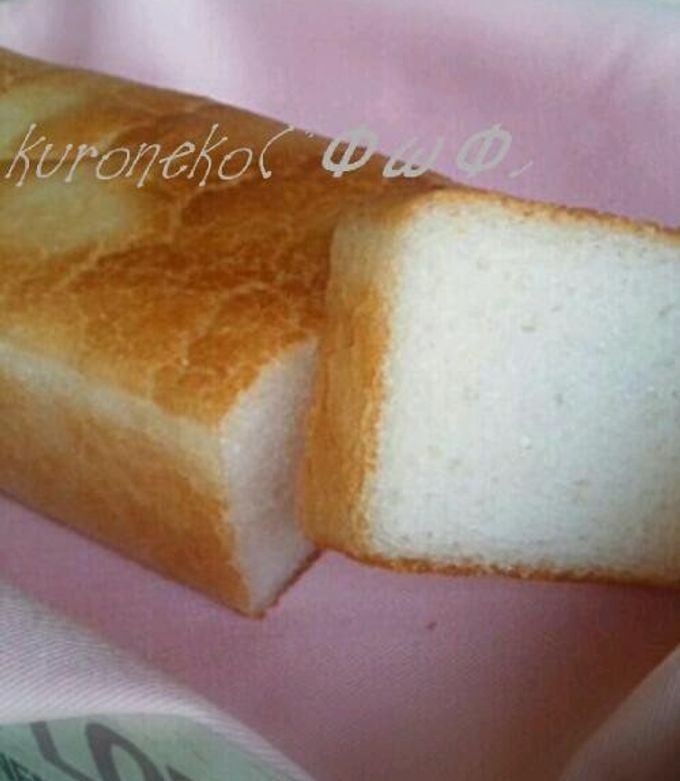
Allergen-free Rice Flour Mini Loaves
My son has allergies! And since I'm breastfeeding him, this limits what I can eat as well. But sometimes I want to enjoy bread, which I love. So I made this through trial and error. From having it fail to expand, to it expanding yet withering... I experienced a lot of failures.
Please use confectionery rice flour, ones that are suited for cakes. It should be written on the package. That'll give you a nice, soft bread.
Using rice flour only makes it too sticky, like mochi. Through trial and error I came up with a bread that I could be happy with. Recipe by Kuroneko3129
Steps
- 1
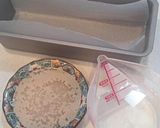
Soak the dry yeast in 30 ml of the listed amount of the lukewarm water (a rough estimate of the lukewarm water is fine). Spread out parchment paper in your pound cake pan.
- 2
Combine the rice flour, cornstarch, sugar, and salt in a bowl with a whisk. Then mix in the warm water, followed by the dry yeast.
- 3
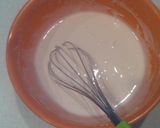
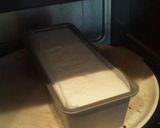
Add the oil last and mix well. The batter will become creamy. If it hasn't become creamy, add more warm water. See the image for reference. Pour into the pan.

- 4
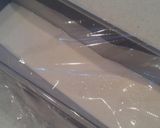
Gently cover with plastic wrap and let sit at room temperature. Allow to rise to twice it's volume. It'll depend on the temperature of the water - if it's not that warm, it'll take time to rise.
- 5
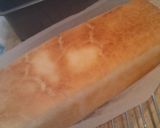
Once the batter has risen to 1.5 times its volume, preheat your oven to 200℃. When it gets to 2 times its volume, bake for 25-30 minutes. Cover with aluminum foil mid-way to stop it from burning.
- 6
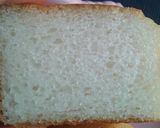
It's done if you can cleanly skewer it with a toothpick. Remove from the pan and cool. Cut it once it's cooled.
- 7
It stays soft and chewy even the next day. Everyone can enjoy eating the same bread, even those with allergies.
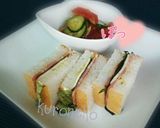
- 8
I tried making sandwiches with this. My husband tried it out and said it was delicious, gobbling it up. Take care with what you put in the sandwich with regards to eggs and milk allergies.
Cooksnaps
Did you know that you can import recipes from anywhere into Cookpad with one click?
https://blog.cookpad.com/us/cookpad-recipe-import-feature-save-recipes-from-anywhere/
Download Cookpad app to plan your meals and store your cooking ideas in one safe place! https://cookpad.wasmer.app/us/download
Keywords
Similar Recipes
More Recipes
-

Non-Fried Egg Yolk & Veggies Pakora

-


-


-

Egg Bread Roll | Crispy & Tasty Breakfast Recipe

-
")
Dad's Favourite Ofe Akwu (Banga Stew)

-

Oats Cranberry and Nuts Cookies

-
")
Crunchy & Fluffy Nutty Sabudana Khichdi (Rainy Day Special)

-

Crispy Protein-Rich Soya-Veggie Pakoda

-


-


-

Garlic Parmesan Salmon Patties

-


-

Chocolate covered strawberries

-

LuBella's Stuffed Eggplant Parmigiana

-


-

-


-


-
-
-


-
")

-


-
 kgabella
 -


Comments (3)