Allergen-Free Rice Flour Pullman Loaf
I came up with this recipe out of the desire to satiate my child with allergies, who wants to eat what his older brothers are eating.
Adjust the amount of water to suit the type of flour you are using.
This bread can also be frozen.
You can also add raisins or pineapple to the bread (like the bread in school lunches). For 6 by 14 and 1/2 cm [0.8 in] loaf-shaped plastic container. Recipe by Toshihaya
Steps
- 1
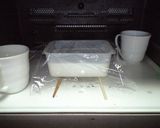
Coat the inside of a plastic container with margarine (not listed).

- 2
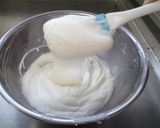
Combine all the ingredients except for the water, then add lukewarm water until the dough thickens.
- 3
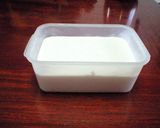
Pour the dough into the prepared loaf-shaped plastic mold, and lightly wrap with saran wrap. The batter will fill the container about 80 percent.
- 4
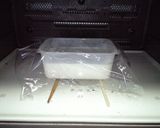
Set the Tupperware on top of two chopsticks, and cook in the microwave for 30 seconds (40 seconds in the winter) at 500 W. Leave in the microwave for 30 to 40 minutes to let the dough rise.
- 5
Helpful tip: While the dough is rising, set two cups filled with hot water in the microwave to maintain the temperature.
- 6
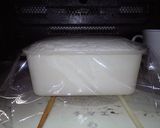
It is finished rising once the dough rises to the top of the container. (It may take up to 50 to 60 minutes to rise in the winter.)
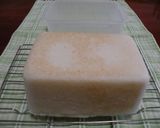
- 7
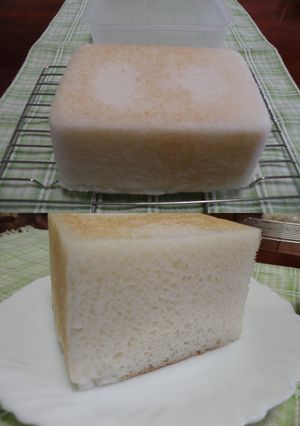
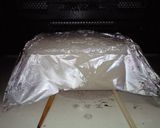
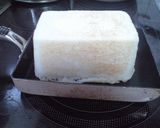
Without removing the saran wrap, heat for 6 minutes at 500 W, then it's done.(The above photo shows the baked bread.) Remove from the container while still hot, and cool.
- 8
It's tasty and fluffy right out of the oven (Step 7), but my family likes a baked finish, so I brown the crust in a pan.
- 9
Place on a rack until the heat dissipates. It should have a fluffy texture, but if it gets tough, microwave for a few seconds to soften.
Cooksnaps
Did you know that you can import recipes from anywhere into Cookpad with one click?
https://blog.cookpad.com/us/cookpad-recipe-import-feature-save-recipes-from-anywhere/
Download Cookpad app to plan your meals and store your cooking ideas in one safe place! https://cookpad.wasmer.app/us/download
Similar Recipes
More Recipes
-

Nepali Chukauni ~ Simple Potato 🥔 Comfort Bowl 🥣

-

No Onion No Garlic Paneer Butter Masala

-

Crunchy Salt and Pepper Pork Chops

-


-


-

BBCCC: Brown Butter Chocolate Chip Cookies

-


-


-


-


-

Sweet Potato and Bacon in Oyster and Mayonnaise Sauce

-

-

No Eggs, Food-Allergy Friendly Spongecake
-
-

Easy Spring Rolls with Cheese and Wieners
-
-
")
Canned Crab Meat and Spinach Soup (Low-Carb)
-

Low Sugar: Bean Sprouts, Cucumber, Ham, with Sesame


")


Comments