Basic Pizza Dough
I think that kneading flour into dough is the ultimate Slow Food. When I'm leisurely kneading dough on a day off while listening to music, all my daily stress just disappears. The dough will become more delicious too.
The most important thing is to knead the dough thoroughly. Please knead it well for 20 to 30 minutes while listening to music. Just be careful not to knead your iPod into the dough! The other key is to rest the dough in the refrigerator. It will become very easy to flatten out. Recipe by Koba
Cooking Instructions
- 1
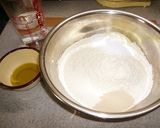
Measure out the flour, dry yeast, sugar, salt and skim milk powder, and combine in a bowl.
- 2
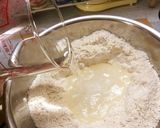
Make a well in the middle of the flour, and add 90% of the lukewarm water. The water should not be hot to the touch, or the yeast will die.
- 3
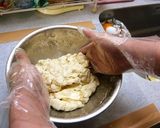
Mix the contents of the bowl. If you cover your hands with plastic gloves the dough won't stick to them. If the dough is too stiff, add the rest of the lukewarm water. It can be on the stiff side.
- 4
Mix in the olive oil. Knead the dough until it cleanly comes off the sides of the bowl (about 5 minutes).
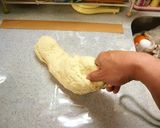
- 5
Knead the dough on a work surface. I use a thick (3 mm) vinyl sheet as a kneading surface. Fold the dough towards you as you knead.
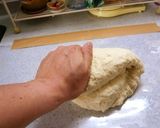
- 6
Knead, or bash the dough on the work surface (it's great for releasing stress). Get rid of your stress for 20 minutes.
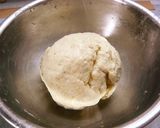
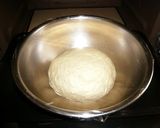
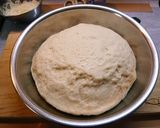
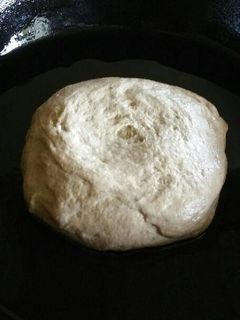
- 7
When the dough is silky smooth and bouncy, the kneading is done. Leave to rise (1st rising) in a 37°C oven for about 1 hour.
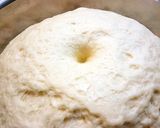
- 8
When the dough has about doubled in volume, the 1st rising is done. The rising time will vary depending on the season (temperature, humidity). It should double approximately in volume.
- 9
Poke the dough with your index finger, to make sure the hole doesn't fill back up. Apparently this is called the "finger test". If the hole fills up, let the dough rise a bit more.
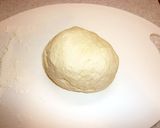
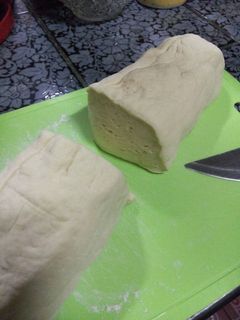
- 10
Cut the dough into 4 portions with a pastry scraper (or a knife). Round off each portion of dough, so that they have a smooth, taut surface (rather like steamed buns).
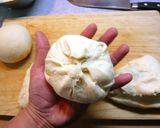
- 11
Roll the dough balls on a work surface to make their surfaces really smooth.
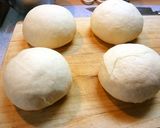
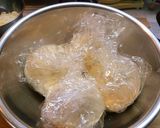
- 12
(This is a key point) Rest the dough in the refrigerator. Wrap each ball of dough in plastic wrap, and rest for at least 2 hours (or up to half a day).
- 13
Even in the refrigerator, the dough will rise in residual heat. Press down lightly to deflate the dough, and round off the dough again using bread flour (not listed) to dust your work surface.
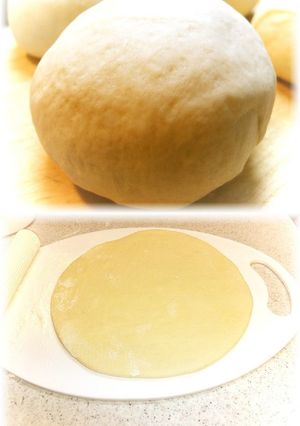
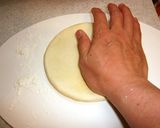
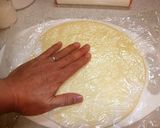
- 14
Press each dough ball out with the fat part of your palm into a circle. Since the dough has rested in the refrigerator, it will be very easy to flatten.
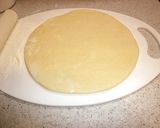
- 15
You can flatten it to about 7-8 mm in thickness just using your hands, but use a rolling pin to make it about 5 mm thick. Make sure to keep the dough circular.
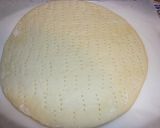
- 16
Cover the dough circle with one of the pieces of plastic wrap you used to wrap the balls. Stroke with your hands to shape and smooth out the dough.
- 17
Poke several holes in the dough with a fork to finish. Stab it repeatedly, but gently! The basic pizza crust is done.
Cooksnaps
Did you make this recipe? Share a picture of your creation!

Similar Recipes
-

Easy Pizza Dough Easy Pizza Dough
I don't like pizza crust that's too soft and fluffy like bread. So I thought in that case, I don't really need to bother too much about kneading and rising times. I tried out my theory, and the result was a crunchy, nutty crust that had just the right softness and was delicious, so I made it into a recipe!In the summer, just leave the dough to rise at room temperature, and it will do so while you are preparing the toppings. In the winter, use your oven's bread-rising setting or put the dough in a warm location for 10-15 minutes, which is enough. This crust is not puffy like bread, so you only need to leave it to rise for a short time. Recipe by Lesser Panda
-

Simple Pizza Dough Simple Pizza Dough
I wanted to make a pizza dough that I could make as soon as wanted it.If you prepare the topping ingredients before making the dough, then you don't need to deflate the dough in Step 3.You can freeze the dough. Next time you want to use it, just defrost in the microwave. Recipe by emakatu -

Quick Pizza Dough Quick Pizza Dough
Just the dough!You'll have to use your own inspiration for the toppings :)
-
Perfect Pizza Dough Perfect Pizza Dough
A recipe that can be tweaked to make bread dough or even replace the water with a beer to make It a beer dough recipe!
-

Quick Pizza Dough Quick Pizza Dough
The dough for the crust is quick to make but you cannot rush to yeast rising.
-

Perfect Pizza Dough Perfect Pizza Dough
This is my go-to pizza dough. It's so fun and easy to make! The cool thing about this pizza dough is you can either cook it in a hour or let it rise in the fridge for 3 days! I've tried a ton of different recipes but this one is the best
-

Great Pizza Dough Great Pizza Dough
This pizza dough is easy and consistently light and fluffy. We use Heinz chili sauce instead of pizza sauce.
-

-

Thin Pizza Dough Thin Pizza Dough
TIPS:The dough can be frozen. Remove it from the freezer 2 hours before. Put plenty of flour on the work area when rolling out the dough because it is wet.You can put seeds in the flour (such as pipes, poppy seeds…).Some ingredients can let out a lot of water (such as courgette) and the dough can be soft. Cook the ingredient first and drain it a bit.
-
-

Pizza Dough Pizza Dough
source: https://sugarspunrun.com/wprm_print/13562Notes¹I've found that all-purpose flour yields a softer crust while bread flour gives a slightly crispier exterior. Please see the post for more information on all-purpose vs. bread flour in pizza dough.²Many commenters have reported using active dry yeast (use the same amount, 2 ¼ teaspoon) with success. Some people have proofed the yeast first with the ¾ cup warm water, which is what I would recommend, while others have just mixed it into the dough as instructed. Both have had success!³Ideally your water should be between 105-115F (40-46C). I usually just use warm tap water but do make sure that your water isn't too hot or it will kill your yeast!
-

Authentic Homemade Pizza Dough Authentic Homemade Pizza Dough
This is our family's pizza dough.Lukewarm water: Always keep it around 40℃, since the rising will not occur well if the water is cold or hot.Storage in fridge: If you put the dough in a tightly closed plastic bag, it will be okay for 2 to 3 days. Recipe by Haruna
More Recipes
- Italian Bread-Style Okara Bread
- A Healthier Breakfast: Tofu Banana Oatmeal
- "Cottage Cheese" from Soy Milk
- Macrobiotic Baked Rice Bran & Natto Dumplings
- Mike's Quick 6 lb Party Wing Pack
- Taylor's Family Favorite Fried Rice
- High Protein Chickpea Curry
- Macrobiotic White Miso Cauliflower Soup
- Clams Casino Over Linguine
- Meat-free Chickpea Gyoza

Comments