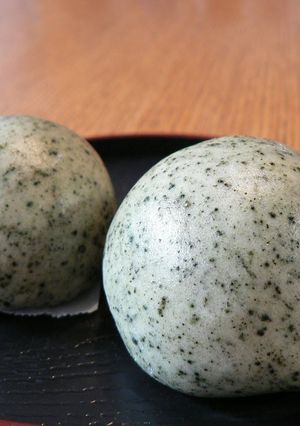
Yomogi Manju
I wanted to eat freshly-made, piping-hot manju. For the filling, since I like really sweet adzuki, making it by hand is the fastest way!
Since yomogi wasn't in season, I bought dried yomogi instead.
I used dried yomogi this time. Depending on the kind of dried yomogi, the preparation methods may differ, so follow the instruction. Of course, fresh yomogi is best!
The dough is extremely soft and sticky. This time, I refrigerated it before handling, which made it a lot easier. For 12. Recipe by Te-03
Steps
- 1
Make the filling. First, cook the adzuki beans. Boil the *water with the beans until tender, then add the *salt and *sugar and simmer until the liquid reduces, mashing the beans as you go.
- 2
Portion the filling from Step 1 (or store bought filling) into 12 balls.
- 3
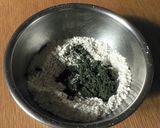
Mix together the cake flour and dried yomogi.
- 4
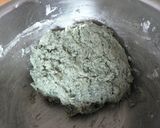
Put the water and sugar into a bowl, and heat to melt the sugar. After cooling, add baking soda and combine with the dough from Step 3. Let chill in the refrigerator to make it easier to handle.
- 5
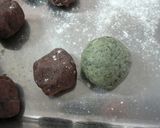
Break the dough from Step 4 into 12 balls. (About the same size as the filling balls).
- 6
Shape the manju. Flatten the dough balls from Step 5 and place a filling in the center.
- 7
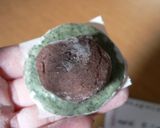
Use your thumb and pointer finger to stretch the dough up and around the filling like in the picture. If you leave the bottom slightly thicker than the rest, it looks nicer when finished.
- 8
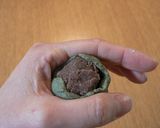
It's done! It's fine if this dough is a little thinner at the bottom. Be sure to completely cover the filling.
- 9
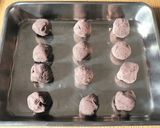
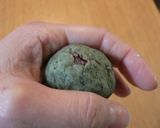
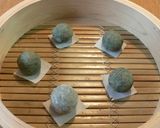
Once you get all the dough and filling balls to Step 8, put the opening side down and lightly coat with katakuriko. They'll be nice and shiny when finished. You could also omit it.
- 10
Place the manju in a steamer on 3-4 cm sheets of parchment paper. They will plump when steamed, so leave a little room between.
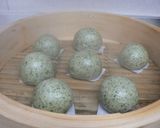
- 11
Steam for about 10 minutes, and they're done. This picture was taken just after they finished steaming.
Cooksnaps
Did you know that you can import recipes from anywhere into Cookpad with one click?
https://blog.cookpad.com/us/cookpad-recipe-import-feature-save-recipes-from-anywhere/
Download Cookpad app to plan your meals and store your cooking ideas in one safe place! https://cookpad.wasmer.app/us/download
Similar Recipes
More Recipes
-
 jam")

-

Crispy Garlic Butter Baked Potatoes

-

Lemon mint kadha for digestion

-


-


-


-

Brown Butter Mini Chocolate Chip Cookies

-

Fudgy Brownie Cookies with Crackly Tops
-

Easy peasy leftovers pasta salad

-

-


-

Mom's apple pie/ diabetic friendly
-

Light and Moist Chocolate Sponge Cake

-

Tender Pressure Cooker Spareribs
-

Light and Airy Strawberry Mousse with White Wine
-

-

Spicy Garlic Shoots and Atsuage
-

-


-

Chocolate Manju with Kabocha Filling
-

-

Easy Strawberry Daifuku Made in a Microwave
-

Toshichin-mama's Milk Yokan Jello


Comments