CookpadCookpad
Guest
Register or Log In
Save and create recipes, send cooksnaps and more
  • Search
  • Premium
    • Top Cooksnapped Recipes
    • Top Viewed Recipes
  • Premium
  • Challenges
  • FAQ
  • Send Feedback
  • Region
  • Your Collection
Your Collection
To start creating your recipe library, please register or login.
Rainbow cake
Save this recipe to come back to it later.
  • Add Cooksnap
  • Add to folders
  • Print
  • Share
    • Copied!
    • Email
    • Facebook
    • Pin it
    • Twitter
  • Report Recipe
  • See report
  • Edit recipe
  • Delete
CookpadCookpad
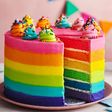
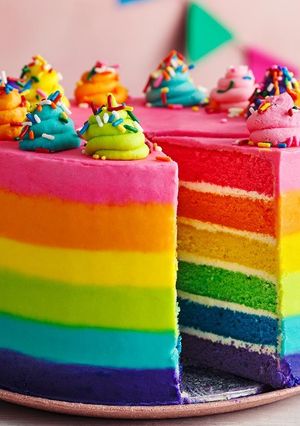
A picture of Rainbow cake.

Rainbow cake

kasus303
kasus303 @kasus303

KASUS303

KASUS303

Read more

Rainbow cake

kasus303
kasus303 @kasus303

KASUS303

KASUS303

Read more
Saved
Save this recipe to come back to it later.
Edit recipe
See report
Add to folders
Add CooksnapAdd Cooksnap
ShareShare
  • Copied!
  • Email
  • Facebook
  • Pin it
  • Twitter
PrintPrint
  • PrintPrint
  • Add CooksnapAdd Cooksnap
  • Report Recipe
  • See report
  • Delete
Share
  • Copied!
  • Email
  • Facebook
  • Pin it
  • Twitter
Save this recipe to come back to it later.
  • Add Cooksnap
  • Add to folders
  • Print
  • Report Recipe
  • See report
  • Edit recipe
  • Delete

Ingredients

10 - 30 minutes
12 - 18 servings
  • For the sponge
  • 500g/1lb 2oz salted butter, at room temperature, plus extra for greasing the tins
  • 500g/1lb 2oz caster sugar
  • 10large free-range eggs, lightly beaten
  • 3 tbspvanilla extract
  • 500g/1lb 2oz self-raising flour, plus extra for dusting the tins
  • For the buttercream
  • 500g/1lb 2oz salted butter, at room temperature
  • 1kg/2lb 4oz icing sugar
  • 3 tbspvanilla extract
  • 2 splashesmilk
  • To decorate
  • food colouring paste, in pink, purple, yellow, green, orange and blue
  • multi-coloured sprinkles or funfetti
Cookpad Open in Cookpad App
Saved
Save this recipe to come back to it later.

Steps

10 - 30 minutes
  1. 1

    Preheat the oven to 170C/150C Fan/Gas 3. Grease 6 x 20cm/8in loose bottom sandwich cake tins (approximately 4cm/1½in deep) and line the bottoms with greaseproof paper. Dust the tins with flour, then shake out the excess.

  2. 2

    Beat the butter and sugar together in a stand mixer or with a handheld electric whisk on a high speed until pale and fluffy. Turn the mixer to low speed and add the eggs bit by bit, mixing on high speed after each addition. Add the vanilla, then add half of the flour. Mix until combined, then add the rest of the flour and mix until you have a smooth cake batter.

  3. 3

    Divide the batter equally between 6 medium-sized bowls and add dashes of each of the food colourings. Mix until you have a pink, yellow, orange, green, blue and purple batter. Pour each colour into one of the prepared tins and bake for approximately 25 minutes, turning after 18 minutes so they colour evenly. Once baked, cool the cakes on a wire rack, then wrap in cling film and store in the fridge.

  4. 4

    To make the buttercream, place the salted butter in the bowl of an electric mixer. Sift the icing sugar on top, bring the mixture together at a low speed, then beat at high speed for a few minutes until the mixture is pale and fluffy. Add the vanilla extract and beat to combine.

  5. 5

    Remove the cakes from the fridge and trim the domes off so they are flat. Discard the off cuts. Place the 18cm/7in non-slip mat on the turntable and put the 20cm/8in cake board on top. Put a dab of buttercream on the cake board and place the purple sponge on top. Spread a ¾cm/½in thick layer of buttercream on the top, then place the blue sponge on top. Repeat this process for the green, yellow, orange and pink sponges until you have assembled the whole cake with five layers of buttercream in bet

  6. 6

    Using a knife or a cheese grater, trim the sides of the cake to within a few millimetres of the cake board it’s sitting on. Add a splash of milk to the buttercream and beat for 30 seconds to loosen. Put 2 spoons of the buttercream on the top of the cake, then spread the buttercream towards the edges and down the sides with a palette knife. Scrape of any excess and discard. This layer should be very thin, almost translucent in parts. Return the cake to the fridge for 10 minutes.

  7. 7

    Divide the remaining buttercream into 6 equal portions and place in bowls. Colour the buttercream in the same way you coloured the cake batter, then place each colour into a separate piping bag.

  8. 8

    Put the 25cm/10in non-slip mat on the turntable and place the 30cm/12in cake board on top, along with the cake. Pipe concentric rings of each colour buttercream around the outside of the cake, in the same order as the picture. Add enough pink buttercream to cover the top of the cake. Scrape the excess buttercream off the sides of the cake using the side scraper. Turn the turntable in a fluid motion while ensuring you keep the blade at a 45 degree angle against the side of the cake with your othe

  9. 9

    Using your palette knife, carefully brush any excess buttercream that’s gathered at the rim of the cake towards the centre, aiming all the time for sharp edges, straight sides and a flat top. If the buttercream has ‘torn’ in places, dip your palette knife in hot water and use that to smooth over any imperfections. Put the cake back in the fridge for 10 minutes, or until you’re ready for the next stage.

  10. 10

    Put the cake directly on the turntable. Pipe 6 swirls on top of the cake with your remaining colours and sprinkle them with the multi-coloured sprinkles.

Saved
Save this recipe to come back to it later.
Edit recipe
See report
Add to folders
Add CooksnapAdd Cooksnap
ShareShare
  • Copied!
  • Email
  • Facebook
  • Pin it
  • Twitter
PrintPrint
  • PrintPrint
  • Add CooksnapAdd Cooksnap
  • Report Recipe
  • See report
  • Delete

Cooksnaps

Saved
Save this recipe to come back to it later.
  • Add Cooksnap
  • Add to folders
  • Print
  • Share
    • Copied!
    • Email
    • Facebook
    • Pin it
    • Twitter
  • Report Recipe
  • See report
  • Edit recipe
  • Delete

Copied!

kasus303
kasus303 @kasus303
on August 02, 2023 22:58
https://heylink.me/kasus303official/
Read more

Comments

Ghosia Hammad
Ghosia Hammad @cook_and_crocks
August 13, 2023 21:32
Fantastic made to perfection 👌
Guest
Add a comment
0/0

Similar Recipes

More Recipes

  1. A picture of Chili.

    Chili

    Maeli Maeli
  2. A picture of Roasted Pork Roast with Onions.

    Roasted Pork Roast with Onions

    skunkmonkey101 skunkmonkey101
  3. A picture of Tilapia Plate.

    Tilapia Plate

    Maeli Maeli
  4. A picture of Burgers & Fries.

    Burgers & Fries

    Maeli Maeli
  5. A picture of Slow Cooker Beef & Veggies.

    Slow Cooker Beef & Veggies

    Maeli Maeli
  6. A picture of Chili Dog Casserole.

    Chili Dog Casserole

    Maeli Maeli
  7. A picture of Chicken Enchilada Casserole.

    Chicken Enchilada Casserole

    Maeli Maeli
  8. A picture of Zobo Drink.

    Zobo Drink

    Hannatu Muhammad Tukur Hannatu Muhammad Tukur
  9. A picture of Rotel Spaghetti.

    Rotel Spaghetti

    Maeli Maeli
  10. A picture of Meat Pie.

    Meat Pie

    Hannatu Muhammad Tukur Hannatu Muhammad Tukur
  11. A picture of Creamy Corn Pasta with Basil.

    Creamy Corn Pasta with Basil

    Ricardo Ricardo
  12. A picture of California Farm Air Fryer Bread.

    California Farm Air Fryer Bread

    Hobby Horseman Hobby Horseman
  13. A picture of California Farm Rotisserie Chicken in the Air Fryer.

    California Farm Rotisserie Chicken in the Air Fryer

    Hobby Horseman Hobby Horseman
  14. A picture of Peach and mango punch.

    Peach and mango punch

    Jon Michelena Jon Michelena
  15. A picture of Canning Homemade Dill Pickles.

    Canning Homemade Dill Pickles

    DeDee Freeman DeDee Freeman
  16. A picture of Leftover suya rice (my version).

    Leftover suya rice (my version)

    mrs zaynnab mrs zaynnab
  17. A picture of Simple chocolate pancake.

    Simple chocolate pancake

    mrs zaynnab mrs zaynnab
  18. A picture of Spicy chickpea and sweetcorn burgers.

    Spicy chickpea and sweetcorn burgers

    Siobhan Linehan Siobhan Linehan
  19. A picture of Canning Homemade Dill Pickles.

    Canning Homemade Dill Pickles

    DeDee Freeman DeDee Freeman
  20. A picture of Asparagus.

    Asparagus

    Richard Scott Cunningham Richard Scott Cunningham
  21. A picture of Asparagus and eggs au gratin.

    Asparagus and eggs au gratin

    Richard Scott Cunningham Richard Scott Cunningham
  22. A picture of Khandvi.

    Khandvi

    Priyanka Pachhapur Priyanka Pachhapur
  23. A picture of The best spaghetti ai pomodorini.

    The best spaghetti ai pomodorini

    haotru0ng haotru0ng
  24. A picture of California Farm Rotisserie Chicken in the Air Fryer.

    California Farm Rotisserie Chicken in the Air Fryer

    Hobby Horseman Hobby Horseman
  25. A picture of Coconut bread.

    Coconut bread

    Asiya Almustapha Dangani Asiya Almustapha Dangani

https://cookpad.wasmer.app/us/recipes/17025707
Cookpad Open in Cookpad App

About Us

Our mission at Cookpad is to make everyday cooking fun, because we believe that cooking is key to a happier and healthier life for people, communities and the planet. We empower home cooks all over the world to help each other by sharing their recipes and cooking experiences.

Subscribe to Premium for exclusive features & benefits!

Cookpad Communities

🇺🇸 United States 🇬🇧 United Kingdom 🇪🇸 España 🇦🇷 Argentina 🇺🇾 Uruguay 🇲🇽 México 🇨🇱 Chile 🇻🇳 Việt Nam 🇹🇭 ไทย 🇮🇩 Indonesia 🇫🇷 France 🇸🇦 السعودية 🇹🇼 臺灣 🇮🇹 Italia 🇮🇷 ایران 🇮🇳 India 🇭🇺 Magyarország 🇳🇬 Nigeria 🇬🇷 Ελλάδα 🇲🇾 Malaysia 🇵🇹 Portugal 🇺🇦 Україна 🇯🇵 日本 See All

Learn More

Cookpad Premium Careers Feedback Blog Terms of Service Community Guidelines Privacy Policy Frequently Asked Questions

Download our app

Open Cookpad App on Google Play Open Cookpad App on App Store
Copyright © Cookpad Inc. All Rights Reserved
close