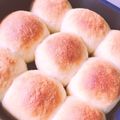
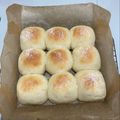
 初心者でも簡単!♡ミルクのちぎりパン♡
Easy for Beginners! ♡Milk Pull-Apart Bread♡
This pull-apart bread is easy to make by hand even for beginners! The fluffy milk texture is delicious. Thank you for all the feedback!
The story behind this recipe
You can make this easily without any special ingredients, just by kneading and shaping. Please give it a try!
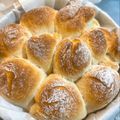
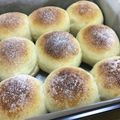
Easy for Beginners! ♡Milk Pull-Apart Bread♡


This pull-apart bread is easy to make by hand even for beginners! The fluffy milk texture is delicious. Thank you for all the feedback!
The story behind this recipe
You can make this easily without any special ingredients, just by kneading and shaping. Please give it a try!
Cooking Instructions
- 1
Bring the butter to room temperature. Warm the milk slightly in the microwave. Line a baking pan with parchment paper.
- 2
Combine all ingredients except the butter in a bowl and mix with a spatula. Mix gently to avoid flour flying everywhere.
- 3
Scrape the dough from the sides of the bowl as you mix until it forms a ball.

- 4
Place the dough on a surface and knead in the butter. (You'll use the bowl again for proofing.)

- 5
Knead the dough by stretching it with the palm of your hand, folding it, and repeating. The butter may initially come out, but that's okay!

- 6
Knead thoroughly for 7-8 minutes.

- 7
Once the surface of the dough is smooth, shape it into a neat ball.

- 8
Place the dough back in the bowl, cover with plastic wrap, and let it rise in a warm place for 40-50 minutes. You can use the microwave's proofing function if available.

- 9
Recommended first proofing method is available in the sandwich bread recipe. Please refer to it if you like. ID: 19156802 Steps 12-14
- 10
The dough is ready when it has doubled in size. If it hasn't risen enough, cover and let it sit for an additional 10 minutes.

- 11
Gently press the dough once with your palm to release the gas.

- 12
Take the dough out onto a surface and cut it into three equal parts using a dough scraper or knife.

- 13
Cut each piece into three more parts, making a total of 9 pieces.

- 14
Shape each of the 9 pieces into a neat ball.

- 15
Arrange the 9 dough balls with space between them, cover with a damp cloth, and let them rest for 10 minutes. You can also cover them loosely with plastic wrap.

- 16
After resting, reshape the dough balls neatly and place them in the pan, ensuring even spacing.

- 17
Dust with bread flour using a tea strainer. Be careful not to overdo it! Tap the strainer gently with your other hand to sprinkle lightly.

- 18
After dusting, cover loosely with plastic wrap and let rise in a warm place for about 20 minutes (second proofing). You can use the microwave's proofing function as well.
- 19
●Recommended second proofing method is also available in the sandwich bread recipe. Please refer to it if you like! ID: 19156802 Step 29
- 20
Start preheating the oven during the second proofing. If using the oven's proofing function, remove the dough early to preheat.
- 21
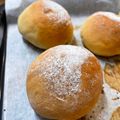
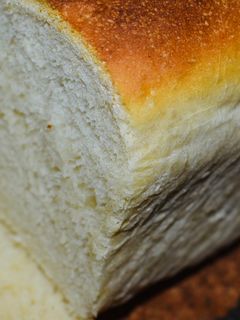
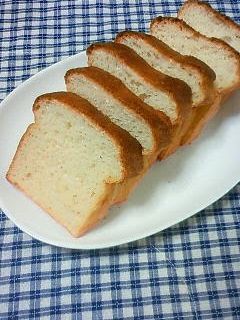
Once proofing is complete, bake in a preheated oven at 350°F (180°C) for 15 minutes.

- 22
It's done!
♡ From preparation to baking, it should take a little over 2 hours. ♡

- 23
Everyone has been sharing their own variations in the feedback! Please take a look for inspiration.
- 24
☆ Also available ☆
Fluffy Sandwich Bread ID: 19156802
Cinnamon Rolls ID: 18847299 - 25
Raisin Pull-Apart Bread ID: 18754233
Homemade Anpan (Sweet Red Bean Buns) ID: 18695599 - 26
Homemade Margherita Pizza
ID: 19947786
Sweet Buns ID: 20500022
Similar Recipes
-

Fluffy Ideal Milk Pull-Apart Bread Fluffy Ideal Milk Pull-Apart Bread
★ Hall of Fame ★ Fluffy and moist ~ (´▽`)♪A silky, fine-textured, and soft dough full of milk. Perfect for breakfast or sandwiches♫About this recipeThis is our basic bread dough. I have shared it as a basic recipe because I use this dough as a base for various adaptations.Feel free to visit my YouTube channel♪https://www.youtube.com/c/ApreaCuisine
 Translated from Cookpad Japan
 -

Piggy Pull-Apart Bread Piggy Pull-Apart Bread
Celebrate the Year of the Pig with this pig-shaped pull-apart bread. It's a great activity to do with kids.
 Translated from Cookpad Taiwan
 -

Yogurt Pull-Apart Bread Yogurt Pull-Apart Bread
I just wanted to use up some leftover plain yogurt, so I added a lot of it.The dough is made simply by mixing yogurt into it, but I didn't want to go out of my way to make something extra to top the bread but I still wanted some sort of simple topping, so I was pondering this problem for a while.I used a 21 cm frying pan with a removable handle to bake this bread. A 21 cm frying pan can hold about 346 ml, but an 18 cm square baking pan can hold about 324 ml. So the bread should come out to about the same size. Calculate the capacity of whatever pan you want to use to bake the bread in this way. For a domed bread loaf, just put the dough in the pan. For a square Pullman type loaf, calculate the amount of dough by dividing the capacity of the pan by 3.5. Recipe by Osshosan
-
EASY Basic Bread EASY Basic Bread
So we’re all in quarantine and we still want bread this recipe is filled with simple ingredients and easy to make . Give it a try! it’s fluffy and delish!
-

Pull Apart Bread Pull Apart Bread
This bread was always made by my mother when we had guests over for dinner. It pulls apart into sections for easy eating. Great with almost any dinner!
-
Super Easy Milk-enriched White Bread Super Easy Milk-enriched White Bread
I made this milk-enriched white bread using my super easy bread recipe that does't require any kneading or pounding.Take care to avoid the plastic wrap touching the dough after its final rising, since its surface will be rough as in the photo!!To make a nice slice, make a small cut with a bread knife, then use a thin knife to slice.You could also use regular cake liners instead of pound cake liners. Recipe by MADatougonnomugi -

Pull apart bread Pull apart bread
A soft pull apart bread!When making bread-When placing yeast and salt in a bowl at the beginning, do not put it next to each other! When yeast touches salt before the yeast is dissolved in liquid, the salt will stop yeast from working.-Always use warm milk and unsalted butter-when rising, make sure the dough has doubled its size from beginning to end. Adjust the time if necessary.-if the dough is drying, spray water with spray bottle
-

Milk Bread Milk Bread
This milk bread with homemade yeast is my favorite bread recipe that I bake often []. Recently, I haven't had time to make homemade yeast (sob!) so I made the bread with cheap and easy dry yeast. It still tastes good so I wrote it all down.Keep kneading until the gluten is well-developed. The rising and baking steps will make a big difference in the final product so please monitor carefully and decide for yourself. I like a light-colored bread so halfway through baking I lowered the oven temperature but if you prefer a darker color keep the oven temperature as is. For 1 loaf. Recipe by Lesser Panda -

Fluffy Milk Bread 🍞 Fluffy Milk Bread 🍞
This bread is delicious and fluffy. This is one of my family’s favorite bread recipes.
-

Fluffy Milk Bread Fluffy Milk Bread
I wanted to make really fluffy bread!And with this bread, my dream came true.I wanted the bread to have a slight golden color on the tops, so I covered them with a sheet of aluminum foil after 10 minutes of baking time. But if you want to bake white bread, dust the tops with bread flour, bake at 180°C for 8 minutes, cover with aluminum foil, lower the temperature to 140°C and bake for another 7 minutes.In the summertime, preheat the oven to 180°C, lower the temperature to 140°C, and bake for 15 minutes (cover with aluminum foil if needed). Recipe by Nagiry -

Milk Bread Milk Bread
This is the milk bread sold in Asian stores. It is soft like commercial bread, but sweet and milky. Perfect for sandwiches, toast, etc.You know how some bakers say, you can't make bread stressed out? It's true. When making your dough, you cannot stress about time. Knead as much as you can until you hit the right consistency. Watch a movie when letting the dough rise. Go out for your walk when you are proofing. Pay attention to the smell and peek in the oven to see how it looks instead of letting the timer run out.
-

Easy For Beginners: Raisin Bread Starter Rolls Easy For Beginners: Raisin Bread Starter Rolls
Ever since I discovered homemade natural bread starter or leaven, my bread baking experience has gotten so much richer. I've been making natural-starter bread referring to various books and online articles.In this recipe the starter liquid is used straight, without making an intermediary sponge. This is called the "straight method". With this method you can really enjoy the fragrance of the starter and the straightforward taste of the flour, and it's really delicious. I prefer using straight starter rather than the sponge method, since the dough is more tender and moist. Please watch the bread's color in the oven to judge its baking time. When it's golden brown and smells wonderful, it's done. If the bread won't brown well, that means the dough was over-proofed. Recipe by Raichi

More Recipes
