Tart Crust

I wanted to eat a nice crunchy tart! So I tried this!!
It goes with just about everything so give it a try.
The crust will turn out nicest if you work through Steps 1 and 2!
When baking, sometimes bits of the dough will rise so keep an eye on it and use the back of a fork to push down any rising parts.
At Step 6 if the dough is not sticking together try warming your hands or mixing it in a warmer room of your house. The key point to making a crunchy crust is for the dough to be thoroughly mixed! For one 18 cm [7.1 in] tart crust. Recipe by Hinanako*
Tart Crust
I wanted to eat a nice crunchy tart! So I tried this!!
It goes with just about everything so give it a try.
The crust will turn out nicest if you work through Steps 1 and 2!
When baking, sometimes bits of the dough will rise so keep an eye on it and use the back of a fork to push down any rising parts.
At Step 6 if the dough is not sticking together try warming your hands or mixing it in a warmer room of your house. The key point to making a crunchy crust is for the dough to be thoroughly mixed! For one 18 cm [7.1 in] tart crust. Recipe by Hinanako*
Cooking Instructions
- 1
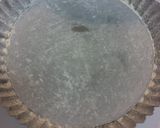
Smear the tart pan with butter (not the 100 g to be used as an ingredient).
- 2
Spread cake flour (not the 200 g to be used as an ingredient) on the pan and shake off any extra. Place the pan in the refrigerator to cool. This will make it easier to remove the tart crust later.
- 3
Mix the butter (or microwave it for 10 to 20 seconds if you don't have time) until it gets thick and white.
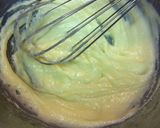
- 4
Add the sugar in two batches to Step 3 and mix it well. Add the egg yolk and vanilla extract and thoroughly knead everything together.
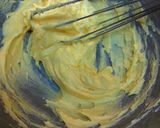
- 5
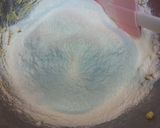
Next add the cake flour and use a rubber spatula to stir it all together. (In the hot summer, you can make the dough just by mixing, so skip to Step 8!)
- 6
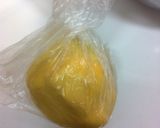
Place the mix in a bag. (This is only if the dough is not forming! If the ingredients stick together just by stirring then you don't have to do this!
- 7
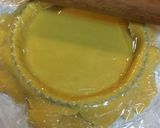
Knead the mix together with your fingers through the bag until it turns a nice yellow.
- 8
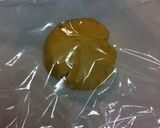
Move the dough to a bowl and round it with your hands. Wrap it in saran wrap and let it rest in the refrigerator for 30 minutes (you can skip this if you don't have time).
- 9
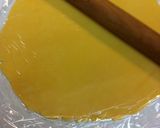
Place the dough ball between two sheets of saran wrap and use a rolling pin to roll it about 3 mm in thick.
- 10
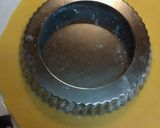
Remove the top layer of saran wrap and place the tart pan on top of the dough.
- 11
Flip the pan, dough, and saran wrap over all at once. Use a rolling pin to press off the extra dough and make sure it is all fit in the pan.
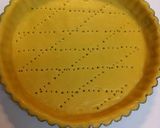
- 12
Pierce the dough (put air holes in it) and bake in the over for 15 minutes at 180°C. (*The time may vary depending on your oven so adjust as needed!)
- 13
Use the extra dough to make cookies!
Cooksnaps
Did you make this recipe? Share a picture of your creation!
Similar Recipes
-
My Tart Crust My Tart Crust
It won't break easily but is easy to handle. It's flaky and delicious .That's my tart crust.This crust won't shrink that much when it's baked. But if you are worried, use baking beans .Step 8: Flip over the dough and tart mold quickly! If you do it slowly, it will crack and you'll have to do it all over again.Step 6: When you bring the dough to room temperature in a microwave, heat for 20 seconds at 500W. Recipe by peko&poko cookpad.japan -
Basic Tart Crust Basic Tart Crust
This is a tart crust I always use.You can also freeze the tart dough from Step 7. Wrap tightly with plastic wrap, put into a plastic bag with a zip seal, and store in the freezer.The baking times may vary by ovens, so please keep an eye on the color of the crust as it bakes and adjust the baking times accordingly. Recipe by Otometeo cookpad.japan -
-
Crispy Tart Crust Crispy Tart Crust
I've always loved the crust part of tarts so much so that I always ate it last. Many recipes call for lining a mold with crust, adding the filling and baking it all together, but for tart crust lovers like me, they always end up tasting uncooked, and I've been disappointed many times. By baking the crust at a high temperature beforehand, it becomes crispy and nutty. The almond flour adds depth to the flavor, so even if the crust is thick, it will be delicious.Having baked many a tart without using pie weights, I've been able to come up with a way to bake a beautiful crust without the weights. If you want to use up the egg, just double the ingredient amounts and for 2 tarts' worth. You can freeze the unbaked dough, and it's on the sweet side too, so it's also delicious rolled and baked as cookies. Recipe by noi mama chan cookpad.japan -
Flaky Tart Crust Flaky Tart Crust
My boyfriend loves tarts, so I've been making them 4 times a month! Since I'm always making and editing the recipe, I finally found an easy and manageable crust!When you're mixing, just blend everything together and it'll be fine!Adjust the baking time to match whatever filling you're using. A longer baking time makes a crispier crust! Recipe by Maminkotarou cookpad.japan -
Easy Tart Crust Easy Tart Crust
I've modified this recipe many times. When you make different tarts you will have to adjust it slightly, but this basic tart crust is easy to bake.Adjust your the baking time based on your oven's strength.You can make a batch and freeze it for later use. Recipe by Maria358 cookpad.japan -
Crispy Crumbly Tart Crust Crispy Crumbly Tart Crust
I wanted to make a hard tart, but with less oil and moisture than what I've made up until now, so I took out one egg from the recipe and tested it out a few times.In Step 1, if you have parts that ball up and clump together, they will cause the crust to lose its texture when eating, so be sure to thoroughly break up all the clumps until the mixture is crumbly. To help with this, keep the butter in the fridge until just before using it.The crust will shrink a little when baked, so be sure to press the dough with your fingers to make it stand up just a little higher than the pan.It's okay even if you don't grease the tart pan with anything. For 20 cm [7.9 in] tart. Recipe by Koharumama cookpad.japan -
Tart Crust (Pâte Sucrée) Tart Crust (Pâte Sucrée)
This is a note for myself for a basic Pâte Sucrée (Tart crust).Slowly mix the butter in a circular motion so that the air does not get in. Once the flour is added, do not over mix! The dough may get too soft in summer. You can chill the working surface or put the dough back in the refrigerator from time to time. For two 18 cm [7.1 in] tart crusts. Recipe by twinflower cookpad.japan -
Tart Crust for Quiche Tart Crust for Quiche
This is one part of a dish that I struggled really hard with while looking at various recipe books and websites. I've tried using both the microwave and the oven and I think I've finally found something successful.If you use margarine, you can put it in the freezer for about 30 minutes and it will become the same hard consistency as butter.In Step 6, if you use a rolling pin to roll out the dough, cover the dough with plastic wrap and it will spread easier.In Step 8, if you fill a one size smaller cake mold with rocks, it becomes perfect to use as pie weights.Step 9 can be refrigerated as-is. For 22 cm [8.7 in] tart pan. Recipe by tora-mame cookpad.japan -
Tart Crust (Pâte Sucrée) Tart Crust (Pâte Sucrée)
I found some a softened bar of chocolate in my cupboard, so I thought I should try to make some chocolate sweets. Afterward, I made a banana chocolate clafoutis.Tart crusts are made by creaming butter and adding sugar, eggs, and flour.The amount of sugar is a little high, so it will brown easily. Because of this, I recommend using powdered sugar.Finally, it will be even more flavorful if you use cultured butter. Recipe by gurecoco cookpad.japan -
Crispy Tart Crust With Minimal Butter Crispy Tart Crust With Minimal Butter
If you make shortcrust pastry dough in the way you'd make cookie dough, it won't be very crispy and crumbly, so I tried making it like a folded puff pastry crust, and the results were very crispy and delicious.I reduced the amount of butter used to cut the calories as well as the cost. If you don't have unsalted butter, you can make it with salted butter.○This amount will line an 18cm diameter tart tin without any leftovers, so use all of the dough.○Roll out the dough so the bottom of the tart is 3mm thick, and the sides about 5mm thick. You can do a bit of cutting and patching of the crust without any issues. Recipe by Ikumihan cookpad.japan -
Basic Tart Crust (Pâte Sucrée) Basic Tart Crust (Pâte Sucrée)
This is the tart crust (pâte sucrée) recipe I have been using for ages. It's not too sweet, so it goes with any kind of filling.When making pâte sucrée, make sure you mix the dough very well as though you are kneading it (Foncer dough is mixed by cutting in the butter). This recipe makes a large amount of dough to make sure it fits nicely in the tart pan. The extra dough can be baked as is to make shortbread or you can use it to make mini tarts. Or you can save it and mix it in the next time you make tart dough. It will keep 5 days in the refrigerator and 2 weeks in the freezer. Recipe by Yukiline cookpad.japan
More Recipes
- Coffee steak rub
- Tart Crust with no eggs, no food processor, and no dirty hands
- Homemade Strawberry Milk Ice Cream
- Grated Carrot Cake With Honey
- Moist Sweet Potato Cookies
- Maple Carrot Cake
- Creamy Kabocha Squash Flan
- Save Time with a Food Processor and Rice-Cooker! Butter-Free Sweet Potato Cake
- Easy Sweet Potato Cake Using Only 20 g of Butter!
- Sweet Potato Cake that Tastes Like Japanese Sweet Potato Cake (Twice-Baked Sweet Potato Confections)!
Comments