 讃岐出身の母直伝!簡単手打ち讃岐うどん
Mom’s Authentic & Easy Handmade Sanuki Udon
My mother, who is from Kagawa, perfected this recipe after much trial and error. By kneading the dough in a plastic bag, you can easily achieve the signature chewy texture of authentic Sanuki udon. It’s truly delicious!
Recipe Background:
My mom developed this method so anyone could make udon easily at home, using a bag for kneading. The noodles have the same chewy bite as real Sanuki udon.
★ You can let the dough rest in the refrigerator for up to 2 days for extra flavor.
Adjust the salt: use a bit more in summer, a bit less in winter.
Flour to salt water ratio = 2:1
★ For dusting flour, any all-purpose flour works. Be sure to shake off excess flour before boiling to keep the water from getting too starchy.
★ For the noodles, use medium-gluten flour if possible, or flour labeled for udon. The type of flour really affects the taste.
Mom’s Authentic & Easy Handmade Sanuki Udon


My mother, who is from Kagawa, perfected this recipe after much trial and error. By kneading the dough in a plastic bag, you can easily achieve the signature chewy texture of authentic Sanuki udon. It’s truly delicious!
Recipe Background:
My mom developed this method so anyone could make udon easily at home, using a bag for kneading. The noodles have the same chewy bite as real Sanuki udon.
★ You can let the dough rest in the refrigerator for up to 2 days for extra flavor.
Adjust the salt: use a bit more in summer, a bit less in winter.
Flour to salt water ratio = 2:1
★ For dusting flour, any all-purpose flour works. Be sure to shake off excess flour before boiling to keep the water from getting too starchy.
★ For the noodles, use medium-gluten flour if possible, or flour labeled for udon. The type of flour really affects the taste.
Cooking Instructions
- 1
1. Make the salt water: Combine the salt and water in a bowl and stir until dissolved. In winter, use lukewarm water instead of cold.

- 2
2. Combine: Put the flour into the plastic bag, add all the salt water, seal the bag with some air inside, and shake for about 5 minutes.

- 3
As you shake, the flour will form small clumps. This step is important for making Sanuki udon.

- 4
Gather the dough together in the bag with your hands to form a ball.

- 5
3. Knead with your feet: Place the dough (still in the bag) between sheets of newspaper and step on it to flatten (leave the bag open). Step 20 times.

- 6
After flattening, fold the dough in the bag and shape it into a ball again. Repeat the process of stepping 20 times and folding, for a total of 4 times.

- 7
4. Rest the dough: Shape the dough into a ball, close the bag, and let it rest at room temperature. In summer, rest for 1 hour; in winter, 2–3 hours.

- 8
5. Roll out: Sprinkle flour on a large board or countertop, place the dough on it, and roll it out with a rolling pin into as close to a rectangle as possible. Roll to about 1/8 inch thick (3mm).

- 9
Rolling the dough around the pin and pressing helps speed up the process. Try to roll it out thin and evenly.

- 10
6. Cut: Sprinkle flour on the surface, then fold the dough back and forth like an accordion (alternating folds).

- 11
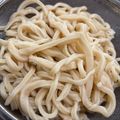
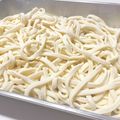
Cut into 1/8 inch (3mm) wide strips with a knife. If you’re not boiling right away, separate the noodles and dust with flour to prevent sticking.

- 12
7. Boil: Use the largest pot you have. For every 3 1/2 ounces (100g) of noodles, use at least 4 cups (1L) of water. Add noodles to boiling water and cook for 10 minutes.

- 13
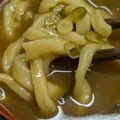
After boiling, immediately rinse the noodles in cold water. Rub the noodles gently to remove any stickiness for a smooth texture.
- 14
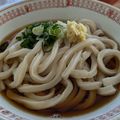
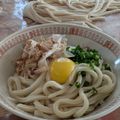
8. Finish: For cold udon (zaru udon or bukkake), serve directly in a bowl. For hot udon (kake udon), briefly dip the noodles in hot water for a few seconds before serving.

- 15
I’ve posted a recipe for authentic bukkake udon broth! See Recipe ID:19947724

- 16
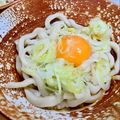
My favorite way to enjoy these noodles is as salad udon—enjoy the chewy noodles with fresh veggies! See Recipe ID:19766398
Similar Recipes
-

Mentaiko Udon Mentaiko Udon
My husband says he likes mentaiko udon a whole lot more than mentaiko pasta.Adjust the seasoning with soy sauce at the end. For 2 servings. Recipe by Tanosukedono
-

Everyone Loves This Tarako Udon Everyone Loves This Tarako Udon
A recipe using a margarine that tastes like butter.You can use mentaiko (spicy salted cod roe) instead of tarako.Adjust the amount of added soy sauce depending on the saltiness of the tarako you have. For about 2 servings. Recipe by Riorinrin -

Easy Handmade Udon Noodles Easy Handmade Udon Noodles
I wanted to make freshly made noodles. I remembered back to the Sanuki udon noodles I used to eat a lot at my former workplace to make this.You can use all medium-strength (all-purpose) flour instead of the mix of bread and cake flours.When you are making this during the rainy season or whenever there's high humidity, use less Recipe by XLR250R -

Ultimate Sanuki Udon Noodles Ultimate Sanuki Udon Noodles
I was raised watching my grandma make homemade udon noodles, but she was unable to teach me before her mind started slipping, so I jumped over to Sanuki, studied at an udon school, and made udon over and over again. Later, I discovered the Easy Noodles with a Pasta Machine" book by Yamato Oomori, got the idea for the tapioca flour from another Cookpad user. I was able to finally come up with the perfect chewy noodles through trial and error.This is great if you have Sanuki flour! It really does taste different. Using a starch-based flour for dusting will prevent the noodles from sticking. Don't use wheat flour. This is a dough with little water and is hard to form into a ball. The amount of water will vary according to the season, so you can add up to 30 g more water if you like. Add it into the food processor if you do, though. You can use a pasta machine to cut the noodles, but I recommend cutting them by hand if you want to come close to Sanuki udon noodles. Recipe by kapacyan -

Handmade Udon Noodles Handmade Udon Noodles
There are many different ingredient ratios for making udon noodles. I tried several versions, and of them all I thought this one is the best, so I decided to upload it.You don't have to buy medium-strength or all-purpose flour just to make udon noodles. (Translator's note: all-purpose flour is not usually stocked in Japanese home kitchens, but bread and cake flour often are.)It's often written that you need to adjust the amount of water used from 40 to 45% depending on the season, but I find that dough with just 40% water is too stiff and hard to knead! Dough made with 45% water is still very delicious.In the wintertime, try to rest the dough in as warm a place as possible. Recipe by ondine -

Handmade Udon Noodles Handmade Udon Noodles
This is a delicious and simple variation of an udon recipe that I learned. I think it's perfect for beginners. The elasticity and smoothness of homemade noodles is the best. Give it a try and let me know what kind of soup you had with these udon noodles.You can use either bread flour or cake flour, or you can use 50 g of each. They tend to stick together, so dust them with flour really well. If you aren't cooking them straight away, cover with cling film so that they won't dry out. The texture of the udon noodles won't be as nice as the ones freshly made, but you can boil them firmly, then freeze to store. I cook 50 g of udon noodles per serving. Recipe by mini -

Authentic Handmade Udon Noodles without Getting Your Hands Messy Authentic Handmade Udon Noodles without Getting Your Hands Messy
It's hard to get good tasting udon noodles in England, so I made some myself.The key to firm, well textured udon noodles is the 7:3 ratio of strong bread flour to soft cake flour.Thin plastic bags may rip, so I recommend double-bagging. For 3 servings. Recipe by Linnypub -

Authentic Sanuki-style Udon with Soft Poached Egg and Beef Authentic Sanuki-style Udon with Soft Poached Egg and Beef
Every time I visit to Kagawa Prefecture, I eat 'Udon with Soft Poached Egg and Beef'. I created my own recipe so that I could make it easily at home.If you want to make iriko dashi stock, use 40 g iriko (after heads and guts are removed) and 400 ml water. Simmer for about 15 minutes and you will have an authentic iriko dashi stock.In summer, chill everything to make a chilled udon bowl. Refresh the udon noodles in ice water after they have finished boiling.In winter, heat everything and serve it warm. Recipe by Namaichigo -

Easy Kansai-Style Kitsune Udon Easy Kansai-Style Kitsune Udon
My mother taught me this recipe.1) Every type of kombu dashi is different, so adjust the amount of salt to your liking.2) When making the astuaage, cut it in half and simmer it in inari sushi sauce, then store it in the freezer; this makes it easier to use up the leftovers.Be sure to properly drain the water from the noodles.2) You can also put the noodles directly into the pot. Recipe by Yuuyuu0221 -

Authentic Gourmet Vegan Udon Noodles Authentic Gourmet Vegan Udon Noodles
Cooking video: youtu.be/2JgrsmcoRu8We have created a delicious Udon noodle soup, carefully flavored with only pure plant-based ingredients and free from artificial flavorings! The leftover ingredients to make the Udon Dashi can also be eaten and are very tasty.We have made a delicious vegan Udon noodle soup, using vegan braised Shiitake as a base, and can be eaten as a side dish or condiment. The braised Shiitake was highly acclaimed at Shiitake tasting events. It's delicious, so please make sure you cook a lot of noodles.This recipe brings out the ultimate Umami taste for Dashi. Please read each step carefully. Each detail and step is used to deepen and strengthen the Dashi flavors. It might seem a bit complicated and detailed, but we think you will be rewarded for the extra work. We have also provided a quick and easy Vegan Udon Dashi when you don't have the time or the will ("Easy Vegan Udon Noodle Soup, made with Shiitake powder"). It is also good but not at the same level as this Dashi.When cooking for a lot of people or using the finest Shiitake, there are times when the Umami taste of the Shiitake is too strong, giving rise to bitterness. If that happens, it's ok to thin out the Shiitake Dashi broth with water or increase the kelp Dashi amount.#givingthanks
-

My Grandmother's DIY Udon Noodles My Grandmother's DIY Udon Noodles
As my grandfather loved udon noodles, my grandmother made them year round. As she has aged, she no longer makes them regularly, but they really take me back. I replicated her noodles and uploaded the recipe here!I ate these noodles with my DIY noodle dipping sauce, which is also based on my grandmother's recipe.-You can roughly measure the ingredients. Add enough water so that the dough comes together.-I recommend using all-purpose flour. You could use cake flour, but it won't be as chewy.-I've added tips to each step, so consult them while you're making these. Recipe by Myajima -

Large! Kansai-Style Kitsune Udon Large! Kansai-Style Kitsune Udon
This is a kitsune udon made with homemade kitsune! If you use homemade udon noodles, it's excellent, but it's delicious even with frozen udon.It's very important to thoroughly remove the oil from the kitsune, then squeeze out the moisture before simmering in the seasonings. If you don't squeeze out enough water, the seasonings will become diluted. The color will also be diluted! If you use tofu skins for inarizushi, it's even more delicious! See. Recipe by Cooking S Papa
More Recipes
