Cheap, Easy, and Low-Calorie Homemade Cream Cheese
I wanted a low-fat and cheaply made yet gentle cream cheese.
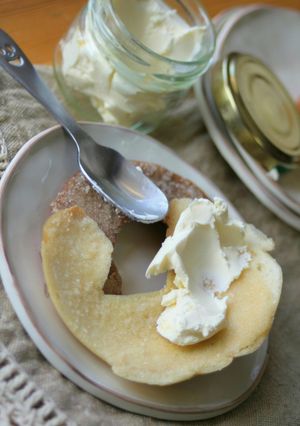
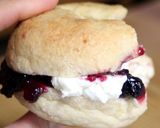
(By the way, the top picture is a red bean paste and cream cheese sandwich.)
In the case of wringing out the moisture with your hands, if you squeeze it too tightly, it will become hard and crumbly. So gently squeeze it with a dish cloth. Be sure to knead it afterwards.
Be careful not to heat the water too much! 50°C (about the temperature that you can feel with your finger) is best. For 1 cream cheese pack: 200-250g. Recipe by pogue
Cheap, Easy, and Low-Calorie Homemade Cream Cheese
I wanted a low-fat and cheaply made yet gentle cream cheese.
(By the way, the top picture is a red bean paste and cream cheese sandwich.)
In the case of wringing out the moisture with your hands, if you squeeze it too tightly, it will become hard and crumbly. So gently squeeze it with a dish cloth. Be sure to knead it afterwards.
Be careful not to heat the water too much! 50°C (about the temperature that you can feel with your finger) is best. For 1 cream cheese pack: 200-250g. Recipe by pogue
Steps
- 1
Put the heavy cream into a heat-resistant bowl and microwave using the "heat milk" mode. Be careful not to let it boil.
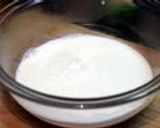
- 2
Add lemon juice to Step 1, wait 10 minutes, and then gently and slooooowly move it around. (Don't move it quickly or suddenly). The milk component will quickly separate.
- 3
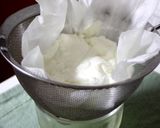
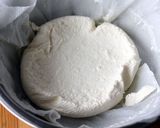
Place 2 paper towels into a colander and pour in Step 2. Let it strain for 2-3 hours. If it's being stubborn, after the allotted time, use your hands to squeeze out the remaining moisture.
- 4
This is what it looks like after 1 hour. It made a lot! This condition finishes the hard cream state (about the same as soft cream cheese).
- 5
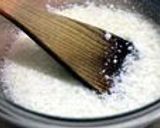
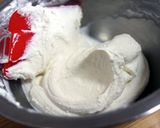
[If you want to finish hardening] Transfer to a new paper towel or dish cloth and gently squeeze out the moisture with both hands. .Don't squeeze it too much!
- 6
Transfer it to a bowl and add salt. Knead it with a rubber spatula until it becomes smooth, and then it's finished. (The amount of kneading and labor and finished smoothness varies by person!)
- 7
If you let it naturally drain, as in Step 4, it will be the type of cream just right for spreading. It will be easy to spread on bagels or sandwiches.
- 8
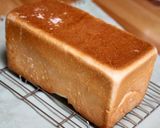
You should use the whey that was left behind in place of water when baking bread. Even after 3 days, the bread is still moist!
Cooksnaps
Did you know that you can import recipes from anywhere into Cookpad with one click?
https://blog.cookpad.com/us/cookpad-recipe-import-feature-save-recipes-from-anywhere/
Download Cookpad app to plan your meals and store your cooking ideas in one safe place! https://cookpad.wasmer.app/us/download
Keywords
Similar Recipes
More Recipes
-


-


-

-

Zucchini and Tomato Stuffed Chicken Fillet

-


-


-


-

Bailey's Irish Cream PB Whip Cake*

-


-


-
 k.essence.7.11
 -


-

Super Easy Truffles with Milk For Valentine's Day
-

Strawberry Jam with a Pressure Cooker or Regular Pot
-


- crxtasy12
-
 Dumplings")
Tiny Kinako (Roasted Soy Powder) Dumplings
-


")


Comments