CookpadCookpad
Guest
Register or Log In
Save and create recipes, send cooksnaps and more
  • Search
  • Premium
    • Top Cooksnapped Recipes
    • Top Viewed Recipes
  • Premium
  • Challenges
  • FAQ
  • Send Feedback
  • Region
  • Your Collection
Your Collection
To start creating your recipe library, please register or login.
Tart Crust (Pâte Sucrée)
Save this recipe to come back to it later.
  • Add Cooksnap
  • Add to folders
  • Print
  • Share
    • Copied!
    • Email
    • Facebook
    • Pin it
    • Twitter
  • Report Recipe
  • See report
  • Edit recipe
  • Delete
CookpadCookpad
A picture of Tart Crust (Pâte Sucrée).

Tart Crust (Pâte Sucrée)

cookpad.japan
cookpad.japan @cookpad_jp

This is a note for myself for a basic Pâte Sucrée (Tart crust).

Slowly mix the butter in a circular motion so that the air does not get in. Once the flour is added, do not over mix! The dough may get too soft in summer. You can chill the working surface or put the dough back in the refrigerator from time to time. For two 18 cm [7.1 in] tart crusts. Recipe by twinflower

Read more
Saved
Save this recipe to come back to it later.
Edit recipe
See report
Add to folders
Add CooksnapAdd Cooksnap
ShareShare
  • Copied!
  • Email
  • Facebook
  • Pin it
  • Twitter
PrintPrint
  • PrintPrint
  • Add CooksnapAdd Cooksnap
  • Report Recipe
  • See report
  • Delete
Share
  • Copied!
  • Email
  • Facebook
  • Pin it
  • Twitter
Save this recipe to come back to it later.
  • Add Cooksnap
  • Add to folders
  • Print
  • Report Recipe
  • See report
  • Edit recipe
  • Delete

Ingredients

2 servings
  1. 120 gramsButter (or margarine)
  2. 75 grams◆ Sugar
  3. 1 pinch◆ Salt
  4. 25 grams○ Almond flour
  5. 25 grams○ Sugar
  6. 1Whole egg
  7. 240 gramsCake flour
Cookpad Open in Cookpad App
Saved
Save this recipe to come back to it later.

Steps

  1. 1

    Bring the butter and egg to room temperature. Sift the cake flour twice. Sift together the ○ ingredients (almond flour and sugar).

  2. 2

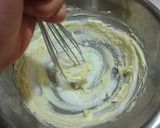
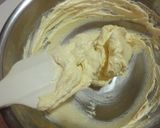
    Once the butter has been softened, either by bringing it to room temperature or by microwaving it, mix it without letting air in. Holding the whisk upright, as shown in the picture, will help.

    A picture of step 2 of Tart Crust (Pâte Sucrée).
  3. 3

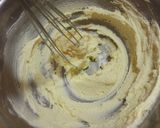
    Add the ◆ ingredients in two batches for each ingredient. Stir the mixture in a circular motion. (I am using extra fine granulated sugar.)

    A picture of step 3 of Tart Crust (Pâte Sucrée).
  4. 4

    Add the sifted ingredients ○ in two batches. Mix until well blended.

    A picture of step 4 of Tart Crust (Pâte Sucrée).
  5. 5

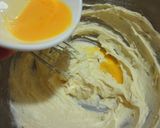
    Add the room temperature egg gradually (in about 5-6 batches) to the butter mixture. Each time you add part of the egg, mix it until it is well blended.

    A picture of step 5 of Tart Crust (Pâte Sucrée).
  6. 6

    Once all the egg is mixed in, switch from using a whisk to using a rubber spatula.

    A picture of step 6 of Tart Crust (Pâte Sucrée).
  7. 7

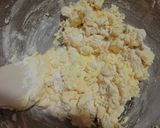
    Add half the amount of the cake flour. Using a rubber spatula, quickly mix the dough by scraping from the bottom of the bowl. Stop at the point where the flour is still visible.

    A picture of step 7 of Tart Crust (Pâte Sucrée).
  8. 8

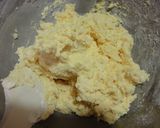
    Add the rest of the flour. Mix it quickly in the same way. When all the flour disappears, stop mixing. Do not over mix!

    A picture of step 8 of Tart Crust (Pâte Sucrée).
  9. 9

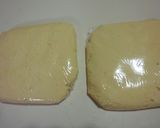
    Divide the dough into 2 parts. Wrap it with plastic and let it rest for over 3 hours to overnight if possible. It can be stored in a refrigerator for 3-4 days or in a freezer for 1-2 weeks.

    A picture of step 9 of Tart Crust (Pâte Sucrée).
  10. 10

    I use a non-stick pie mold without any oil. If the dough is likely to stick to your mold, grease it with butter, flour it, and chill before rolling out the dough.

  11. 11

    Dust the working surface and roll out the dough into a size bigger than the pie mold using a rolling pin. (If the dough becomes too soft to handle, put it back in the refrigerator to chill.)

    A picture of step 11 of Tart Crust (Pâte Sucrée).
  12. 12

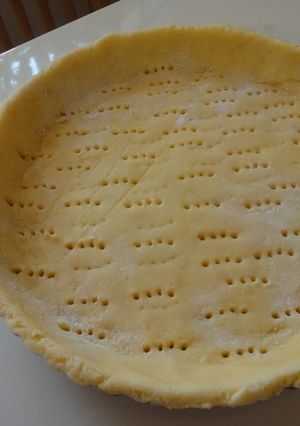
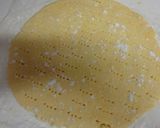
    If the tart crust needs holes to let the steam escape, pierce some holes using a Roller Docker or a fork. (If the filling contains a lot of moisture, piercing is not required.)

    A picture of step 12 of Tart Crust (Pâte Sucrée).
  13. 13

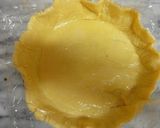
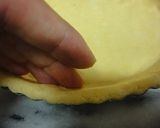
    Pick up the dough with both hands, drape loosely on the mold, aligning in the center, then press it into the mold. Press the sides and the edge also.

    A picture of step 13 of Tart Crust (Pâte Sucrée).
  14. 14

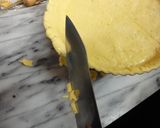
    Trim the edges of the crust by rolling the rolling pin over it or cutting with a knife.

    A picture of step 14 of Tart Crust (Pâte Sucrée).
  15. 15

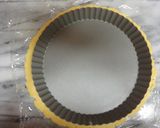
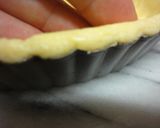
    Gently press the sides of the crust so the edge will firmly bulge out.

    A picture of step 15 of Tart Crust (Pâte Sucrée).
  16. 16

    To prevent the crust from shrinking, make the edge about 1mm higher than the mold. It is preferred to let the dough rest about 30 minutes in the refrigerator before baking.

    A picture of step 16 of Tart Crust (Pâte Sucrée).
  17. 17

    Preheat the oven to 180℃.

  18. 18

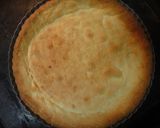
    I don't use pie weights, but if you do, lay aluminum foil on the crust and place the pie weights on it. Reduce the oven temperature to 160℃, and bake for 35 minutes. Refer to the individual recipe for the baking time.

    A picture of step 18 of Tart Crust (Pâte Sucrée).
  19. 19

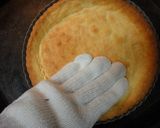
    When the pie weights are not used and the surface bulges out, using a cotton work glove, press it down to fix it while it is still hot.

    A picture of step 19 of Tart Crust (Pâte Sucrée).
  20. 20

    If you are using a moist filling, apply some egg yolk with a brush to the surface of the crust, put it back in the oven and bake it for 5 more minutes using the residual heat, so the juice does not penetrate into the crust.

Saved
Save this recipe to come back to it later.
Edit recipe
See report
Add to folders
Add CooksnapAdd Cooksnap
ShareShare
  • Copied!
  • Email
  • Facebook
  • Pin it
  • Twitter
PrintPrint
  • PrintPrint
  • Add CooksnapAdd Cooksnap
  • Report Recipe
  • See report
  • Delete

Cooksnaps

Saved
Save this recipe to come back to it later.
  • Add Cooksnap
  • Add to folders
  • Print
  • Share
    • Copied!
    • Email
    • Facebook
    • Pin it
    • Twitter
  • Report Recipe
  • See report
  • Edit recipe
  • Delete

Copied!

cookpad.japan
cookpad.japan @cookpad_jp
on February 27, 2014 03:25

Did you know that you can import recipes from anywhere into Cookpad with one click?
https://blog.cookpad.com/us/cookpad-recipe-import-feature-save-recipes-from-anywhere/

Download Cookpad app to plan your meals and store your cooking ideas in one safe place! https://cookpad.wasmer.app/us/download

Read more

Comments

Guest
Add a comment
0/0

Similar Recipes

More Recipes

  1. A picture of Cherry Tomatoes Chutney.

    Cherry Tomatoes Chutney

    ZMA ZMA
  2. A picture of Salisbury Steak (Campbell's

    Salisbury Steak (Campbell's "Cooking With Soup" Cookbook) (1974)

    Cluelesskitty Cluelesskitty
  3. A picture of Cluster Beans Palya - Karnataka Style Stir Fry.

    Cluster Beans Palya - Karnataka Style Stir Fry

    ZMA ZMA
  4. A picture of Collard "Gumbo".

    Collard "Gumbo"

    Spice and Zeal Spice and Zeal
  5. A picture of Chicken Nuggets Wrap.

    Chicken Nuggets Wrap

    Amazing Foodies Amazing Foodies
  6. A picture of Vanilla Cake.

    Vanilla Cake

    Favour ✨🌺 Favour ✨🌺
  7. A picture of Nigerian Chin Chin (Deep Frying).

    Nigerian Chin Chin (Deep Frying)

    Favour ✨🌺 Favour ✨🌺
  8. A picture of Cow Patties, aka Chocolate Peanut Butter Oatmeal Cookies.

    Cow Patties, aka Chocolate Peanut Butter Oatmeal Cookies

    Hailey Debity Hailey Debity
  9. A picture of Guvar besan sabji.

    Guvar besan sabji

    pinal Patel pinal Patel
  10. A picture of Brad's Schnitzel Oscar Burger.

    Brad's Schnitzel Oscar Burger

    wingmaster835 wingmaster835
  11. A picture of Crockpot Louisiana Red Beans and Rice.

    Crockpot Louisiana Red Beans and Rice

    sammie27 sammie27
  12. A picture of Herb Roasted Potatoes with Honey Mustard.

    Herb Roasted Potatoes with Honey Mustard

    ChefDoogles ChefDoogles
  13. A picture of Louisiana Chicken and Andouille Sausage Gumbo.

    Louisiana Chicken and Andouille Sausage Gumbo

    sammie27 sammie27
  14. A picture of Sophie's cold honey sesame meatball noodles.

    Sophie's cold honey sesame meatball noodles

    justanothersoph justanothersoph
  15. A picture of Honey Walnut Asparagus.

    Honey Walnut Asparagus

    ChefDoogles ChefDoogles
  16. A picture of Egg-Free Matcha Cookies.

    Egg-Free Matcha Cookies

    cookpad.japan cookpad.japan
  17. A picture of Hotel-style Scrambled Eggs.

    Hotel-style Scrambled Eggs

    cookpad.japan cookpad.japan
  18. A picture of Tomato and Cheese Sandwich with Pesto alla Genovese.

    Tomato and Cheese Sandwich with Pesto alla Genovese

    cookpad.japan cookpad.japan
  19. A picture of Winter Melon and Tomato Simmer.

    Winter Melon and Tomato Simmer

    cookpad.japan cookpad.japan
  20. A picture of How to Boil Easy-Peel Quail Eggs.

    How to Boil Easy-Peel Quail Eggs

    cookpad.japan cookpad.japan
  21. A picture of Vegetarian Tofu Loaf.

    Vegetarian Tofu Loaf

    cookpad.japan cookpad.japan
  22. A picture of Seasonal Tarts.

    Seasonal Tarts

    cookpad.japan cookpad.japan
  23. A picture of Ray's' The Ultimate Quesadilla Platter.

    Ray's' The Ultimate Quesadilla Platter

    summerplace summerplace
  24. A picture of Polish sausage and potatoes skillet dinner..

    Polish sausage and potatoes skillet dinner.

    Samantha Samantha
  25. A picture of Mapo Cellophane Noodles for Vegetarians.

    Mapo Cellophane Noodles for Vegetarians

    cookpad.japan cookpad.japan
https://cookpad.wasmer.app/us/recipes/170939
Cookpad Open in Cookpad App

About Us

Our mission at Cookpad is to make everyday cooking fun, because we believe that cooking is key to a happier and healthier life for people, communities and the planet. We empower home cooks all over the world to help each other by sharing their recipes and cooking experiences.

Subscribe to Premium for exclusive features & benefits!

Cookpad Communities

🇺🇸 United States 🇬🇧 United Kingdom 🇪🇸 España 🇦🇷 Argentina 🇺🇾 Uruguay 🇲🇽 México 🇨🇱 Chile 🇻🇳 Việt Nam 🇹🇭 ไทย 🇮🇩 Indonesia 🇫🇷 France 🇸🇦 السعودية 🇹🇼 臺灣 🇮🇹 Italia 🇮🇷 ایران 🇮🇳 India 🇭🇺 Magyarország 🇳🇬 Nigeria 🇬🇷 Ελλάδα 🇲🇾 Malaysia 🇵🇹 Portugal 🇺🇦 Україна 🇯🇵 日本 See All

Learn More

Cookpad Premium Careers Feedback Blog Terms of Service Community Guidelines Privacy Policy Frequently Asked Questions

Download our app

Open Cookpad App on Google Play Open Cookpad App on App Store
Copyright © Cookpad Inc. All Rights Reserved
close