
Apple Bread Rolls
I tried to come up with an original recipe using "Secret Apple Filling". I tried all sorts of complicated recipes, but in the end I settled on this simple bread recipe.
Be sure to close the seam tightly in Step 19, or the rolls may burst open when rising. Also, be sure to drain the apple filling well before spreading it on the dough. Recipe by Wagamamahime
Cooking Instructions
- 1
Bring the butter and egg to room temperature.
- 2
Toast the walnuts for 7 minutes in a 180℃ oven (no need to pre-heat).
- 3
When the walnuts have cooled slightly, crush with your hands into fairly small bits.
- 4
Strain the egg through a sieve. You will need 20 g for the bread dough, and the rest can be set aside for later.
- 5
If you have a bread machine, put all of the ingredients into the bread pan and turn it on! (If kneading by hand, see.)

- 6
In the meantime, make the filling. Work quickly.
- 7
For this recipe, I would recommend cutting the apples into 5 mm-1 cm slices, as opposed to wedges.
- 8
When the apples have cooled a bit, drain them well in a colander.
- 9
When the bread maker finishes, do a "finger check" (coat your finger with flour and poke a hole in the dough. If it doesn't spring back, you know that the first rising is complete).
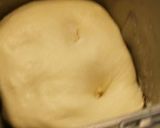
- 10
If the dough springs back, it hasn't finished rising. Let it sit for about another 5 minutes.
- 11
If the dough has shrunk, it means you have let it rise too much. There's nothing you can do about this, so it's best just to proceed to the next step, bearing in mind that your rolls might not turn out the greatest!
- 12
Carefully take the dough out of the bread machine with a bench scraper. Punch down the dough.
- 13
Shape the dough into a ball. Make it nice and smooth. Close the seam tightly on the bottom.
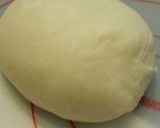
- 14
Cover with a damp cloth and let rest for 15 minutes.
- 15
Place the dough seam-side up and, using a rolling pin, lightly mark the dough with a cross.
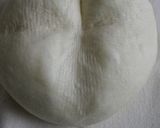
- 16
Roll out the dough, but leave approx. 1 cm on either end un-rolled (this helps achieve an even thickness).
- 17
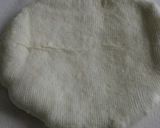
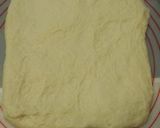
Roll out the dough into a 25 cm square. (This is easiest if you work from the centre, leaving the top, bottom, and sides until the very end).
- 18
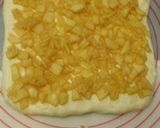
Thoroughly drain the apple filling and spread it out on the dough, leaving 2 cm at the end furthest from you empty.
- 19
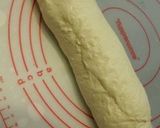
Roll it up from the end nearest you. Close the seam tightly, as you did when making the dough.
- 20
Cut the dough into 6 pieces with a bench scraper (start by cutting it in half, then cut each half into 3 pieces.)
- 21
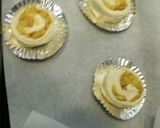
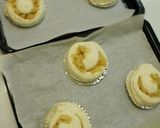
Spread out the aluminum foil baking cups and place a roll in each cup. Let rise once more, this time at 40°C on your oven's 'bread rising' setting.
- 22
This is what they look like after the second rising.
- 23
Pre-heat the oven to 190°C. While waiting for it to heat, brush the rolls with the leftover egg and top with sliced almonds and walnuts.
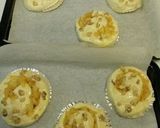
- 24
When heated, pop them into the oven for 12 minutes. Adjust the baking time according to your oven.
- 25
Take the rolls out of the oven and cool on a wire rack...
- 26
Mix together the icing ingredients until thick (make sure not to over-mix or it'll be hard). Drizzle the icing on the rolls!
- 27
Even if you just drizzle it on at random, these will look surprisingly professional when finished, so don't worry too much. And with that, you're done!

Cooksnaps
Did you make this recipe? Share a picture of your creation!

Similar Recipes
-

Sweet Bread Rolls Sweet Bread Rolls
I love this bread. It would be better if you use premium bread flour.
-

Bread Rolls Bread Rolls
Bread rolls were the first kind of bread I ever made. I made these rolls with my favourite dough.When the dough is not stretching well, cover with a tightly wrung out kitchen towel and let it sit for a little while.I used about 1/2 an egg for the dough and the remaining for the glaze. Recipe by Maria358
-

Round Bread Rolls Round Bread Rolls
Butter rolls are too much work to form into shapes, so I tried baking dinner roll-style buns with egg and a generous amount of butter.When you are brushing with the beaten egg, please be gentle so that you won't damage the dough. Recipe by Mamyuchoko -

Easy Bread Rolls Easy Bread Rolls
So versatile, they are very nice when you add ingredients such as garlic and herbs to spice it up a bit also!
-

Homemade White Bread Rolls Homemade White Bread Rolls
Since bread starters needs to be used up within 1 - 2 weeks, I thought it best to make bread directly from liquid yeast, which lasts for a while.Unlike dry yeast, the time needed for rising varies greatly depending on the strength of the starter.I recommend yogurt or strawberry yeast, which are both strong. Recipe by saku_nana -

Sweet Bread Rolls Sweet Bread Rolls
A recipe that I've been playing with and tweaking for a couple of weeks now. I think I've finally got it where I want it.
-

Fluffy Bread Rolls Fluffy Bread Rolls
I'm proud to present this recipe! I make these rolls all the time.I usually use instant yeast for this.- Keep your eye on the bread and adjust the time and temperature according to your oven.- Halve the amount of ingredients when making half the amount.The chocolate variation is our family's standard bread. It's even more delicious to eat on the day after, when the chocolate has hardened again! Recipe by yukanosuke -

Old Fashioned Bread Rolls Old Fashioned Bread Rolls
I thought of making old fashioned bread rolls.Because it's hard to brown things properly in my oven, I use a higher temperature. Please adjust your baking time and temperature based on your oven.You can use just milk or milk and the egg. When adding it in, keep an eye on the dough and adjust to make it easier to knead. Recipe by Ayachipan -

Cinnamon Almond Cream Bread Rolls Cinnamon Almond Cream Bread Rolls
I wanted to make bread that would taste sweet like a cake.I used the ingredient ratios of Rika Sakamoto's almond cream as the base for my recipe.About the eggs.... First, crack open 2, beat, and set aside 30 g for the dough and 40 g for the cream. Set aside the rest for glazing. You can use salted butter for this recipe. Recipe by Sweetpy -

Simple Walnut Bread Rolls Simple Walnut Bread Rolls
I kept these simple so that they could be eaten for dinner.You can use strong milky tea for the liquid instead.Raw walnuts should be roasted in a 150°C (not preheated) oven for 15 to 20 minutes.I put the in walnuts in at the beginning as my daughter likes it this way, but if you want them to be more prominent in the bread, add them halfway through. Recipe by Mahha mama -

Easy, Homemade White Bread Rolls Easy, Homemade White Bread Rolls
I received a request to bake bread rolls. This recipe has less sugar and oil but still a rich taste.As you don't have to knead, it should only take about an hour to make. Please cover the dough with plastic wrap so that it does not dry out.I recommend storing leftover yeast in the freezer. Recipe by mini -

Simple Sugar-Topped Bread Rolls Simple Sugar-Topped Bread Rolls
I made simple bread rolls that really made the most of the scent of the Rama brand margarine I used. Recipe by Ayachipan
More Recipes

Comments