CookpadCookpad
Guest
Register or Log In
Save and create recipes, send cooksnaps and more
  • Search
  • Premium
    • Top Cooksnapped Recipes
    • Top Viewed Recipes
  • Premium
  • Challenges
  • FAQ
  • Send Feedback
  • Region
  • Your Collection
Your Collection
To start creating your recipe library, please register or login.
Death of chocolate cake
Save this recipe to come back to it later.
  • Add Cooksnap
  • Add to folders
  • Print
  • Share
    • Copied!
    • Email
    • Facebook
    • Pin it
    • Twitter
  • Report Recipe
  • See report
  • Edit recipe
  • Delete
CookpadCookpad
A picture of Death of chocolate cake.

Death of chocolate cake

Ankita Mazumder
Ankita Mazumder @cook_15513910

#sweettooth

#sweettooth

Read more

Death of chocolate cake

Ankita Mazumder
Ankita Mazumder @cook_15513910

#sweettooth

#sweettooth

Read more
Saved
Save this recipe to come back to it later.
Edit recipe
See report
Add to folders
Add CooksnapAdd Cooksnap
ShareShare
  • Copied!
  • Email
  • Facebook
  • Pin it
  • Twitter
PrintPrint
  • PrintPrint
  • Add CooksnapAdd Cooksnap
  • Report Recipe
  • See report
  • Delete
Share
  • Copied!
  • Email
  • Facebook
  • Pin it
  • Twitter
Save this recipe to come back to it later.
  • Add Cooksnap
  • Add to folders
  • Print
  • Report Recipe
  • See report
  • Edit recipe
  • Delete

Ingredients

6-8 servings
  1. For Cake
  2. 1 cup (150 gm)all purpose flour
  3. 1/2 teaspoonsalt
  4. 1 teaspoonbaking powder
  5. 2eggs at room temperature
  6. 1 cup (150 gm)granulated sugar
  7. 1/2 tablespoonvanilla essence
  8. 1/2 cup (100 ml)milk
  9. 2 tablespoonbutter
  10. 3 tablespoonoil
  11. For Frosting
  12. 1/2 cup (75 gm)cocoa powder (shifted)
  13. 2 cup (300 gm)granulated sugar (shifted)
  14. 1/8 teaspoonsalt
  15. 2 tablespoonhot water
  16. 1/2 cup (100 gm)butter at room temperature
  17. Soaking syrup
  18. 2-3 teaspoonchocolate syrup
  19. 3-4 tspwater
Cookpad Open in Cookpad App
Saved
Save this recipe to come back to it later.

Steps

  1. 1

    Preheat the oven to 175°C. Grease 6" round cake pan.

  2. 2

    In a small bowl shift and combine the flour, salt and baking powder. Set aside.

  3. 3

    In a large mixing bowl, either using an electronic hand mixer or beater, beat the egg, sugar, vanilla until thickened and light gold in colour about 2 minutes in medium- high speed. The batter should fall in thick ribbon from the beater.

  4. 4

    Add the dry ingredients to the mixture in the bowl and mix by hand on low speed of a mixer just enough to combine. Scrape the bottom and side of the bowl, then mix again briefly to incorporate any residual flour/ sticky bits.

  5. 5

    In a saucepan set over medium heat bring the milk to a simmer. Remove it from the heat and add the butter and oil stirring by hand until the butter has melt.

  6. 6

    Slowly mix the hot butter-milk-oil mixture into the batter, stirring on low speed of a mixer until everything is well combined. Scrape the bowl and mix briefly just until smooth.

  7. 7

    Now pour this batter to the greased pan.

  8. 8

    Bake the cake until a toothpick inserted into the centre comes out clean and top feels set, 22-27 mins.

  9. 9

    Remove the cake from the oven carefully loosen the edge and allow them to cool for 15 mins in the pan. Then turn them out of the pan and transfer them to a rack, right side up to cool to room temperature. Cover the cake with a cotton cloth. It doesn't let the top of cake dry out.

  10. 10

    Frosting- In a large bowl stir together by hand / electronic mixer beat the cocoa powder and 1/2 cup sugar and salt. Stir in the water scrape the bowl if necessary

  11. 11

    Add the butter and remaining sugar stirring to combine. Using an electronic hand mixer beat the frosting at medium-high Speed for 1-2 min, until lightened in colour and fluffy, stopping halfway to scrape the bottom and side of the bowl. When the frosting is ready scoop out a bit on your spatula, if it is too stiff beat in water(1 teaspoon at a time) until it's the consistency you want.

  12. 12

    Now cut the cake into 2 equal parys.Place one of the layers on a serving plate ; tuck pieces of parchment paper underneath the edge of the cake to keep the plate clean.

  13. 13

    Drizzle some soaking syrup. Spread the bottom layer with frosting enough to make thick layer. Center the second layer and press gently to set in place.

  14. 14

    If you want you can place the cake in the refrigerator uncovered for at least 30 mins to firm it up. This will make the layers less likely to slide around as you work and the cake won't shed crumbs as you frost. If you are pressed for time you can skip it.

  15. 15

    For best looking cake do the frosting in 2 steps. First spread a very thin layer of frosting around the sides and across the top ; this is called crumb coat. You should able to see the cake through the frosting spots. Refrigerate the cake for 20 mins to let this layer set.

  16. 16

    Once the cake is chilled use the remaining frosting to coat it thoroughly and evenly.

  17. 17

    Refrigerate it.

  18. 18

    For Chocolate decoratives- Melt dark and white chocolate in microwave or double boiling method.

  19. 19

    Take a parchment paper or thick plastic spread it in a tray and clip to fix the paper. With a help of handle of spoon or brush spread melted chocolate in a stick like structure.

  20. 20

    Make a thick layer of 7-8 sticks of white and dark chocolate. Let it set in the refrigerator for 5-10 mins.

  21. 21

    Take out from refrigerator and carefully remove the parchment paper or plastic. Stick them in the side of the cake with melted chocolate.

  22. 22

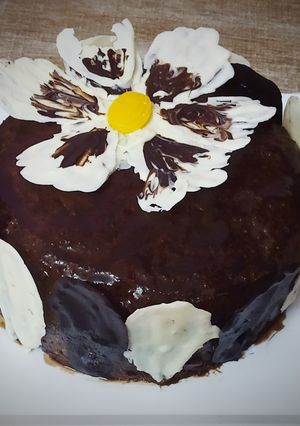
    Now for the petal, cut 5"-5" square out of parchment paper or thick plastic. For making petal like structure draw petals in all 6 pieces of parchment paper or if you are using thick plastic then draw petals in paper and place the paper underneath the plastic and draw petal using handle of spoon or brush. Set them in a bowl so that petal will get a edgy look. Put it in the refrigerator for 5-10 mins.

  23. 23

    Make a 3" circle with white chocolate for base of flower and set it in refrigerator for 5-10 mins.

  24. 24

    Take the circle and glue the petals on it with the help of white chocolate. Refrigerate it for 3-4 mins to set the petal with base.

  25. 25

    Now take the chocolate flower out of the refrigerator. With the handle of the spoon or brush spread dark chocolate on the petals very light handedly so it will enhance the look. For the centre part you can use sugar pearls or you can make dots with dark chocolate. Here I have used a yellow candy.

  26. 26

    Tips: If you want to bake this in kadahi / presser cooker put some regular cooking salt and place a stand. Cover it with lid. On medium heat let it preheat for 10-15 mins. Now place the cake carefully, on medium flame 1st 10 mins and on low flame 25-30 mins.

  27. 27

    If you want you can bake it in normal microwave oven for 5-7 mins or until the toothpick comes out clean.

  28. 28

    For eggless cake you can use 1/2 cup (100 gm) curd and 1/4 teaspoon baking soda. Add 1 tsp vinegar, it has to be added at last once the batter is ready and mix gently.

  29. 29

    For the petals or the sticks you have to use 2 coat of chocolate overwise it will break. After applying 1st coat wait for 1-2 mins then apply 2nd coat.

  30. 30

    Now your tasty cake is ready without any headache of whipping cream and most importantly with easy decoration. Let the cake come to room temperature before serving and enjoy this super delicious cake with friends and family.

Saved
Save this recipe to come back to it later.
Edit recipe
See report
Add to folders
Add CooksnapAdd Cooksnap
ShareShare
  • Copied!
  • Email
  • Facebook
  • Pin it
  • Twitter
PrintPrint
  • PrintPrint
  • Add CooksnapAdd Cooksnap
  • Report Recipe
  • See report
  • Delete

Cooksnaps

Saved
Save this recipe to come back to it later.
  • Add Cooksnap
  • Add to folders
  • Print
  • Share
    • Copied!
    • Email
    • Facebook
    • Pin it
    • Twitter
  • Report Recipe
  • See report
  • Edit recipe
  • Delete

Copied!

Ankita Mazumder
Ankita Mazumder @cook_15513910
on April 01, 2019 21:49

Comments (6)

Aruna Jain
Aruna Jain @cook_16443550
April 02, 2019 11:21
Good decoration
Guest
Add a comment
0/0

Similar Recipes

More Recipes

  1. A picture of Sweet Seviyan.

    Sweet Seviyan

    Pragati Hakim Pragati Hakim
  2. A picture of Ghawan with Peanut Chutney.

    Ghawan with Peanut Chutney

    Prachi Phadke Puranik Prachi Phadke Puranik
  3. A picture of Crispy Fried Potatoes with Vinegar and Salt.

    Crispy Fried Potatoes with Vinegar and Salt

    Phenny Sharon Phenny Sharon
  4. A picture of Mango Lunji.

    Mango Lunji

    Swati Sheth Swati Sheth
  5. A picture of Makhana Kaju Sabzi.

    Makhana Kaju Sabzi

    Vidyutaa Kashyap Vidyutaa Kashyap
  6. A picture of Chilli stingray.

    Chilli stingray

    Ivy Seng Ivy Seng
  7. A picture of Wheat Flour Upma.

    Wheat Flour Upma

    Nutan Shah Nutan Shah
  8. A picture of Soya Kebab.

    Soya Kebab

    Amrita Chakroborty Amrita Chakroborty
  9. A picture of Farali Sago Khichdi.

    Farali Sago Khichdi

    Bhavnaben Adhiya Bhavnaben Adhiya
  10. A picture of Onion Thalipeeth.

    Onion Thalipeeth

    Suchitra S(Radhika S) Suchitra S(Radhika S)
  11. A picture of Homemade pizza sauce.

    Homemade pizza sauce

    🌈NinjaMommaKitchen🌈 🌈NinjaMommaKitchen🌈
  12. A picture of Chickpea Breakfast Patties (Alkaline).

    Chickpea Breakfast Patties (Alkaline)

    eshivers eshivers
  13. A picture of Garlic Mashed Cauliflower.

    Garlic Mashed Cauliflower

    CoolJewel CoolJewel
  14. A picture of Grandma’s Famous Menudo.

    Grandma’s Famous Menudo

    Cheryl Cheryl
  15. A picture of Pork Tenderloin.

    Pork Tenderloin

    Aunty M Aunty M
  16. A picture of Vitamin packed Cous cous lunch.

    Vitamin packed Cous cous lunch

    Aleksandra Gondek Aleksandra Gondek
  17. A picture of YAMBALLs by Maryumms_cuisine.

    YAMBALLs by Maryumms_cuisine

    Chef_Maryumms_cuisine Chef_Maryumms_cuisine
  18. A picture of Garlic Mashed Cauliflower.

    Garlic Mashed Cauliflower

    CoolJewel CoolJewel
  19. A picture of Healthy chicken skewers served with a salad.

    Healthy chicken skewers served with a salad

    Aleksandra Gondek Aleksandra Gondek
  20. A picture of Whosayna’s Amritsari Garlic Kulcha.

    Whosayna’s Amritsari Garlic Kulcha

    Husseina Nazir Husseina Nazir
  21. A picture of Badami kheer.

    Badami kheer

    Abiha Naqvi Abiha Naqvi
  22. A picture of Sweet toth delight.

    Sweet toth delight

    Irsa Khan Irsa Khan
  23. A picture of Whosayna’s Daal Makhani.

    Whosayna’s Daal Makhani

    Husseina Nazir Husseina Nazir
  24. A picture of Badami kheer.

    Badami kheer

    Abiha Naqvi Naqvi Abiha Naqvi Naqvi
  25. A picture of Strawberry flavoured MishtiDoi.

    Strawberry flavoured MishtiDoi

    Nikita Singhal Nikita Singhal
https://cookpad.wasmer.app/us/recipes/7943146
Cookpad Open in Cookpad App

About Us

Our mission at Cookpad is to make everyday cooking fun, because we believe that cooking is key to a happier and healthier life for people, communities and the planet. We empower home cooks all over the world to help each other by sharing their recipes and cooking experiences.

Subscribe to Premium for exclusive features & benefits!

Cookpad Communities

🇺🇸 United States 🇬🇧 United Kingdom 🇪🇸 España 🇦🇷 Argentina 🇺🇾 Uruguay 🇲🇽 México 🇨🇱 Chile 🇻🇳 Việt Nam 🇹🇭 ไทย 🇮🇩 Indonesia 🇫🇷 France 🇸🇦 السعودية 🇹🇼 臺灣 🇮🇹 Italia 🇮🇷 ایران 🇮🇳 India 🇭🇺 Magyarország 🇳🇬 Nigeria 🇬🇷 Ελλάδα 🇲🇾 Malaysia 🇵🇹 Portugal 🇺🇦 Україна 🇯🇵 日本 See All

Learn More

Cookpad Premium Careers Feedback Blog Terms of Service Community Guidelines Privacy Policy Frequently Asked Questions

Download our app

Open Cookpad App on Google Play Open Cookpad App on App Store
Copyright © Cookpad Inc. All Rights Reserved
close