Namafu Manju (Wheat Gluten and Mochi Cakes)
Even though I live in Kyoto, I don't have many opportunities to eat namafu manju. I get the urge to eat them occasionally, but they are surprisingly expensive, as befits their status as high-class sweets! So I did a lot of re with the aim of making them myself. I could figure out that you needed to extract the gluten from the wheat flour to make the "namabu" dough, but I couldn't find out how to go from there... so I tried making them several times, resulting in this recipe. However, it's still not entirely stable (sob). It's rather like making bread, but harder . It really takes a lot of effort.
Make sure to knead the dough really, really well to develop the gluten, and to rest the rough until it's tender. The "kneading" part is the same as when you're making bread, so I think you could use the kneading function of a bread machine or a food processor.
In Step 4, the water will be white and cloudy. Apparently if you dry the starch that comes out here it turns into "ukiko," a fine white powder that's used to make traditional Japanese sweets.
I used frozen boiled yomogi (bracken fern) that I'd made myself, but you can use commercial yomogi powder instead I think you need about 10 to 15 g of powder? (Dissolve it in hot water first.) Recipe by SALASA
Steps
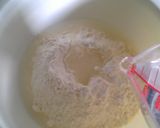
- 1
Put the bread flour and salt in a bowl. Add the water little by little while mixing well.
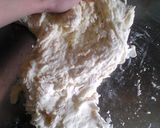
- 2
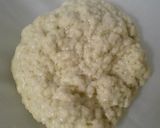
Knead the dough very well, using the base of your palms and smearing the dough onto your work surface (about 20 minutes).
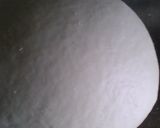
- 3
Here's how the rounded, kneaded dough looks.
- 4
This is a bit of the dough cut off with a pastry cutter and stretched out thinly. This thin film is the gluten.
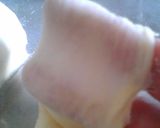
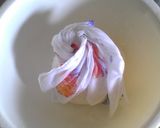
- 5
Moisten an unbleached and undyed piece of loosely woven cotton cloth or cheesecloth and wrap the dough in it. Rest the dough in the refrigerator for 1-2 hours.
- 6
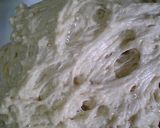
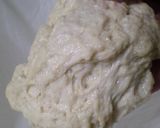
Fill a bowl with water, and wash out the dough while squeezing and rubbing it inside the cloth. Change the water several times - it will be white and cloudy to start, but will become almost clear (about 30 minutes). If you press on the cloth and more white cloudy water comes out, you need to keep rinsing and squeezing the dough.
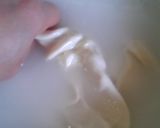
- 7
Here's how the dough looks midway through. You can still see the white starch. The slightly yellow part is the gluten.
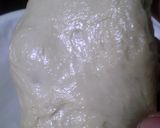
- 8
Keep squeezing and rinsing the dough very well. After 6-7 changes of water while doing this, the dough will look like the photo. Re-wrap in the moist cloth, and rest at room temperature for 60 minutes. (But it may be better to refrigerate it in the summer).
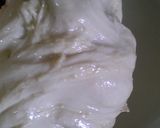
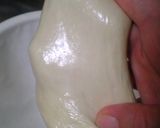
- 9
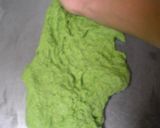
I tried stretching the dough a bit before resting it. It feels like soft rubber. This is the "gluten" that's needed for bread, extracted from the starch.
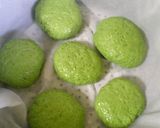
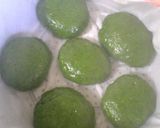
- 10
Take out the well rested dough on a work surface, add the mizuame, shiratama-ko and yomogi, and knead them in until they are well blended. Add water until the dough is a bit softer than your earlobe, and rather moist. If the dough is too stiff it won't taste the way it's supposed to be. It's hard to knead these ingredients in at first, but keep persevering!
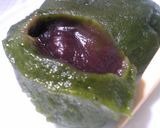
- 11
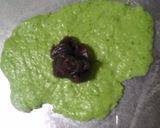
The dough is soft, so sandwich it between 2 sheets of plastic wrap, and roll it out using your hands and a rolling pin. Top with the koshi-an and wrap the dough around it like a parcel. If you're not filling the dough with an, you can just form it into little dumplings If the dough is too easy to handle at this point, the finished cakes may be too stiff and chewy. Add water to make the consistency of the dough softer.
- 12
Lay down a moistened piece of unbleached and undyed cloth or cheesecloth, line up the formed dough or cakes on it and wrap them up loosely. Steam for 10 to 15 minutes. If the dough comes into direct contact with the steaming water it will become rough in texture and not very pretty, so make sure the steaming water does not touch the dough.
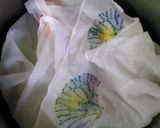
- 13
Here's how they look before steaming.
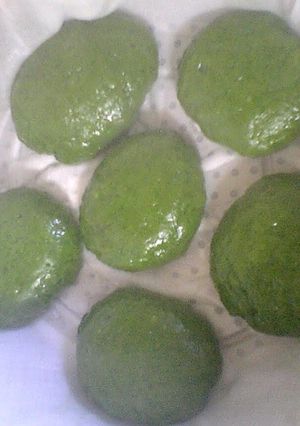
- 14
And here are the finished manju Namafu does not keep well, so finish within 1-2 days.
- 15
I think you can also enjoy this dough without any an filling I used mizuame in the dough this time, but you can use white castor sugar too. Adjust the sweetness to taste They aren't as slippery-smooth as I'd like them to be so I need to try making them again, but I'm happy I was able to make them myself.
- 16
In Step 8, make sure the dough is soft enough. If it's still elastic, let it rest for a while longer. If the dough is still stiff at this stage, it won't become smooth enough no matter how long you knead it, and the dough will not work out. The photos accompanying Steps 16, 17 and 18 show dough that has been rested at room temperature for 90 minutes.
- 17
Step 16 shows the extracted gluten. Step 17 shows the dough after it's been rested for 60 minutes. Step 18 shows the dough after it's been rested for another 30 minutes.
- 18
The dough turned beautifully smooth and shiny after resting for 90 minutes. It should still be fine if you don't rest it this long, but I tried it as an experiment. You can proceed with the subsequent steps after the dough reaches the Step 17 stage.
- 19
{The key to the success or failure of this recipe is the amount of water in the dough!} In Step 10, I use moist boiled yomogi and mizuame (which is a syrup so is also liquid). If you are using castor sugar and dried yomogi powder, adjust the amount of water added so that the dough is a bit softer than your earlobe. It should be a bit on the sticky, loose side.
Cooksnaps
Did you know that you can import recipes from anywhere into Cookpad with one click?
https://blog.cookpad.com/us/cookpad-recipe-import-feature-save-recipes-from-anywhere/
Download Cookpad app to plan your meals and store your cooking ideas in one safe place! https://cookpad.wasmer.app/us/download
Keywords
Similar Recipes
More Recipes
-

Egg Chicken Moglai Kolkata Street Style

-
")
Chicken Zucchini Bake with Cheese and Tomatoes (Oven Recipe)

-


-
")
Pumpkin Leaf Red Lentil Fritters(Kumropataye Musur Daler Bora)

-


-

Sabudana Khichdi — a Comforting Fasting Delight

-


-


-


-

Salty Carmel Peanut & Pretzel Bars

-

Vickys No-Bake 'Nutella Cheesecake', GF DF EF SF Nut-Free Option

-


-


-


-

Poppy Seed & Cream Cheese Cake

-

 Lora Ellis
 - Lora Ellis
-

Vickys Coconut 'Cream Cheese', GF DF EF SF NF
-


-

White Chocolate Daifuku with Walnuts and Kinako


")


Comments