CookpadCookpad
Guest
Register or Log In
Save and create recipes, send cooksnaps and more
  • Search
  • Premium
    • Top Cooksnapped Recipes
    • Top Viewed Recipes
  • Premium
  • Challenges
  • FAQ
  • Send Feedback
  • Region
  • Your Collection
Your Collection
To start creating your recipe library, please register or login.
Bánh da lợn
Save this recipe to come back to it later.
  • Add Cooksnap
  • Add to folders
  • Print
  • Share
    • Copied!
    • Email
    • Facebook
    • Pin it
    • Twitter
  • Report Recipe
  • See report
  • Edit recipe
  • Delete
CookpadCookpad
Vietnam Authentic home cooking from Vietnam, with US measurements.
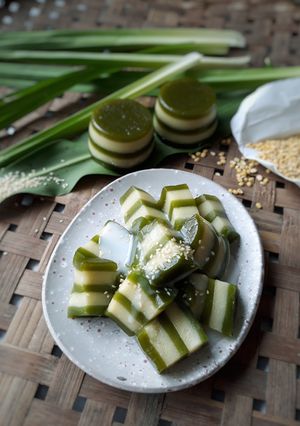
Originally published on Cookpad Vietnam as Bánh da lợn
A picture of Bánh da lợn.

Bánh da lợn

Hoài Linh
Hoài Linh @cook_7525373

The first time I tried this dessert, I was captivated by its chewy, slightly bouncy texture, the fragrant aroma of pandan leaves, and the rich taste of mung beans. Served with sweet coconut milk, it's absolutely delicious. This recipe is very easy to make, requires no fancy ingredients or equipment, and turns out wonderfully flavorful.

The first time I tried this dessert, I was captivated by its chewy, slightly bouncy texture, the fragrant aroma of pandan leaves, and the rich taste of mung beans. Served with sweet coconut milk, it's absolutely delicious. This recipe is very easy to make, requires no fancy ingredients or equipment, and turns out wonderfully flavorful.

Read more
Saved
Save this recipe to come back to it later.
Edit recipe
See report
Add to folders
Add CooksnapAdd Cooksnap
ShareShare
  • Copied!
  • Email
  • Facebook
  • Pin it
  • Twitter
PrintPrint
  • PrintPrint
  • Add CooksnapAdd Cooksnap
  • Report Recipe
  • See report
  • Delete
Share
  • Copied!
  • Email
  • Facebook
  • Pin it
  • Twitter
Save this recipe to come back to it later.
  • Add Cooksnap
  • Add to folders
  • Print
  • Report Recipe
  • See report
  • Edit recipe
  • Delete

Ingredients

  1. For the pandan layer
  2. 2 cupstapioca starch (about 240 grams)
  3. 2/3 cuprice flour (about 80 grams)
  4. 3/4 cupcoconut milk (200 ml)
  5. 3/4 cuppandan juice (200 ml)
  6. 1/2 cupsugar (about 100 grams)
  7. For the mung bean layer
  8. 1/2 cupsplit mung beans (about 100 grams)
  9. 1 1/4 cupswater (300 ml)
  10. 3/4 cupcoconut milk (200 ml)
  11. 1/2 cupsugar (about 100 grams)
  12. 1/3 cuptapioca starch (about 50 grams)
  13. 1/4 cuprice flour (about 35 grams)
Cookpad Open in Cookpad App
Saved
Save this recipe to come back to it later.

Steps

  1. 1

    Choose thick, dark green pandan leaves. Blend about 3.5 ounces (100 grams) of fresh pandan leaves with 1 cup (250 ml) water to make pandan juice. Chop the leaves, blend half the leaves with 1 cup water, then strain to get the juice. Add the remaining leaves and the strained juice back to the blender, blend again, and strain to get more juice.

  2. 2

    Refrigerate the pandan juice for at least 6 hours to enhance the color. After 6 hours, pour off the clear liquid on top and keep the concentrated juice at the bottom for the cake. If you let it sit for 2 days and pour off all the clear liquid, you'll get pure pandan extract. If you're short on time, you can use the juice right away, but the color won't be as vibrant.

  3. 3

    Rinse the mung beans and soak them in hot water for 2 hours until they expand and soften. Drain the soaking water. Add 1 1/4 cups (300 ml) water and cook the mung beans until the water is absorbed and the beans are very soft. Let them cool slightly.

  4. 4

    Mix all the pandan layer ingredients together and strain through a sieve to remove any lumps. Let the mixture rest for 30 minutes.

  5. 5

    Once the mung beans have cooled, blend them with the remaining mung bean layer ingredients until smooth. Strain through a sieve once, then let the mixture rest for 30 minutes.

  6. 6

    While the mixtures are resting, bring water to a boil. When boiling, reduce to low heat and place your greased molds in the steamer for 5 minutes to preheat. I use large ramekins (flan cups) as molds. This recipe makes 12 small round cakes with 5 layers each.

  7. 7

    After preheating the molds for 5 minutes, scoop 12 tablespoons of the pandan mixture into a separate bowl, add 1 teaspoon of pandan juice, mix well, and pour evenly into each mold. The first layer takes the longest to steam and can get dry and dark, but adding extra pandan juice helps prevent this.

  8. 8

    Steam the first layer for 4 minutes until set. Tilt the mold to check that it doesn't run. Then pour 1 1/2 tablespoons of the mung bean mixture on top and continue steaming. The mung bean layer is thicker than the pandan layer, so use a bit more to keep the layers even. Wait for each layer to set before adding the next.

  9. 9

    Each time you add a new layer, increase the steaming time by 1 minute. Alternate the layers, and after pouring the fifth layer, steam for an additional 15 minutes to fully cook the cakes.

  10. 10

    Once done, remove the cakes from the steamer and place them in an ice water bath to cool. This helps the cakes stay chewy and cool down faster.

  11. 11

    When cooled, the cakes will easily release from the molds. For clean slices, use a plastic knife or wrap a knife blade with plastic wrap before cutting. The cakes taste great chilled. Store in the refrigerator for up to 3 days. Re-steam before eating to restore their soft texture.

  12. 12

    For the coconut milk sauce, simply heat coconut milk with sugar to your desired sweetness, then mix in a little tapioca starch to thicken. Let cool before serving.

Saved
Save this recipe to come back to it later.
Edit recipe
See report
Add to folders
Add CooksnapAdd Cooksnap
ShareShare
  • Copied!
  • Email
  • Facebook
  • Pin it
  • Twitter
PrintPrint
  • PrintPrint
  • Add CooksnapAdd Cooksnap
  • Report Recipe
  • See report
  • Delete

Cooksnaps

Saved
Save this recipe to come back to it later.
  • Add Cooksnap
  • Add to folders
  • Print
  • Share
    • Copied!
    • Email
    • Facebook
    • Pin it
    • Twitter
  • Report Recipe
  • See report
  • Edit recipe
  • Delete

Copied!

Hoài Linh
Hoài Linh @cook_7525373
Published in the US on August 07, 2025 14:01
👑 LiMan Bakery 👑
Read more

Similar Recipes

More Recipes

  1. A picture of Brown Butter Mini Chocolate Chip Cookies.

    Brown Butter Mini Chocolate Chip Cookies

    Ashley Smith Ashley Smith
  2. A picture of Fudgy Brownie Cookies with Crackly Tops.

    Fudgy Brownie Cookies with Crackly Tops

    Ashley Smith Ashley Smith
  3. A picture of Fudgy Chocolate Brownies.

    Fudgy Chocolate Brownies

    Ashley Smith Ashley Smith
  4. A picture of Mint Chocolate Chip Cookies.

    Mint Chocolate Chip Cookies

    Ashley Smith Ashley Smith
  5. A picture of Oat Cookies.

    Oat Cookies

    Ashley Smith Ashley Smith
  6. A picture of Egg Tortilla Wrap.

    Egg Tortilla Wrap

    Arezu Arezu
  7. A picture of Chicken Rice Paper Wraps.

    Chicken Rice Paper Wraps

    Yummy everyday Yummy everyday
  8. A picture of Tomato Shorba.

    Tomato Shorba

    Bethica Das Bethica Das
  9. A picture of Chicken Rice Paper Wraps 🍗.

    Chicken Rice Paper Wraps 🍗

    Yummy everyday Yummy everyday
  10. A picture of Mango Mousse.

    Mango Mousse

    Sudipa Gope Sudipa Gope
  11. A picture of Broccoli Salad.

    Broccoli Salad

    Mariah Mariah
  12. A picture of Creamy Broccoli soup.

    Creamy Broccoli soup

    Margie Margie
  13. A picture of Grilled Chicken Fajitas.

    Grilled Chicken Fajitas

    jglehenbauer jglehenbauer
  14. A picture of My Ultimate Bacon Onion Sauce.

    My Ultimate Bacon Onion Sauce

    skunkmonkey101 skunkmonkey101
  15. A picture of Cream Cheese-Banana-Nut Muffins.

    Cream Cheese-Banana-Nut Muffins

    PunkinM54 PunkinM54
  16. A picture of Pretzel (No Knead dough).

    Pretzel (No Knead dough)

    Shruti Raman( legendet100) Shruti Raman( legendet100)
  17. A picture of Sabudana khichdi.

    Sabudana khichdi

    sunitha p sunitha p
  18. A picture of Abak Atama.

    Abak Atama

    Tcheedee Tcheedee
  19. A picture of Protein Smoothie!!!.

    Protein Smoothie!!!

    Ricky Achterstraat Ricky Achterstraat
  20. A picture of Stuffed Gobhi Paratha.

    Stuffed Gobhi Paratha

    SUMAN WADHWA SUMAN WADHWA
  21. A picture of Nolen gurer payesh.

    Nolen gurer payesh

    Uma Pandit Uma Pandit
  22. A picture of Poppy seeds curry with potato and ridge gourd.

    Poppy seeds curry with potato and ridge gourd

    sagnik ganguly sagnik ganguly
  23. A picture of Hummus with baked namken and garlic bread.

    Hummus with baked namken and garlic bread

    Jasmin Motta _ #BeingMotta Jasmin Motta _ #BeingMotta
  24. A picture of Soya chap.

    Soya chap

    manisha srivastava manisha srivastava
  25. A picture of Chicken Puffs.

    Chicken Puffs

    Almina Shaikh Almina Shaikh
https://cookpad.wasmer.app/us/recipes/5349799
Cookpad Open in Cookpad App

About Us

Our mission at Cookpad is to make everyday cooking fun, because we believe that cooking is key to a happier and healthier life for people, communities and the planet. We empower home cooks all over the world to help each other by sharing their recipes and cooking experiences.

Subscribe to Premium for exclusive features & benefits!

Cookpad Communities

🇺🇸 United States 🇬🇧 United Kingdom 🇪🇸 España 🇦🇷 Argentina 🇺🇾 Uruguay 🇲🇽 México 🇨🇱 Chile 🇻🇳 Việt Nam 🇹🇭 ไทย 🇮🇩 Indonesia 🇫🇷 France 🇸🇦 السعودية 🇹🇼 臺灣 🇮🇹 Italia 🇮🇷 ایران 🇮🇳 India 🇭🇺 Magyarország 🇳🇬 Nigeria 🇬🇷 Ελλάδα 🇲🇾 Malaysia 🇵🇹 Portugal 🇺🇦 Україна 🇯🇵 日本 See All

Learn More

Cookpad Premium Careers Feedback Blog Terms of Service Community Guidelines Privacy Policy Frequently Asked Questions

Download our app

Open Cookpad App on Google Play Open Cookpad App on App Store
Copyright © Cookpad Inc. All Rights Reserved
close