Pineapple Tart
As you already know that I am not a fan of the pineapple tart. This is my humble version. Can you imagine that I had been planning to make this for about a year? I am glad that my idea had finally come to a fruition. It is very fulfilling to accomplish a goal whether it will be a success or a failure. It is the process which I had fallen in love with.
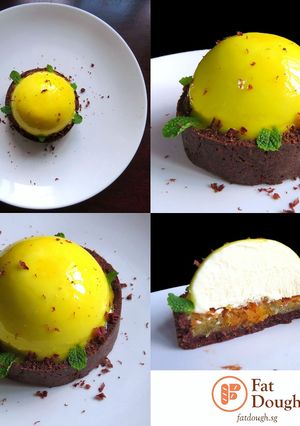
This consist of a chocolate tart with a marzipan and pineapple jam fillings. I really love marzipan. It is probably my top 3 desserts ingredients, aside from chocolate and lemon. The tart is topped with a frozen mousse. Yes, a frozen pineapple mousse glazed with a white chocolate based mirror-effect syrup. I decided to add some decoration with some small mint leaves and dark chocolate shavings.
Yes, this takes massive amount of time and effort, but as soon as you see the end results, it is all worth it. It is even more rewarding when you see the smiles of those whom you served these to. My daughters commented this is like heaven. I hope you will not be intimidated to give this recipe a try, cos if a geezer like me can do this, so can anyone. Let's get started with the recipe.
Pineapple Tart
As you already know that I am not a fan of the pineapple tart. This is my humble version. Can you imagine that I had been planning to make this for about a year? I am glad that my idea had finally come to a fruition. It is very fulfilling to accomplish a goal whether it will be a success or a failure. It is the process which I had fallen in love with.
This consist of a chocolate tart with a marzipan and pineapple jam fillings. I really love marzipan. It is probably my top 3 desserts ingredients, aside from chocolate and lemon. The tart is topped with a frozen mousse. Yes, a frozen pineapple mousse glazed with a white chocolate based mirror-effect syrup. I decided to add some decoration with some small mint leaves and dark chocolate shavings.
Yes, this takes massive amount of time and effort, but as soon as you see the end results, it is all worth it. It is even more rewarding when you see the smiles of those whom you served these to. My daughters commented this is like heaven. I hope you will not be intimidated to give this recipe a try, cos if a geezer like me can do this, so can anyone. Let's get started with the recipe.
Steps
- 1
Pls visit: https://www.fatdough.sg/single-post/2017/01/25/Pineapple-Shortcake for the pineapple jam recipe.
- 2
Prepare the mousse a day before.
Bloom gelatin powder with 1 TBSP of water in a small bowl.
Stir to dissolve the gelatin and set aside.
In a blender, add milk and pineapple.
- 3
Blitz until smooth.
Transfer into a sauce pot.
Add in 15g of sugar.
Turn the heat up to medium low.
- 4
Stir to combine well and until the sugar has dissolved.
Meanwhile, in a small bowl, add egg yolks and the remaining sugar.
Whisk to combine well and until the sugar has dissolved.
Once you see bubbles start to form along the edge of the sauce pot, remove from heat.
- 5
Add a few TBSP of the milk mixture and gradually add into the yolk mixture while still whisking, 1 TBSP at a time.
Once the yolks have been tempered, gradually add the yolk mixture into the milk mixture while still whisking.
Return back to the heat of medium low.
- 6
Once you see bubbles start to form along the edge of the sauce pot, remove from heat.
Add in the bloomed gelatin.
Stir to combine well and until the gelatin dissolved.
Pass the mixture thru a fine sieve over a bowl.
- 7
Set aside to cool down completely.
Once the mixture is cooled, in a chilled large bowl, add in heavy whipping cream.
Using a hand or stand mixer, whisk until soft peaks.
Fold the cream into the milk mixture in batches until fully incorporated.
- 8
Transfer into a piping bag.
Pipe the mousse mixture into the sphere mold.
Scrape off any excess with an offset spatula.
Freeze in the freezer for at least 24 hours.
- 9
Prepare mirror glaze the night before.
Bloom gelatin powder with 1 TBSP of water in a small bowl.
Stir to dissolve the gelatin and set aside.
In a sauce pot over medium low heat, add water, sugar and condensed milk.
- 10
Stir to combine well and until the sugar has dissolved.
Once you see bubbles start to form along the edge of the sauce pot, remove from heat.
Add in the white chocolate.
Stir until the white chocolate has completely melted.
- 11
Add in the bloomed gelatin.
Stir to combine well and until the gelatin dissolved.
Add in the food coloring.
Stir to combine well.
- 12
Pass the mixture thru a fine sieve over a bowl.
*You may have to pass thru the sieve a few times to remove any excess air bubbles.*
Cover with cling film, press the cling film on the surface of the mirror glaze, chill in the fridge overnight.
- 13
You can prepare the dough a day before if desired.
In a large bowl, cream butter with sugar with a spatula until well combine.
Add in cocoa powder, salt and almond meal.
Fold and combine well.
- 14
Add in egg.
Fold and combine well.
Add in flour in 2 batches.
Fold and combine well until a dough is form.
- 15
Do not overwork the dough.*
Transfer onto a cling film, wrap and chill in the fridge for about an hr.
Divide the dough into 6 equal balls with a weighing scale.
*Work on 1 dough at a time while chilling the rest of the dough balls.*
- 16
Grease pastry rings generously with butter.
Lightly dust working surface and rolling pin with flour.
Roll out into a disc to about 1/4 inch thick.
Carefully transfer into the pastry ring.
- 17
It is okay of there are cracks. You can cover the cracks with any excess dough.*
Form and mold the dough into the pastry ring making sure the edges are fully in tact.
Trim off any excess dough.
Transfer onto a baking tray lined with parchment paper.
- 18
Keep chilled in the fridge.
Repeat the process for the remaining dough.
On baking day, prepare the fillings.
- 19
Preheat oven to 180 degrees celsius or 360 fahrenheit.
In a large bowl, add marzipan, sugar and cornstarch.
*If you cannot get your hands on marzipan, you can replace it with 90g almond meal and 90g icing sugar.*
- 20
Using a hand or stand mixer, beat until well combine and until the marzipan has broken down finely.
Add in butter, salt, egg and vanilla.
Continue beating until well combine.
You should have a smooth mixture.
- 21
Transfer into a piping bag.
Take the dough outta fridge.
Prick some holes on the bottom of the dough with a fork.
Place pineapple jam in the middle of each dough.
Pipe the marzipan mixture around the pineapple jam to about 3/4 full.
- 22
Do not fill all the way to the brim as it will overflow during baking process.*
Wack into the oven and bake for about 20 to 25 mins or until lightly brown.
Remove from oven and let it cool completely.
- 23
Assemble the tart.
Place the base tart onto serving plate.
Dissolve the mirror glaze on a double boiler.
Pass it thru' a sieve one last time to ensure no air bubbles.
- 24
Remove mousse from the freezer and unmold onto a wire rack.
Pour the mirror glaze over the mousse.
Gently remove the glazed mousse with an offset spatula and place it on top of the base tart.
You can decorate with some small mint leaves and grate some dark chocolate with a cheese grater over the top.
Serve immediately.
Keywords
Similar Recipes
More Recipes
-


-


-

Phuluri - An Ideal Pakora for Indian Monsoon

-


-


-


-


-


-


-

Savory Smoked Sausage Soup with Veggies 🥣

-

Keto Vanilla Chocolate Custard Pie

-

 pnut00.jw
 -


-


-
 breakfast Recipe")

-


-


-
 Meenakshi Jagga
 -


-


-


-
 Sabeena Gubitra.


Comments