CookpadCookpad
Guest
Register or Log In
Save and create recipes, send cooksnaps and more
  • Search
  • Premium
    • Top Cooksnapped Recipes
    • Top Viewed Recipes
  • Premium
  • Challenges
  • FAQ
  • Send Feedback
  • Region
  • Your Collection
Your Collection
To start creating your recipe library, please register or login.
Asian Sweet & Peppery Jerky
Save this recipe to come back to it later.
  • Add Cooksnap
  • Add to folders
  • Print
  • Share
    • Copied!
    • Email
    • Facebook
    • Pin it
    • Twitter
  • Report Recipe
  • See report
  • Edit recipe
  • Delete
CookpadCookpad
A picture of Asian Sweet & Peppery Jerky.

Asian Sweet & Peppery Jerky

Maggie Conlon
Maggie Conlon @WarsawNan
Orlando, FL

I've been making jerky the traditional way, from thinly sliced lean beef, for over 30 years. Last year (2014) I became curious about making it from ground meat with a jerky gun, so I decided to give it a try. Was a bit nervous that my family, who've always LOVED my jerky, wouldn't like this new way as well. Turned out quite the opposite! They don't want me to make it from sliced beef ever again, only ground meat with the jerky gun! Success!

I've been making jerky the traditional way, from thinly sliced lean beef, for over 30 years. Last year (2014) I became curious about making it from ground meat with a jerky gun, so I decided to give it a try. Was a bit nervous that my family, who've always LOVED my jerky, wouldn't like this new way as well. Turned out quite the opposite! They don't want me to make it from sliced beef ever again, only ground meat with the jerky gun! Success!

Read more
Saved
Save this recipe to come back to it later.
Edit recipe
See report
Add to folders
Add CooksnapAdd Cooksnap
ShareShare
  • Copied!
  • Email
  • Facebook
  • Pin it
  • Twitter
PrintPrint
  • PrintPrint
  • Add CooksnapAdd Cooksnap
  • Report Recipe
  • See report
  • Delete
Share
  • Copied!
  • Email
  • Facebook
  • Pin it
  • Twitter
Save this recipe to come back to it later.
  • Add Cooksnap
  • Add to folders
  • Print
  • Report Recipe
  • See report
  • Edit recipe
  • Delete

Ingredients

  • Basting Sauce
  • 1/3 cuppineapple juice, unsweetened
  • 3 tbspoyster flavor sauce
  • 2 tbspsoy sauce
  • 2 tbsprice wine vinegar
  • 1 tbspwhite sugar
  • Jerky Ingredients
  • 2 lbground beef, super lean (97%)
  • 2 tspMorton Tender Quick Meat Cure
  • 3/4 tspgarlic powder
  • 1/2 tspred pepper flakes
  • 1/2 tspcoarse ground black pepper
  • 3 tbspbrown sugar
  • 1 tspChinese 5-spice powder
  • 1 tsponion powder
  • 1 tbspsoy sauce
Cookpad Open in Cookpad App
Saved
Save this recipe to come back to it later.

Steps

  1. 1

    In a small bowl or measuring cup, mix together all of the basting sauce ingredients and set aside.

  2. 2

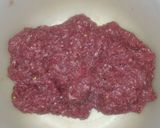
    In a large mixing bowl, combine all the jerky ingredients.

  3. 3

    Using your clean hands, mix the jerky ingredients together VERY well. Get in there and really squish it up! I find it's best to rinse your hands under very warm water about every minute while mixing the meat, shaking off excess water (rather than towel drying). Not only warms up your hands, but adds a bit of moisture to the mix, which makes it come out of the jerky gun more smoothly. You want to hand mix for about 8 to 10 minutes to get the flavors well distributed.
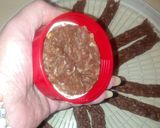
    A picture of step 3 of Asian Sweet & Peppery Jerky.
  4. 4

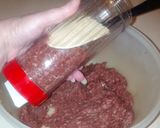
    Load your jerky gun with the meat mixture. I like to use a large rubber spatula to push the meat down as I load.

    A picture of step 4 of Asian Sweet & Peppery Jerky.
  5. 5

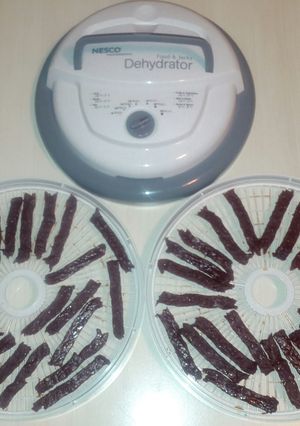
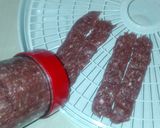
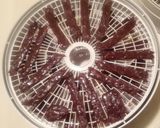
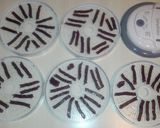
    Squeeze out strips of jerky mix onto your dehydrator trays until all the mix is used up.

    A picture of step 5 of Asian Sweet & Peppery Jerky.
  6. 6

    There's always going to be a bit of meat mixture left in the nozzle tip of the jerky gun. No worries! No waste! Unscrew the jerky gun and pull it out.
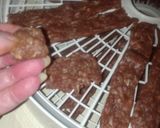
    A picture of step 6 of Asian Sweet & Peppery Jerky.
  7. 7

    Pinch off small pieces of the leftover meat mixture (see photo) and flatten it to the same thickness as your jerky strips. Fill in the small empty spaces on the dehydrator trays. These little pieces are what you'll be taste-testing during the drying process since dehydrating times can vary.
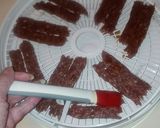
    A picture of step 7 of Asian Sweet & Peppery Jerky.
  8. 8

    Gently brush the top side of the meat with the basting sauce.
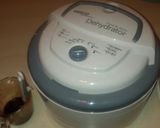
    A picture of step 8 of Asian Sweet & Peppery Jerky.
  9. 9

    Dehydrate at 160°F for 75 minutes.

    A picture of step 9 of Asian Sweet & Peppery Jerky.
  10. 10

    Wash your hands very well. Gently turn over all the jerky. Brush on more basting sauce. Rotate your trays and continue dehydrating.

    A picture of step 10 of Asian Sweet & Peppery Jerky.
  11. 11

    Continue dehydrating another 3 to 4 hours. The time is variable depending on your dehydrator and moisture conditions. Every hour, remove one of the small test pieces of jerky from the dehydrator. Allow it to cool completely (about 30 minutes) so the basting sauce can become less sticky and eat it. When you're happy with the dryness and texture, your jerky is done. Mine is generally done, to my liking, in a total of about 6 hours of dehydrating.

  12. 12

    Turn off the dehydrator and unstack the trays leaving the jerky on the trays until completely cooled, at least 30 minutes. It must be completely cooled before packaging! I usually wait 1 to 2 hours before packaging. If you prefer a strong pepper kick to your jerky (this is mild), as soon as you unstack the trays, while the basting sauce coating is still a bit sticky, sprinkle with coarse ground black pepper.

    A picture of step 12 of Asian Sweet & Peppery Jerky.
  13. 13

    When completely cool, package in airtight containers. I like to vacuum seal about 6 pieces to a bag with my FoodSaver. But you can use ziplock bags or any food container with a tight-fitting lid. This batch here is being shipped to an out-of-state granddaughter, so vacuum packaging is the ideal method.

  14. 14

    ADDITIONAL INFORMATION: If you're lucky enough to know a hunter, deer and elk meat make excellent jerky and, ground, can be substituted for the ground beef in this recipe. The Morton Tender Quick Meat Cure is available in many supermarkets in the spice section near the salt. It's also available at Amazon, though more expensive. The meat cure retards spoilage, although this jerky tends to get eaten up pretty quickly. Should you choose to not add the meat cure, add 2 teaspoons of salt to the recipe.

  15. 15

    Here's another tasty ground beef jerky you might want to try:

    https://cookpad.wasmer.app/us/recipes/343813-snapn-peppery-beef-jerky

    Snap'n Peppery Beef Jerky

Linked Recipes

Snap'n Peppery Beef Jerky

Saved
Save this recipe to come back to it later.
Edit recipe
See report
Add to folders
Add CooksnapAdd Cooksnap
ShareShare
  • Copied!
  • Email
  • Facebook
  • Pin it
  • Twitter
PrintPrint
  • PrintPrint
  • Add CooksnapAdd Cooksnap
  • Report Recipe
  • See report
  • Delete

Cooksnaps

Saved
Save this recipe to come back to it later.
  • Add Cooksnap
  • Add to folders
  • Print
  • Share
    • Copied!
    • Email
    • Facebook
    • Pin it
    • Twitter
  • Report Recipe
  • See report
  • Edit recipe
  • Delete

Copied!

Maggie Conlon
Maggie Conlon @WarsawNan
on January 16, 2015 03:54
Orlando, FL
My 5 siblings and I were raised in the 1950s and 60s midwest by a major foodie dad who was a great cook. We all learned to cook at a young age. I love to cook for my 2 daughters, 7 grandkids, 10 great-grandkids, and extended family. My 4 year old great-grandson makes my day when he says "Nan sure is a good cooker!". :-). I'm trying to get all my favorite recipes saved here so my family and friends all have easy access to them even after I'm gone. My Cookpad collection is their inheritance, so I try to add my comments and memories to each recipe; that way they'll remember me with a smile when they use the recipes years from now. Recently I've called on my grandkids (all adults and avid cooks) to send me their own favorite recipes, with their prep photos, so we can collect everyone's favorites together in one place.
Read more

Comments

Guest
Add a comment
0/0

Keywords

Sweet Onion Pepper Oyster Rice Meat Pineapple Soy Ground Beef Garlic Wine

Similar Recipes

More Recipes

  1. A picture of Amaranth/Rajgira Wrap.

    Amaranth/Rajgira Wrap

    Falgooni Mangrola Falgooni Mangrola
  2. A picture of Brown Rice Balls.

    Brown Rice Balls

    Amrita Chakroborty Amrita Chakroborty
  3. A picture of Potsticker Noodle Bowl.

    Potsticker Noodle Bowl

    Jeremy Smith Jeremy Smith
  4. A picture of Jowar Bajra Roti.

    Jowar Bajra Roti

    Keshma Raichura Keshma Raichura
  5. A picture of Rajgira Farali Puri.

    Rajgira Farali Puri

    pinal Patel pinal Patel
  6. A picture of Sorghum Veggie Handvo.

    Sorghum Veggie Handvo

    Swati Sheth Swati Sheth
  7. A picture of Vegetable and Cheese Burger Recipe | Crispy Homemade Veggie Burger with Cheese.

    Vegetable and Cheese Burger Recipe | Crispy Homemade Veggie Burger with Cheese

    ultra_recipes ultra_recipes
  8. A picture of Smoked Salmon, Mushroom & Cheddar Breakfast Skillet.

    Smoked Salmon, Mushroom & Cheddar Breakfast Skillet

    Steve Mullett Steve Mullett
  9. A picture of Classic Hamburger Recipe (Juicy Homemade Beef Burger – Easy Restaurant Style).

    Classic Hamburger Recipe (Juicy Homemade Beef Burger – Easy Restaurant Style)

    ultra_recipes ultra_recipes
  10. A picture of Rajagara Paratha.

    Rajagara Paratha

    chef Nidhi Bole chef Nidhi Bole
  11. A picture of Chicken Tortilla Soup.

    Chicken Tortilla Soup

    Christina Landers Thompson Christina Landers Thompson
  12. A picture of Super Soft Pretzels and Pretzel Bites (nuggets).

    Super Soft Pretzels and Pretzel Bites (nuggets)

    Raven Raven
  13. A picture of Slow cooker country style ribs.

    Slow cooker country style ribs

    MommaStahl MommaStahl
  14. A picture of Scalloped Potatoes.

    Scalloped Potatoes

    Mzcmoe Mzcmoe
  15. A picture of Chicken Parmasean.

    Chicken Parmasean

    Holly Holly
  16. A picture of Balsamic pear pork chops.

    Balsamic pear pork chops

    MaggieWeller MaggieWeller
  17. A picture of Nu Wave Baby back Ribs.

    Nu Wave Baby back Ribs

    tanlladwyr2003 tanlladwyr2003
  18. A picture of Creamy Chicken Casserole.

    Creamy Chicken Casserole

    Leynn Leynn
  19. A picture of Chicken Chili.

    Chicken Chili

    Randy25 Randy25
  20. A picture of Bre'z Honey Chicken.

    Bre'z Honey Chicken

    brie.bjornson brie.bjornson
  21. A picture of Bre'z Honey Chicken.

    Bre'z Honey Chicken

    brie.bjornson brie.bjornson
  22. A picture of Chicken Tortilla Soup.

    Chicken Tortilla Soup

    Christina Landers Thompson Christina Landers Thompson
  23. A picture of Lentil Fennel Soup.

    Lentil Fennel Soup

    Christina Landers Thompson Christina Landers Thompson
  24. A picture of Linzer Jam Cookies.

    Linzer Jam Cookies

    Christina Landers Thompson Christina Landers Thompson
  25. A picture of Tomatillo Salsa.

    Tomatillo Salsa

    Christina Landers Thompson Christina Landers Thompson
https://cookpad.wasmer.app/us/recipes/342561
Cookpad Open in Cookpad App

About Us

Our mission at Cookpad is to make everyday cooking fun, because we believe that cooking is key to a happier and healthier life for people, communities and the planet. We empower home cooks all over the world to help each other by sharing their recipes and cooking experiences.

Subscribe to Premium for exclusive features & benefits!

Cookpad Communities

🇺🇸 United States 🇬🇧 United Kingdom 🇪🇸 España 🇦🇷 Argentina 🇺🇾 Uruguay 🇲🇽 México 🇨🇱 Chile 🇻🇳 Việt Nam 🇹🇭 ไทย 🇮🇩 Indonesia 🇫🇷 France 🇸🇦 السعودية 🇹🇼 臺灣 🇮🇹 Italia 🇮🇷 ایران 🇮🇳 India 🇭🇺 Magyarország 🇳🇬 Nigeria 🇬🇷 Ελλάδα 🇲🇾 Malaysia 🇵🇹 Portugal 🇺🇦 Україна 🇯🇵 日本 See All

Learn More

Cookpad Premium Careers Feedback Blog Terms of Service Community Guidelines Privacy Policy Frequently Asked Questions

Download our app

Open Cookpad App on Google Play Open Cookpad App on App Store
Copyright © Cookpad Inc. All Rights Reserved
close